The monday.com platform is a visual collaboration tool that helps transform how teams work together. It’s a simple but intuitive tool that enables people to manage work, meet deadlines, and build a collaborative culture.
Jotform’s integration with monday.com sends information from Jotform to your monday.com account as soon as someone fills out and submits a form.
When you add the monday.com integration to one of your forms, preselected data is exported to fill in key details for boards, groups, or items in your monday.com account. This exchange of information eliminates the need for manual data entry or a third-party software tool to connect Jotform and monday.com.
Selecting Preferred Action and Connecting monday.com Account
monday.com integration requires you to select an action first and connect/select your account. Here’s how:
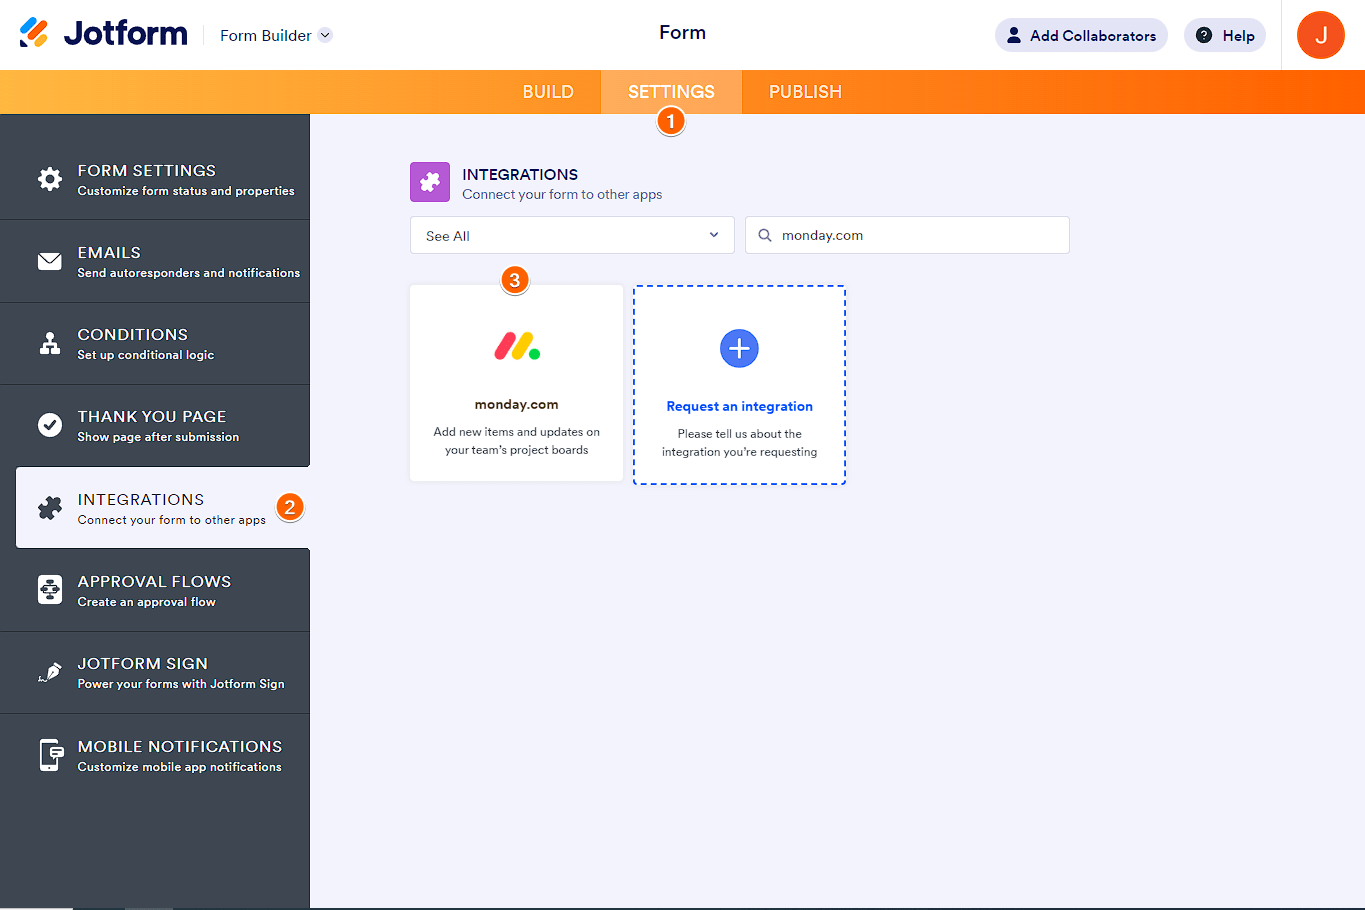
- In the Form Builder, go to the Settings tab.
- Click Integrations on the left.
- Search and select monday.com.
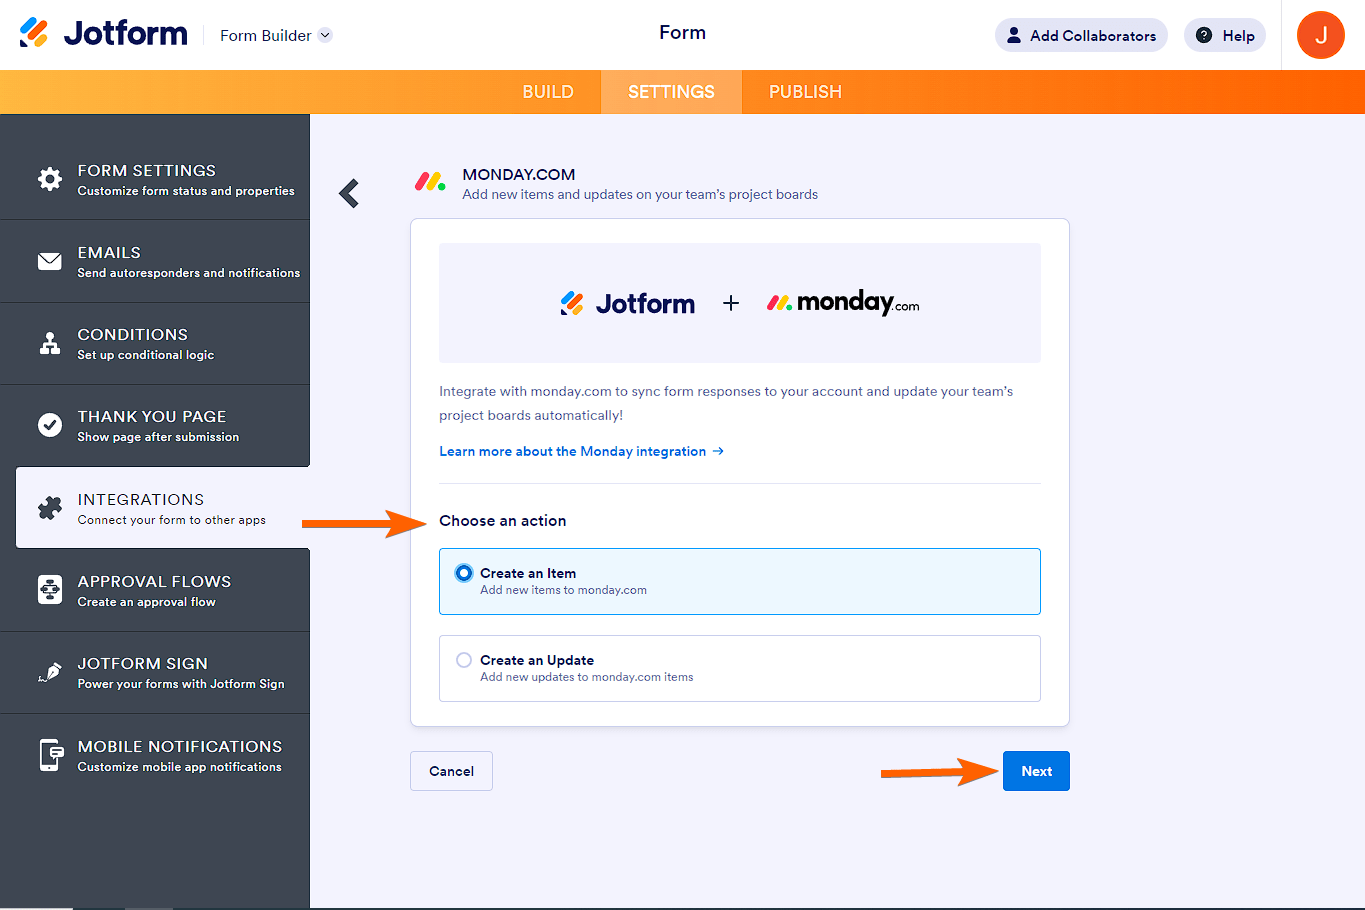
- Select your desired action from the list. You can choose from the following:
- Create an Item — Select this to create an item on a board/group.
- Create an Update — Select this to create an update to an item. The “update” is a term that monday.com uses to describe a feature that is similar to a comment.
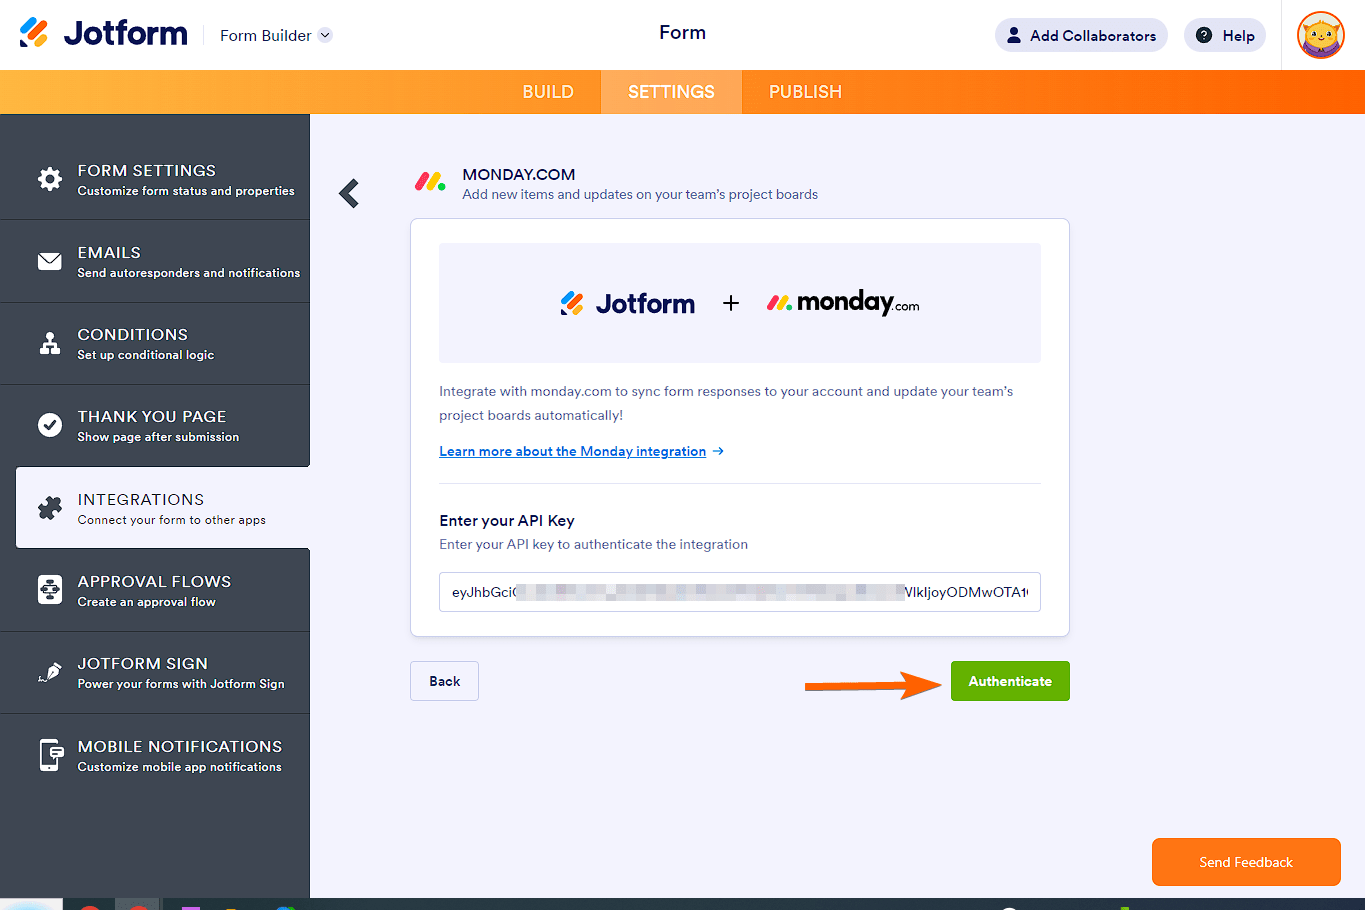
- Enter your monday.com API Key, then click Authenticate if you haven’t connected an account yet.
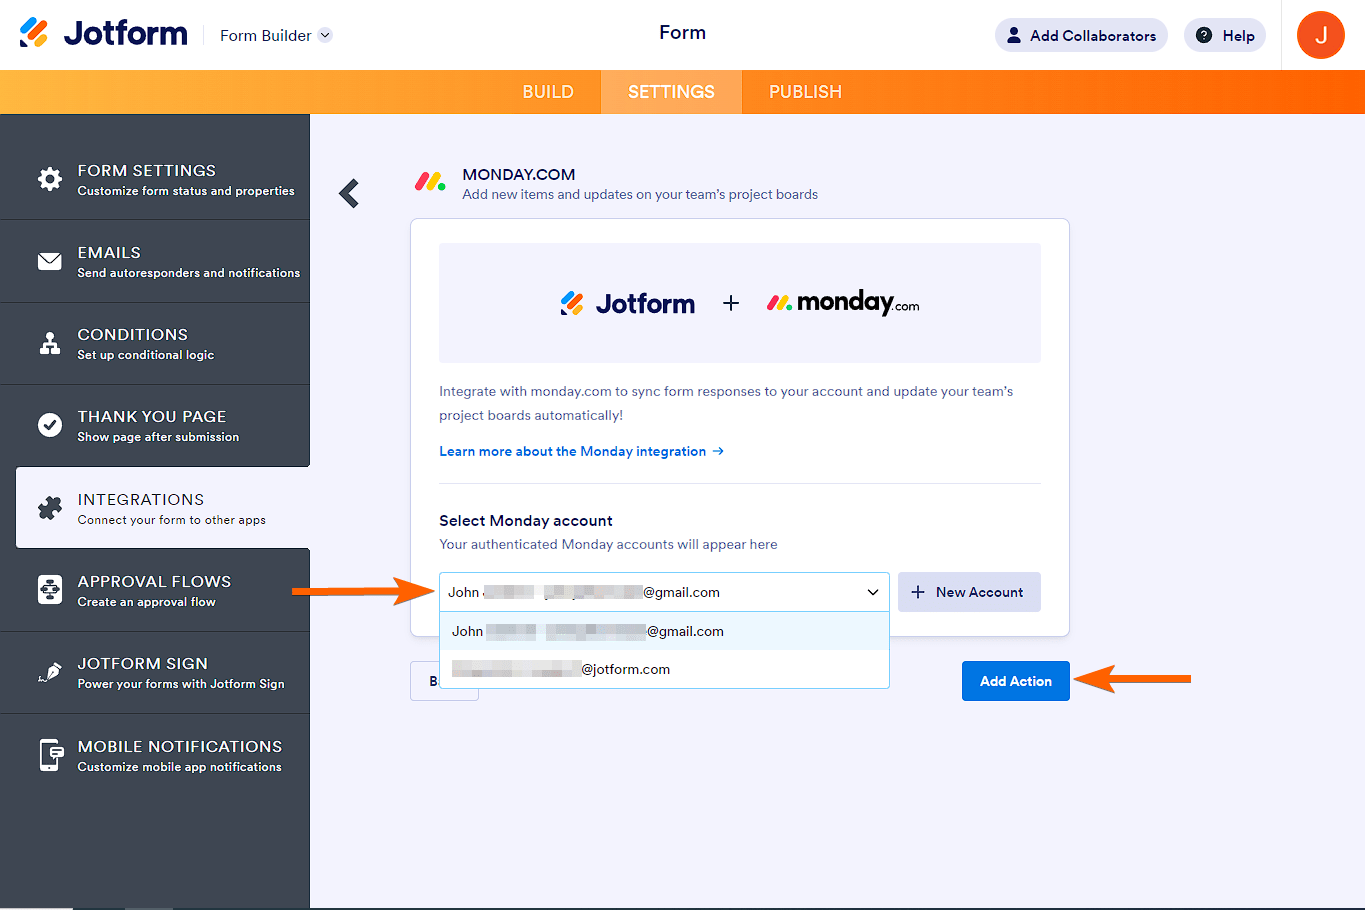
If you’ve already connected your monday.com account previously, select it from the account selector and click the Add Action button. If you wish to connect to a new account that isn’t listed, click the New Account button to authenticate.
Creating an Item to monday.com Board/Group
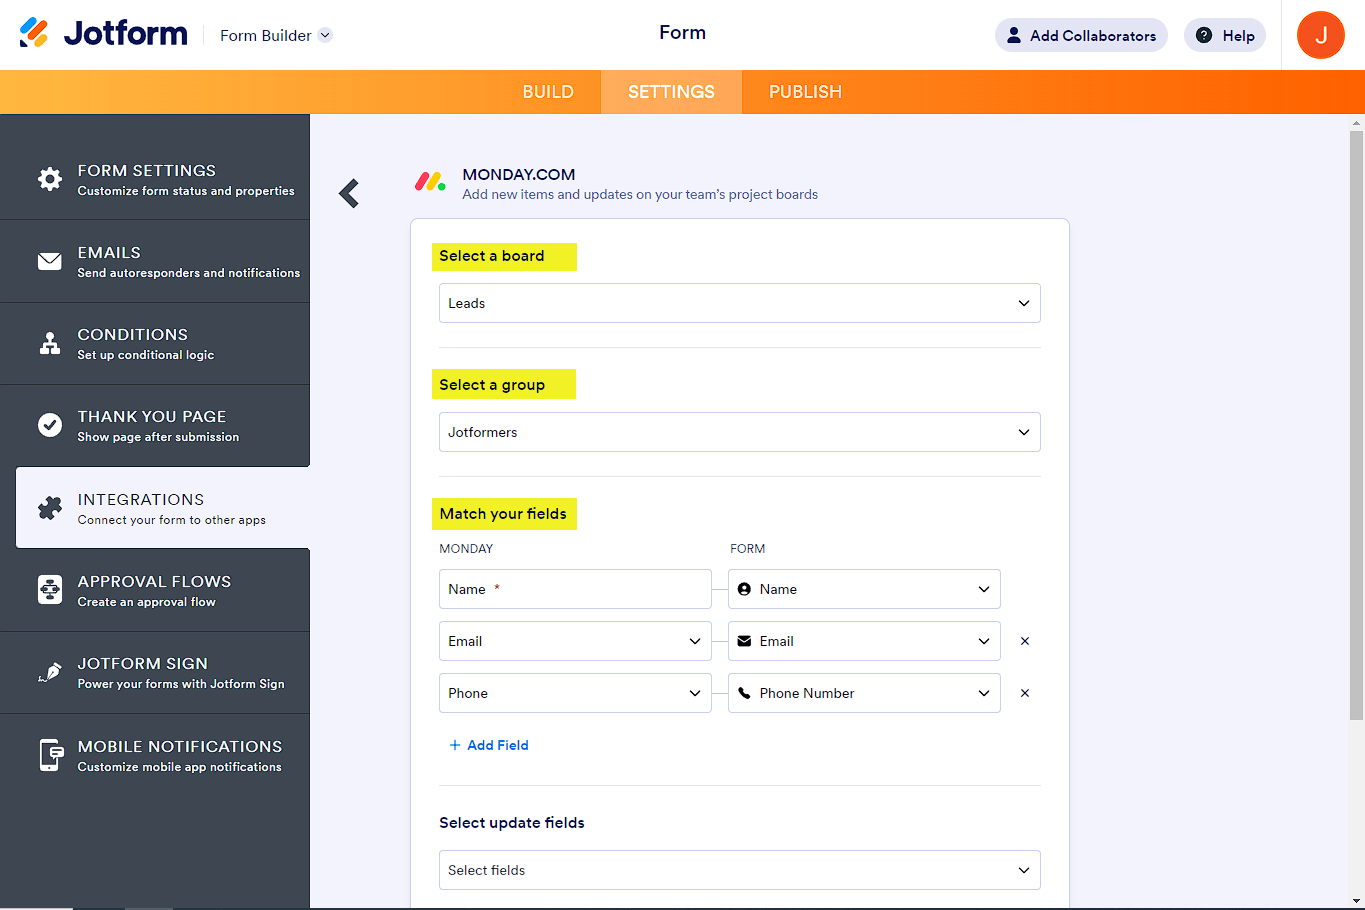
You will be required to match your form fields when choosing to create an item. After connecting/selecting your monday.com account, do the following:
- Select a board.
- Choose a group.
- Next, match your form fields accordingly. The Name field is required and cannot be deleted.
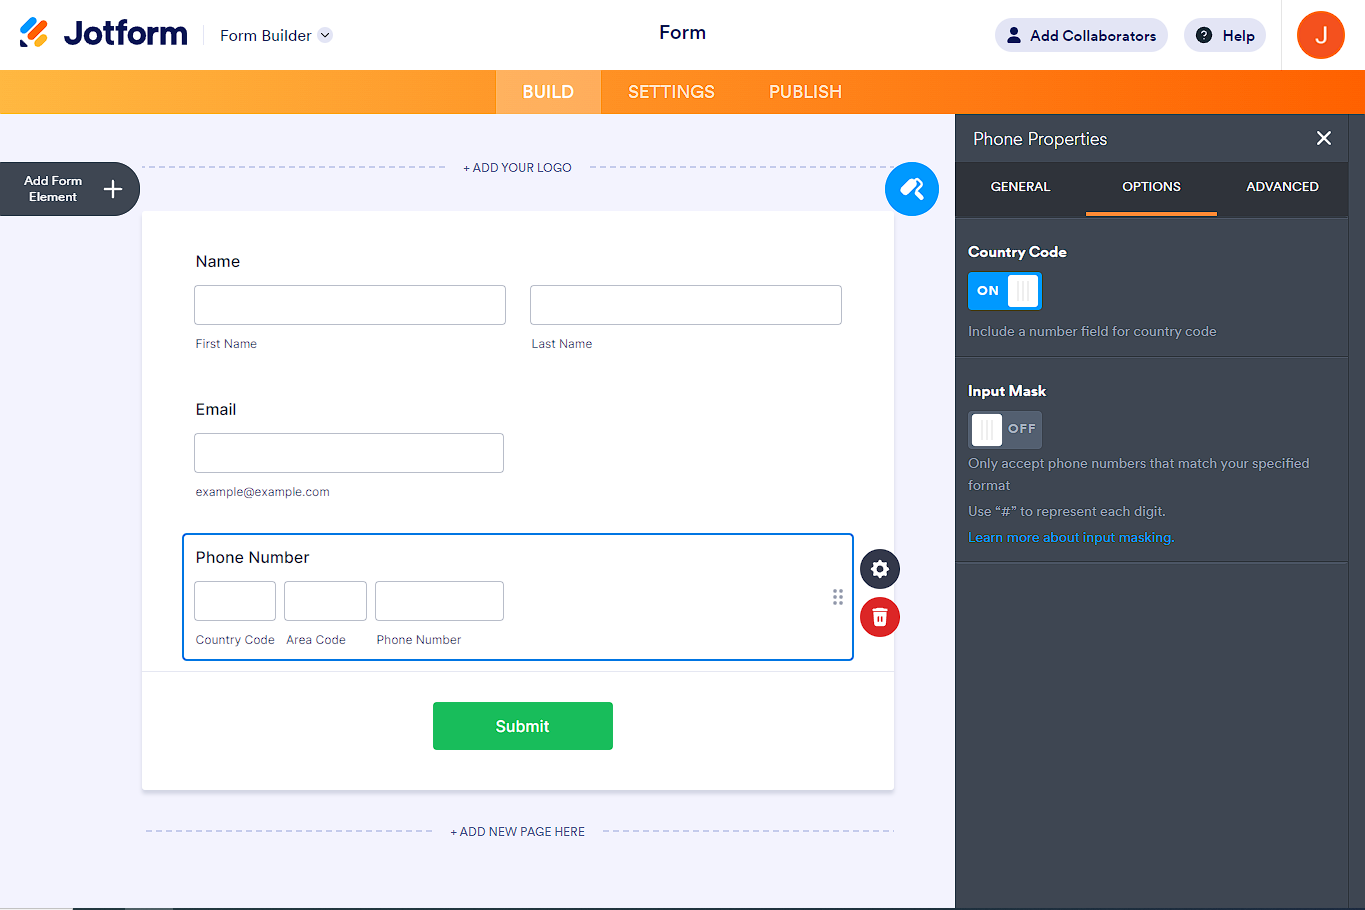
If you’re matching a Phone Number field with monday.com, you must ensure that the Country Code is enabled and the Input Masking disabled, as shown below:
monday.com is forcing the phone number entered to have a Country Code. Without it, the integration will not send any data to monday.com. Visit monday.com – The Phone Column to learn more.
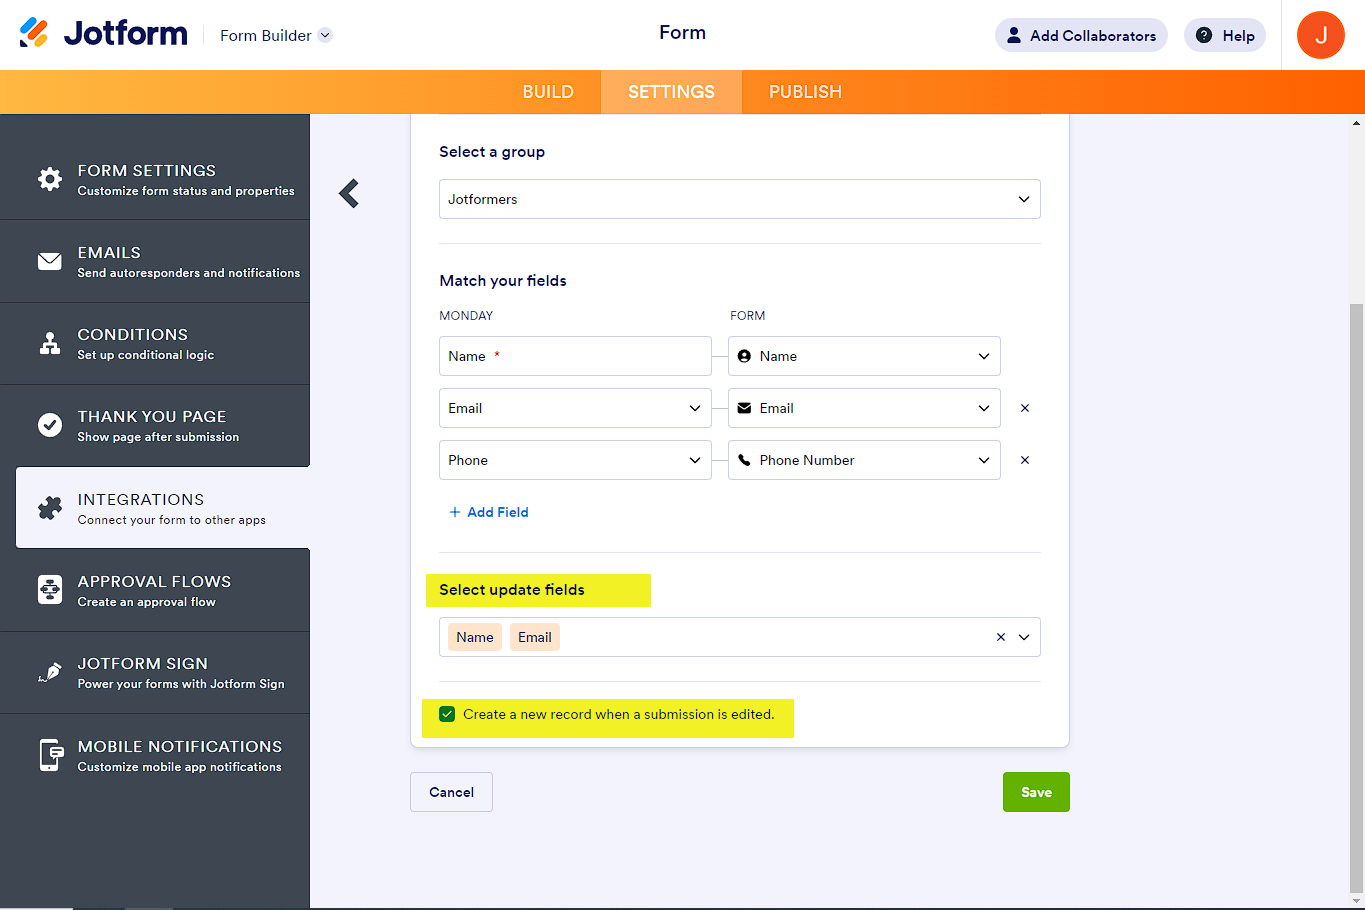
- Set up the other optional settings:
- Select update fields — You can include your form fields as updates to your Airtable board/group. Visit monday.com – The Updates Section to know more.
- Create a new record when a submission is edited — By checking this option, you opt to create a new record when you or the submitter edits the submission.
- Finally, click the Save button to save the integration.
Creating an Update to monday.com Board/Group
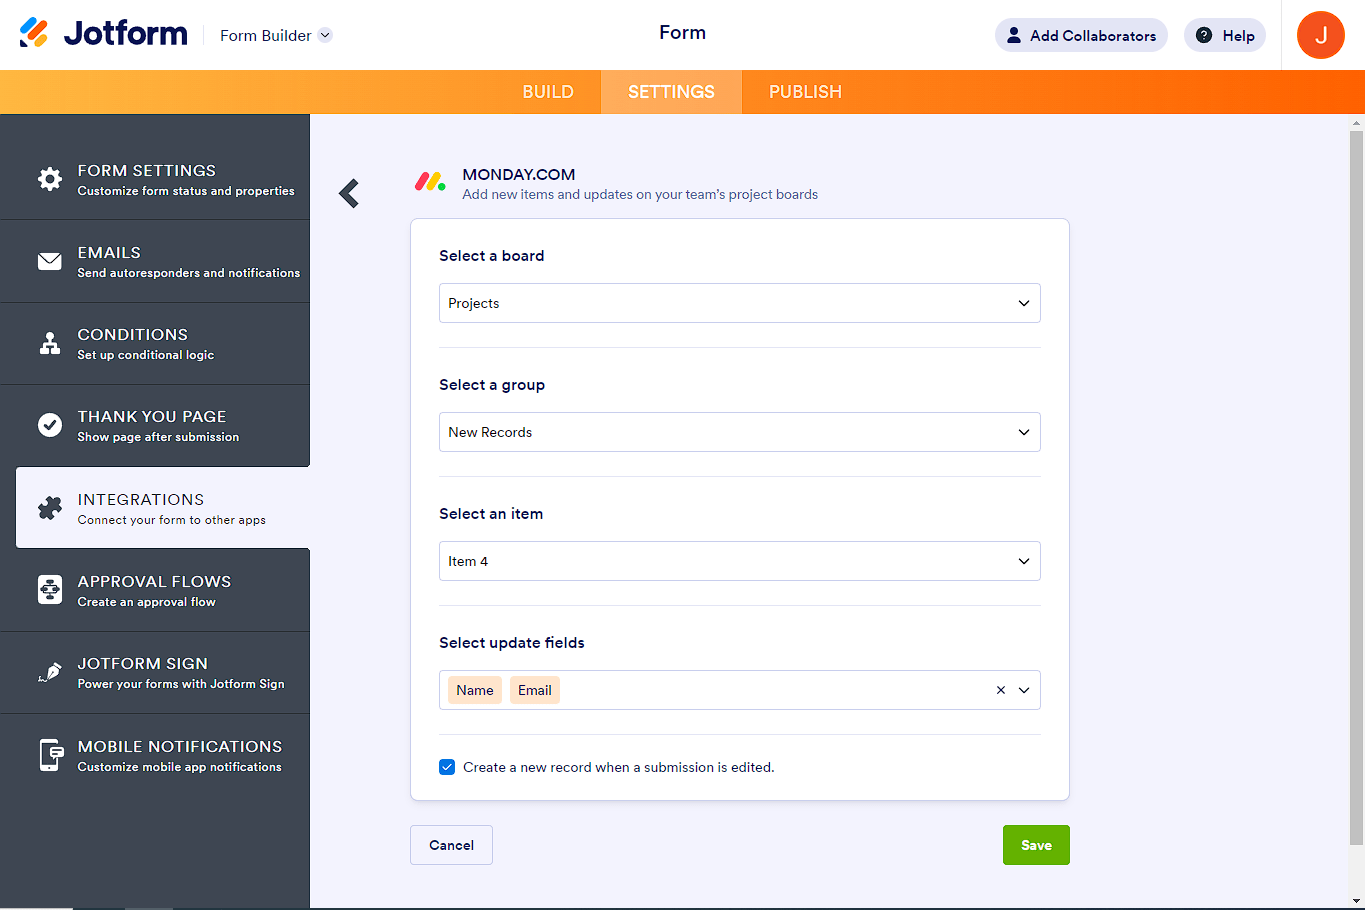
With the Create an Update action, you can push an update to a specific item in your board/group. This is useful if you assign a specific item to someone, such as a prefill.
- Similar to when you create an item, select and set up the following:
- Select a board
- Select a group
- Select an item — The item from the selected group and board.
- Select update fields — Select the fields you wish to include as the update to the chosen item.
- Create a new record when a submission is edited — Checking this option creates a new update on the chosen item when you or the submitter edits the submission.
- Click the Save button to finish and complete the integration.
Managing monday.com Integration Actions
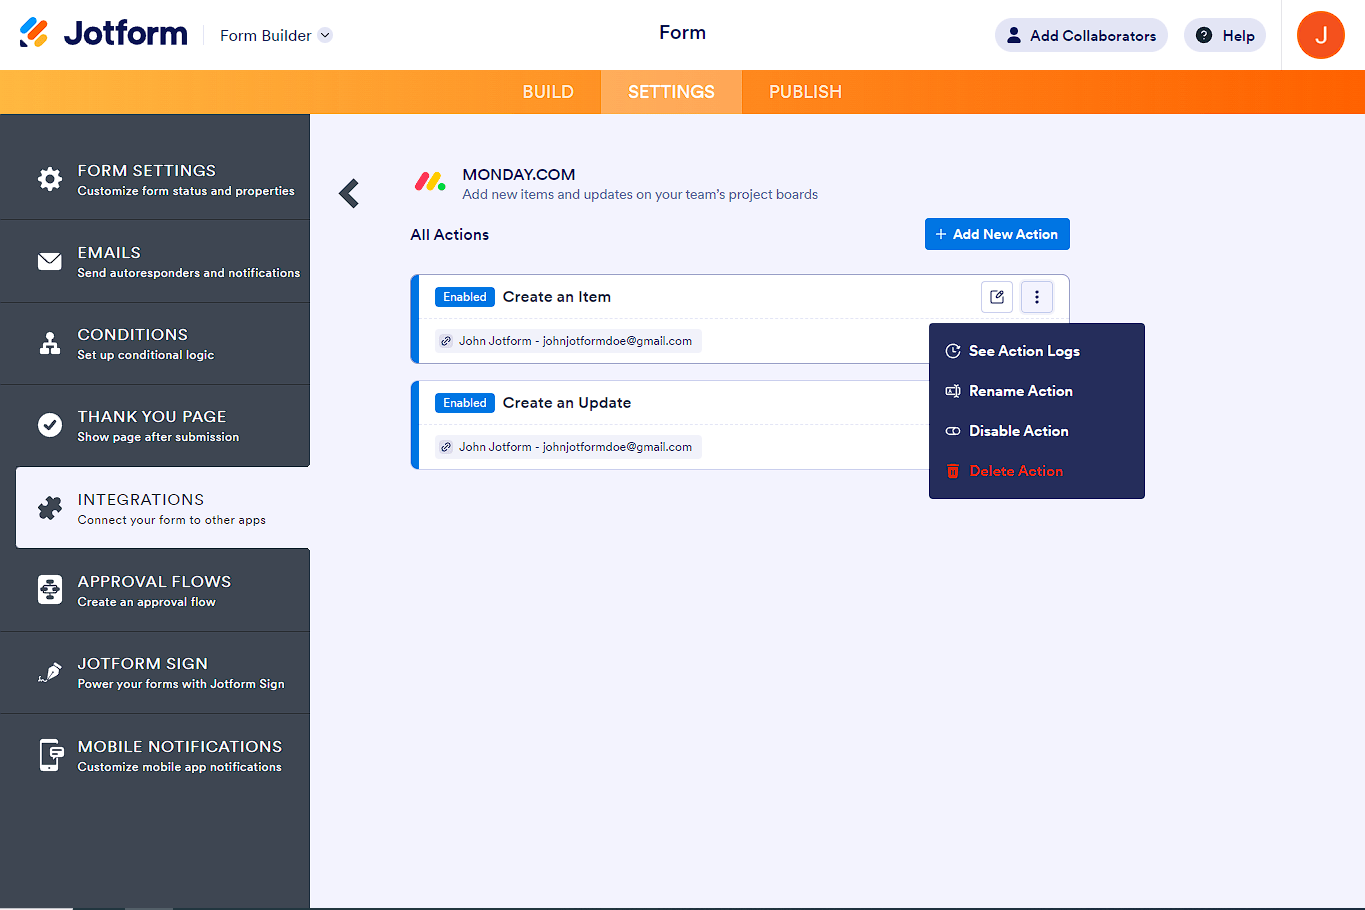
After saving the integration, you can see the list of actions you created and the Add New Action button on the main page. Each action displays the status, name, and the account connected. If you hover your mouse over the created action, you’ll see the Edit Action (pencil icon) and the More (thee-dotted vertical icon) options to the right. The More option includes the following:
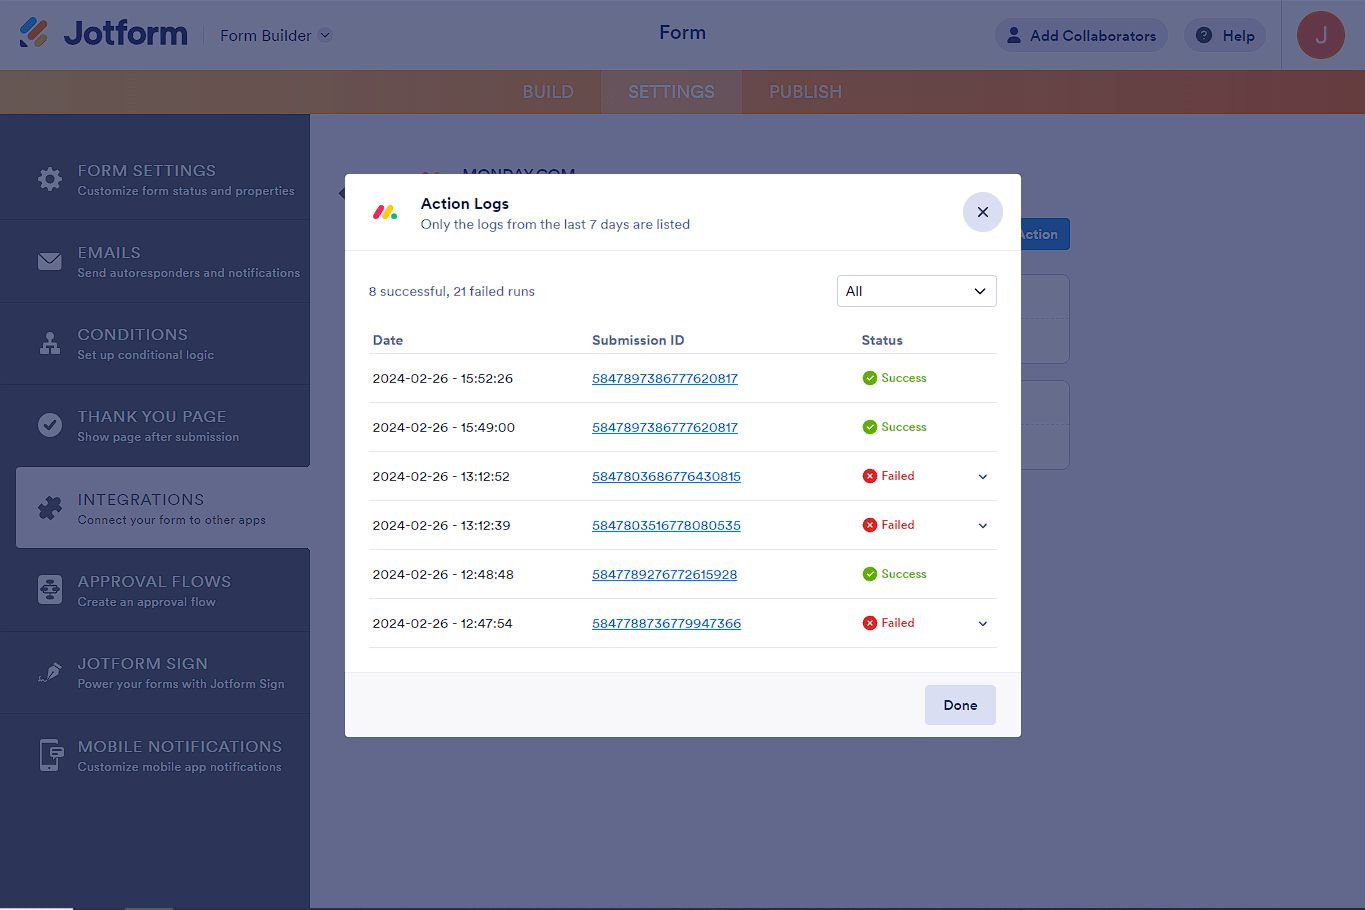
- See Action Logs — This section will display your monday.com integration’s successful and failed runs. It’s useful when troubleshooting issues.
- Rename Action — If you want to personalize the action’s title.
- Disable Action — This option is useful to temporarily stop the integration from sending files.
- Delete Action — If you want to remove the integration from your form.
The action logs window will look like the following:


Send Comment:
31 Comments:
65 days ago
In the action log, What does this failed status mean? How can I fix it? Thank you.
This status label doesn't exist, possible statuses are: {1: Yes, 2: No, 5: Unknown}
129 days ago
Something that would be helpful for you to mention in the video is that if you're utilizing dropdown selections they must match exactly in order for the submission to be successful.
191 days ago
Why does Jotform --> Monday Integration not populate the update field in Monday in the same order the fields are organized in Jotform?
Every new field I create in Jotform, goes to the bottom of the update/comment on a new item that is created in Monday.
If I create a new field and make it the first field in my JotForm. Becasue it was the most recently created field, It translates into the Monday Update/Comment as the very last field (top/down).
What do we need to do to get the fields mapped to an update/comment on Monday to populate in the same order they are configured to in the Jotform?
214 days ago
I'm submitting files into my form, how can I add them to the files folder on Monday?
Also, I need to have the all the information submitted in the update field, but it apeers very disorganized. How Can I organize all that info?
233 days ago
How do I remove 1 account integration with Monday.com and leave the other account?
More than a year ago
What do we need to do in order for attachments in jotform to be passed to Monday.com?
More than a year ago
Hello, before I sign up, is it possible to pull in a connected board column data?
I have a main deal board which has several connected boards as column data which I want my sales team to fill out to start a prospect.
For example:
Industry
CRM Used
Size of Business
Use Case
These 4 columns have defined data in different boards.
The form would need to have these fields in a drop down list.
Is that possible?
Thanks
Mark
More than a year ago
This doesn't show how to send an uploaded file to a Monday.com board which is what the person was asking for help with.
More than a year ago
How can I integrate a widget on my Jotform to monday.com?
More than a year ago
What field types are supported?
More than a year ago
I'm currently trying to map the priority dropdown in jotform to the priority status column in Monday.com. Every time I get an error due the to coloring code. Any insight on how to make this work?
More than a year ago
Is there a way to send answers from fields on a single form to different boards in Monday.com? I would like form responses from certain fields to populate on different boards in Monday.com
More than a year ago
What pricing plans will allow integration with Monday.com?
More than a year ago
hey, there is a way to add the filled pdf file (when its a pdf based form) in monday with the integration?
More than a year ago
Which type of field on monday.com is compatible with the input table on Jotform? I would expect it to be able to map it to multiple number columns but when I select a number column from Monday, the input table is disabled.
More than a year ago
Hey guys,
Can someone please explain to me how I can remove my current account I've logged in on Jotform via Monday. This account is a free trial that I used to test the integration process. Now I want to Sign out of the free trial as we have a fully licensed Jotform and I want to sign in with it.
Please also note that I'm not an admin on our Monday.com account. Do I need to get an admin to sign me out?
Thank you in advance.
More than a year ago
Are all Basic Jotform fields supported by the Monday integration?
More than a year ago
I'm trying to integrate multiple choice answers into monday.com. Does anyone know what kind of column I need to set up in monday.com to get this to work?
More than a year ago
I have an integration between my Jotform and Monday.com and every time a new entry is entered two new lines appear on my Monday.com. One is the correct new entry and the second is a random field populated from the Jotform into Monday (same field on multiple columns on Monday.com)
Any suggestions?
More than a year ago
Hi!
I was wondering how we can import each field from the Jotform questionnaire directly into each column on Monday as opposed to seeing all the information appear vertically in the "Updates" section of Monday.
More than a year ago
I’m looking for a way to get my edit form link on my Monday board
More than a year ago
I have tried this and the TEST INTERGRATION will go through but not new enquiries. Can someone help?
More than a year ago
Is there anyway that you can push the integration between jotform and Monday. I have some forms submitted in jotform but have only just set up the integration. Is it possible to push these through to Monday.
More than a year ago
Currently I have a form connected through zapier to Monday. I use a conditional statement (if a box is checked) then send the response into Monday. (that works)
However, we wanted to go back to old responses (made before the tick box conditional was created), check the box and SAVE/Resubmit the form. (triggering the data from that form to go to monday).
The problem is
1: If I go through Zapier the only option is submitting new forms (doesn't trigger when old ones are updated)
2: If I go direct from Jot --> Monday then the conditional won't work and it's all/nothing.
Is there anyway around that?
More than a year ago
How do I get the PDF to come across into files on Monday? Or Im happy for the photo and the wav file to come across. I just need need the photo and wav file in either capacity to link into files on my Monday Board.