

Jotform Approvals has evolved…and is now Jotform Workflows.
Don’t worry; Workflows still offers approvals.
But as the name suggests, Workflows also includes new, more valuable features so you can automate entire processes.
The result is a solution that fills the gap between traditional business process management and workflow management software. For instance, Jotform Workflows empowers you with
- A powerful, no-code workflow automation tool that turns your forms into flows
- Conditional logic-based integrations with popular third-party applications (your workflow supports multiple integrations as well)
- The ability to have your initial (or order) forms automatically trigger payment forms
- Internal/external task assignment automation based on predefined triggers
How much does Jotform Workflows cost to use? Nothing. It’s common for professional workflow management solutions to cost five figures, on top of a yearly subscription.
But we’re committed to helping you get more done as efficiently as possible. Jotform Workflows does that with simple, no-code workflow automation.
The benefits of an enhanced workflow management solution touch pretty much every branch on the productivity tree — such as saved time, saved money, and ease of use. But one benefit you shouldn’t overlook is inspiration.
We believe that Workflows will inspire you to use its open canvas in creative ways. It can handle the tasks you’ve long wanted to automate as well as tasks you hadn’t even imagined automating.
New features, combined with powerful existing capabilities like conditional logic, multiple/group approvers, customizable notifications, and more, will help you take your organization’s automation further.
What you’ll learn in this post
- The features and benefits of Jotform Workflows
- How to use Jotform Workflows to maximize your, well, workflows 😉
- Which use cases benefit from a form-based workflow management solution
- How Jotform Workflows fills the gap between workflow management and business process management software

Jotform Workflows: Features
What is now Jotform Workflows (née Approvals) first launched in April of 2021, and boy has it grown up!
Workflows now incorporates
- Payment functionality that enables direct payment requests
- Conditional third-party integration usage
- A free-flow builder canvas equipped with tools that let you visually design what you need (including vertical and horizontal layouts and your choice of link styles)
- And more
Here we’ll break down some of the key differentiating features of Jotform Workflows so you can see how to make this solution work for your needs.
Integrations feature breakdown: Using conditional rules to manage data
We’ve made it easy to integrate your new workflows with the third-party tools you use to automate data sharing, notifications, storage, and project management.
The following integrations are currently available in Jotform Workflows:
- ActiveCampaign
- Airtable
- Asana
- AWeber
- Box
- Campaign Monitor
- ClickUp
- Constant Contact
- Dropbox
- Egnyte
- GetResponse
- Google Calendar
- Google Drive
- HubSpot
- MailerLite
- Microsoft OneDrive
- Microsoft Teams
- monday.com
- QuickBooks
- Slack
- Zoho CRM
- Zoom
Now you can customize integrations and embed them exactly where you need in the relevant stage of your workflow. You can also structure your workflow to send form submission data to more than one integration (for instance, storing data in Google Drive and triggering a message in Slack) or run multiple integrations in parallel.
But the real power comes with customizing your workflow integration trigger based on conditional logic.
For example, let’s say you’re hiring for three different roles. When the applications come in, you want to alert three different stakeholders (or store the applications/resumes in corresponding folders for each department).
By automating the notification and/or storage within your workflow, you’ll enable faster action and eliminate extra email and manual busywork.
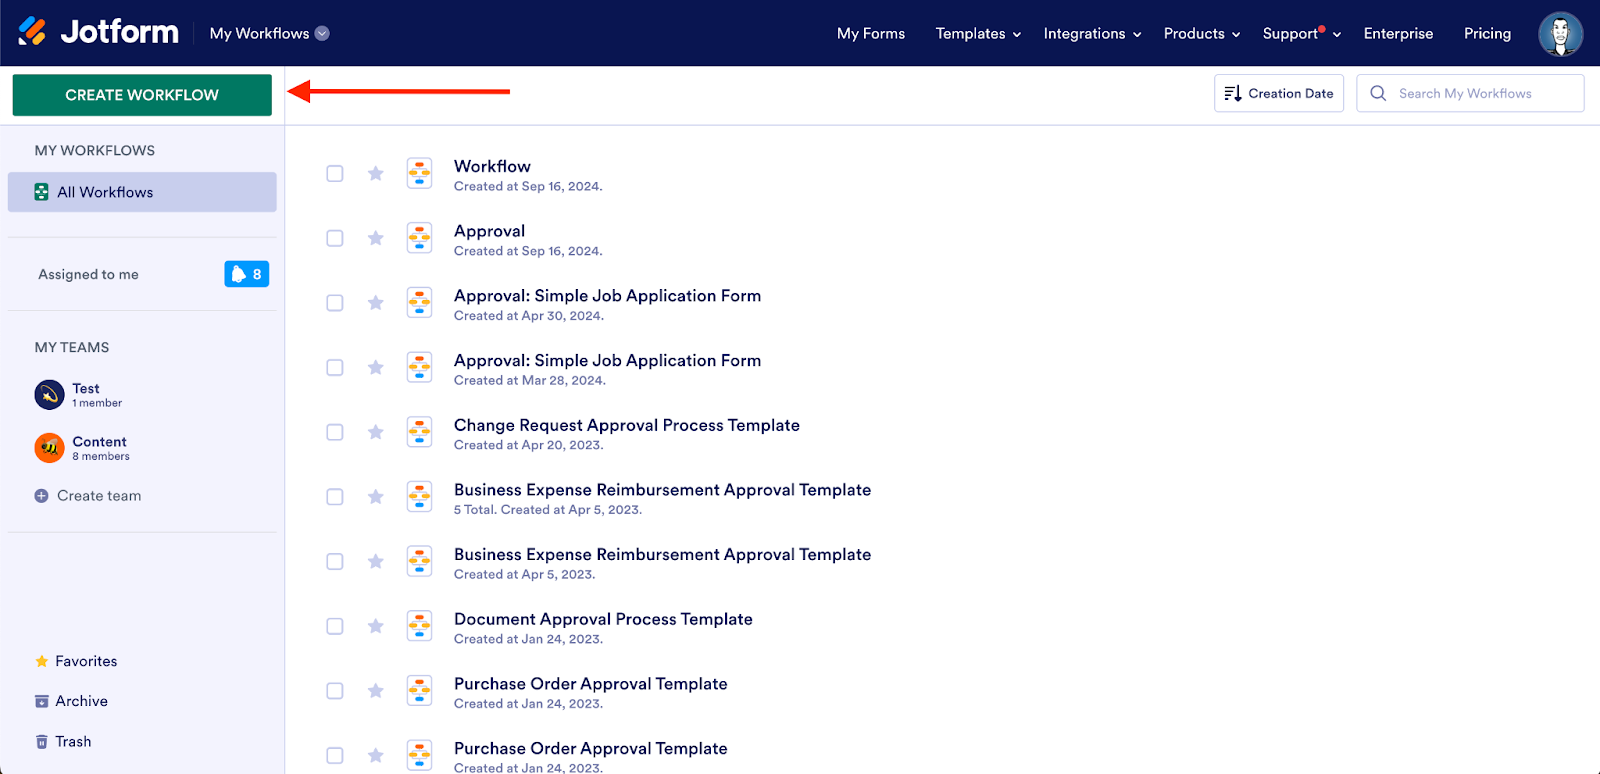
To start, you can open an existing workflow or create a new one from your My Workflows page.
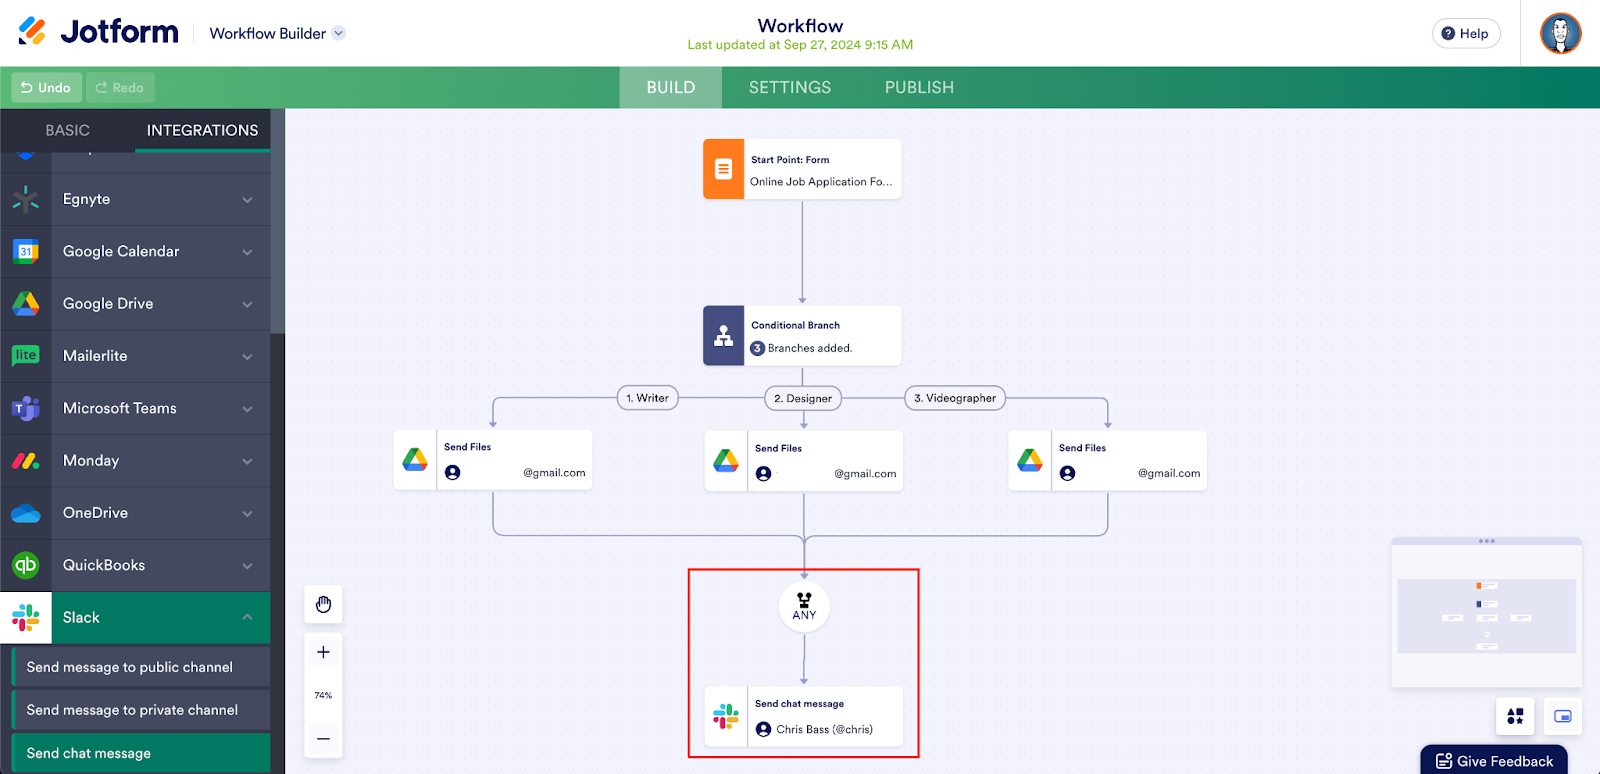
I’ve created a workflow from scratch and added a job application form to kick things off.
To send applications to the relevant folders, I’ve added a Conditional Branch element.
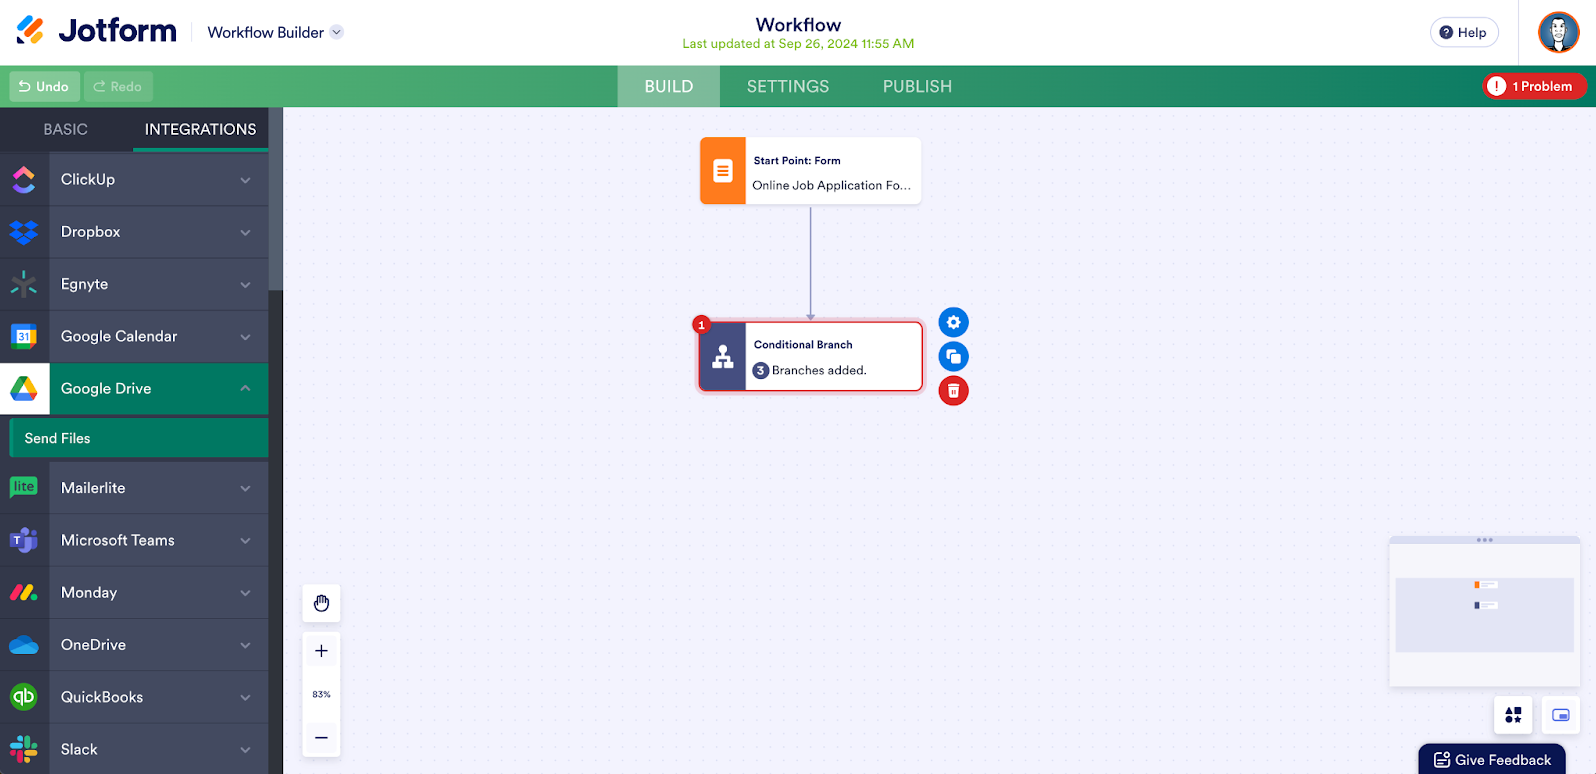
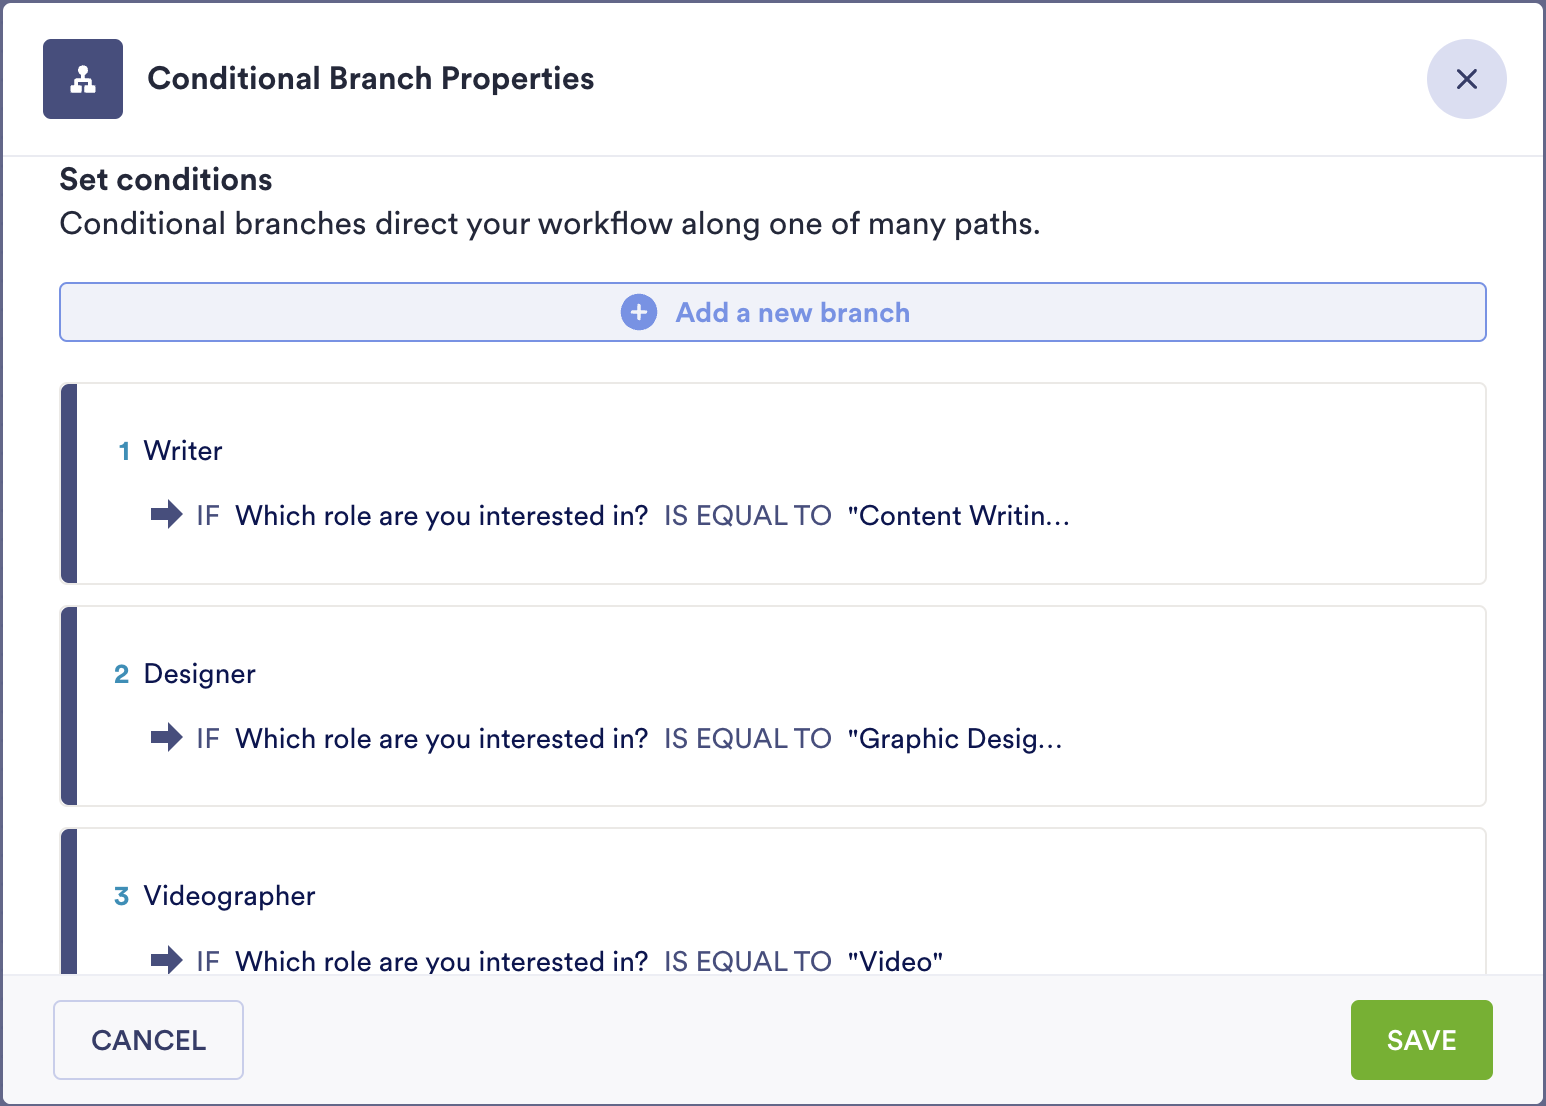
Because we’re hiring for three different roles, I’ve defined the form field conditions in my Conditional Branch to ensure the resume goes to the right folder.
*Note: The red error message in the upper right corner of the page will show up when you have an incomplete or disconnected workflow. It appears here because I wanted to show this build step by step.

Once I have my branches set up, I can add the integration elements to my workflow from the new Integrations tab in the left navigation (in this case, Google Drive).
To connect the different branches to the appropriate Google Drive element, hover over the Conditional Branch element and drag to connect it to Google Drive. Select which condition applies, and everything should be all set.

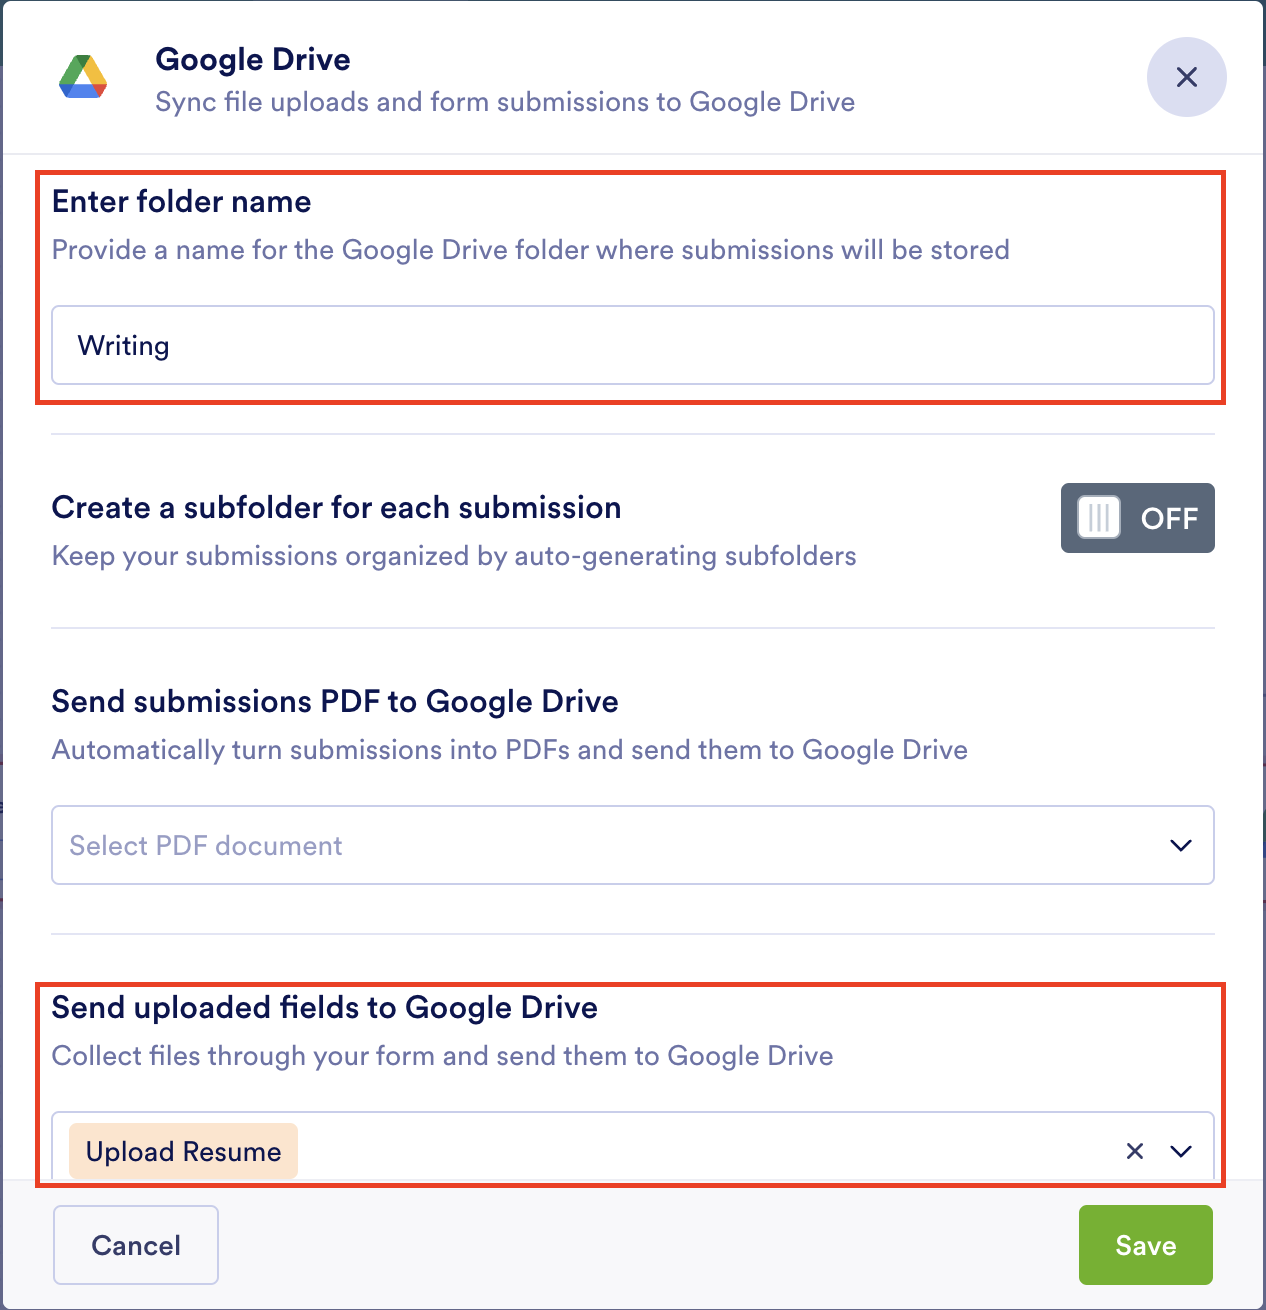
After authenticating my Google account, I’ll create the folders I want certain resumes sent to. I also have the option to create a subfolder associated with each submission.
In this case, I want to send the form’s associated file, which is the applicant’s resume. A PDF of the form submission itself can be sent to the designated folder as well.
For the next step, I’ve added a Merge Branches element (and a Slack integration) underneath the Google Drive integrations. Now, whenever my application workflow is completed, a Slack notification will be triggered.
Pro Tip
In this scenario, when using the Merge Branches element in your workflow, be sure to use the setting “Wait for any of the branches to be completed.” That way, when any of the three conditions are met, the Slack notification will be sure to trigger.
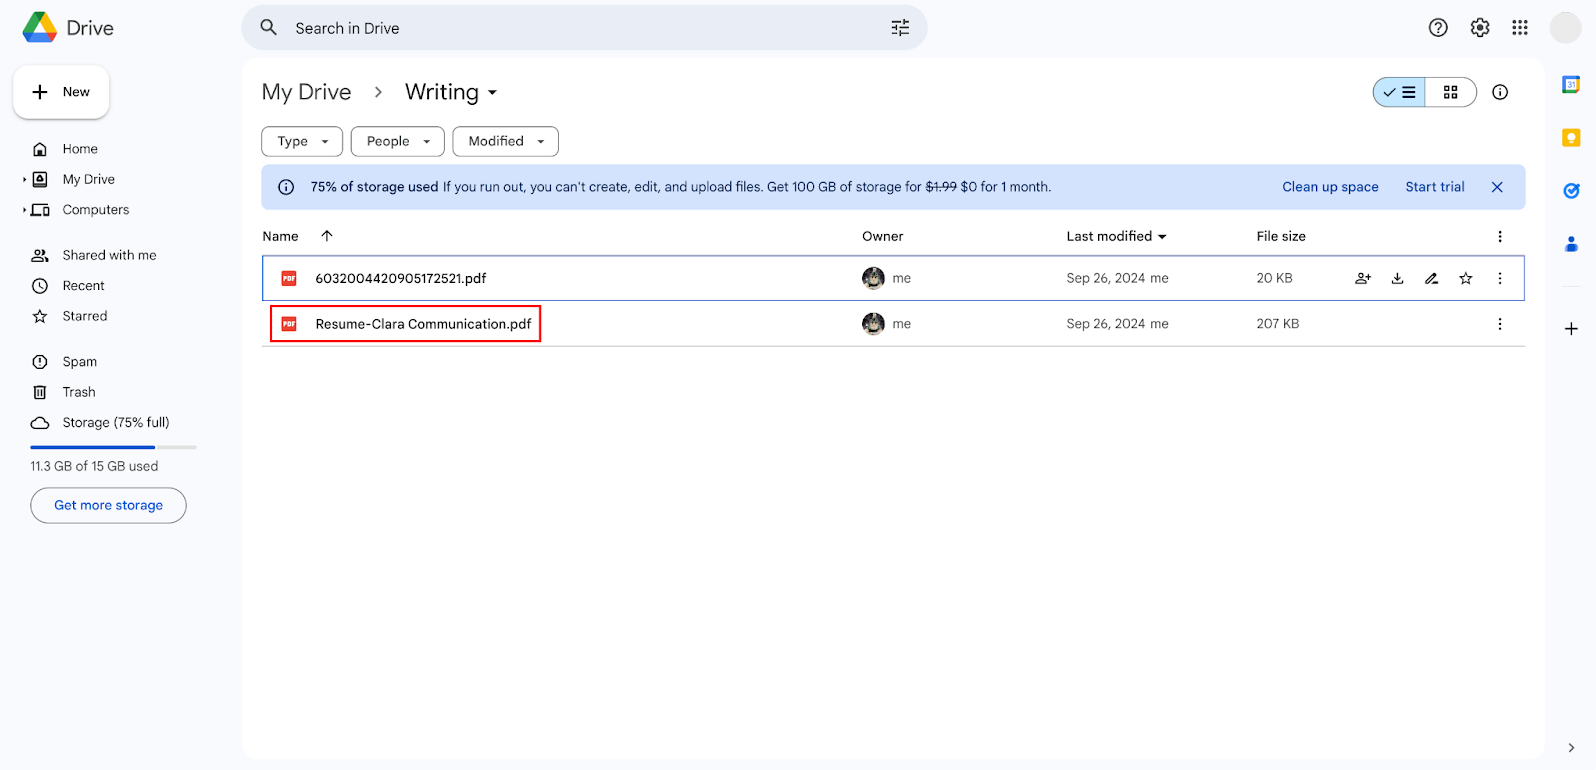
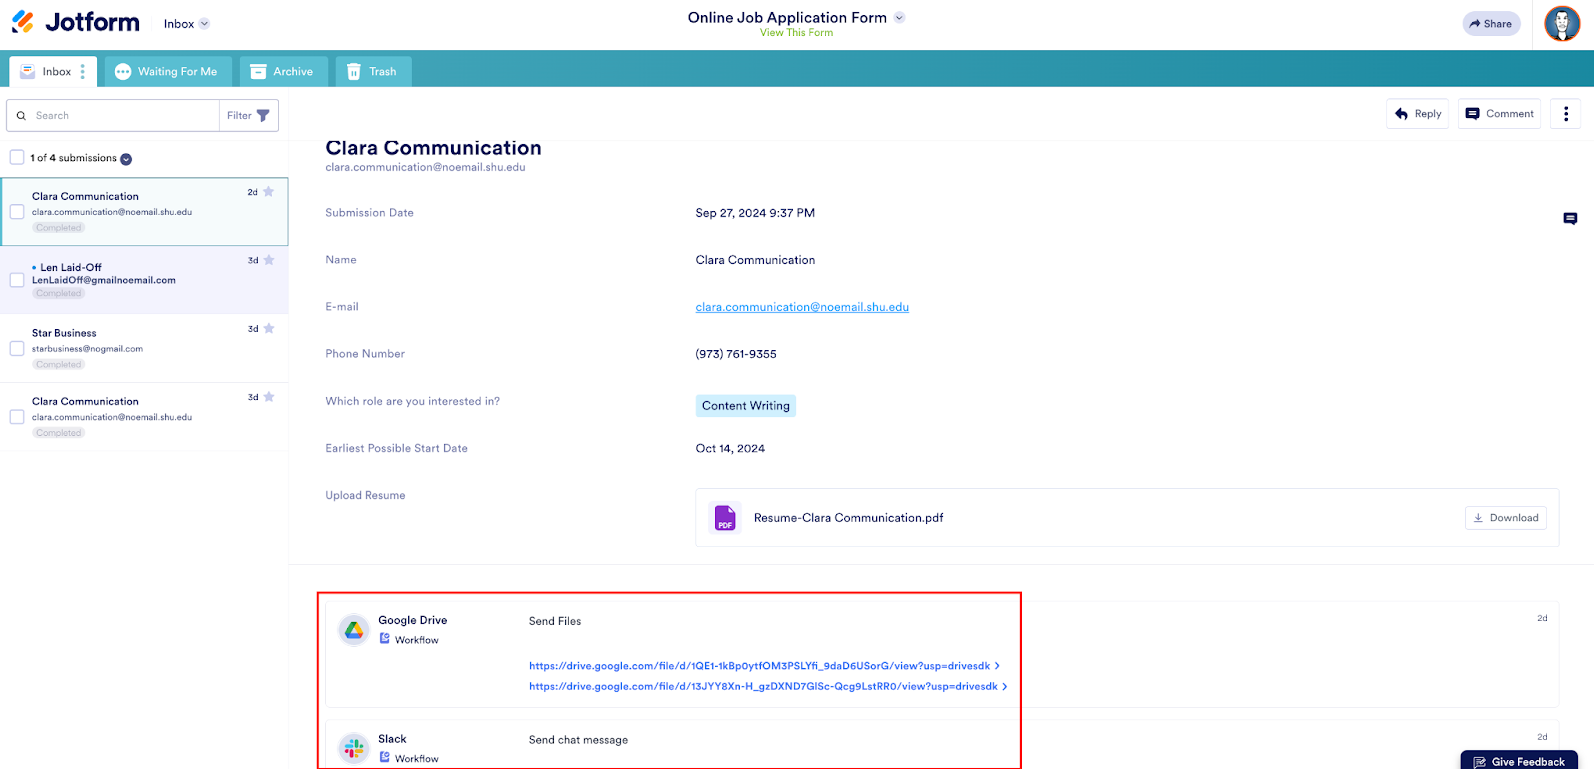
Any application form submission will send the relevant resume to the proper Google Drive folder…
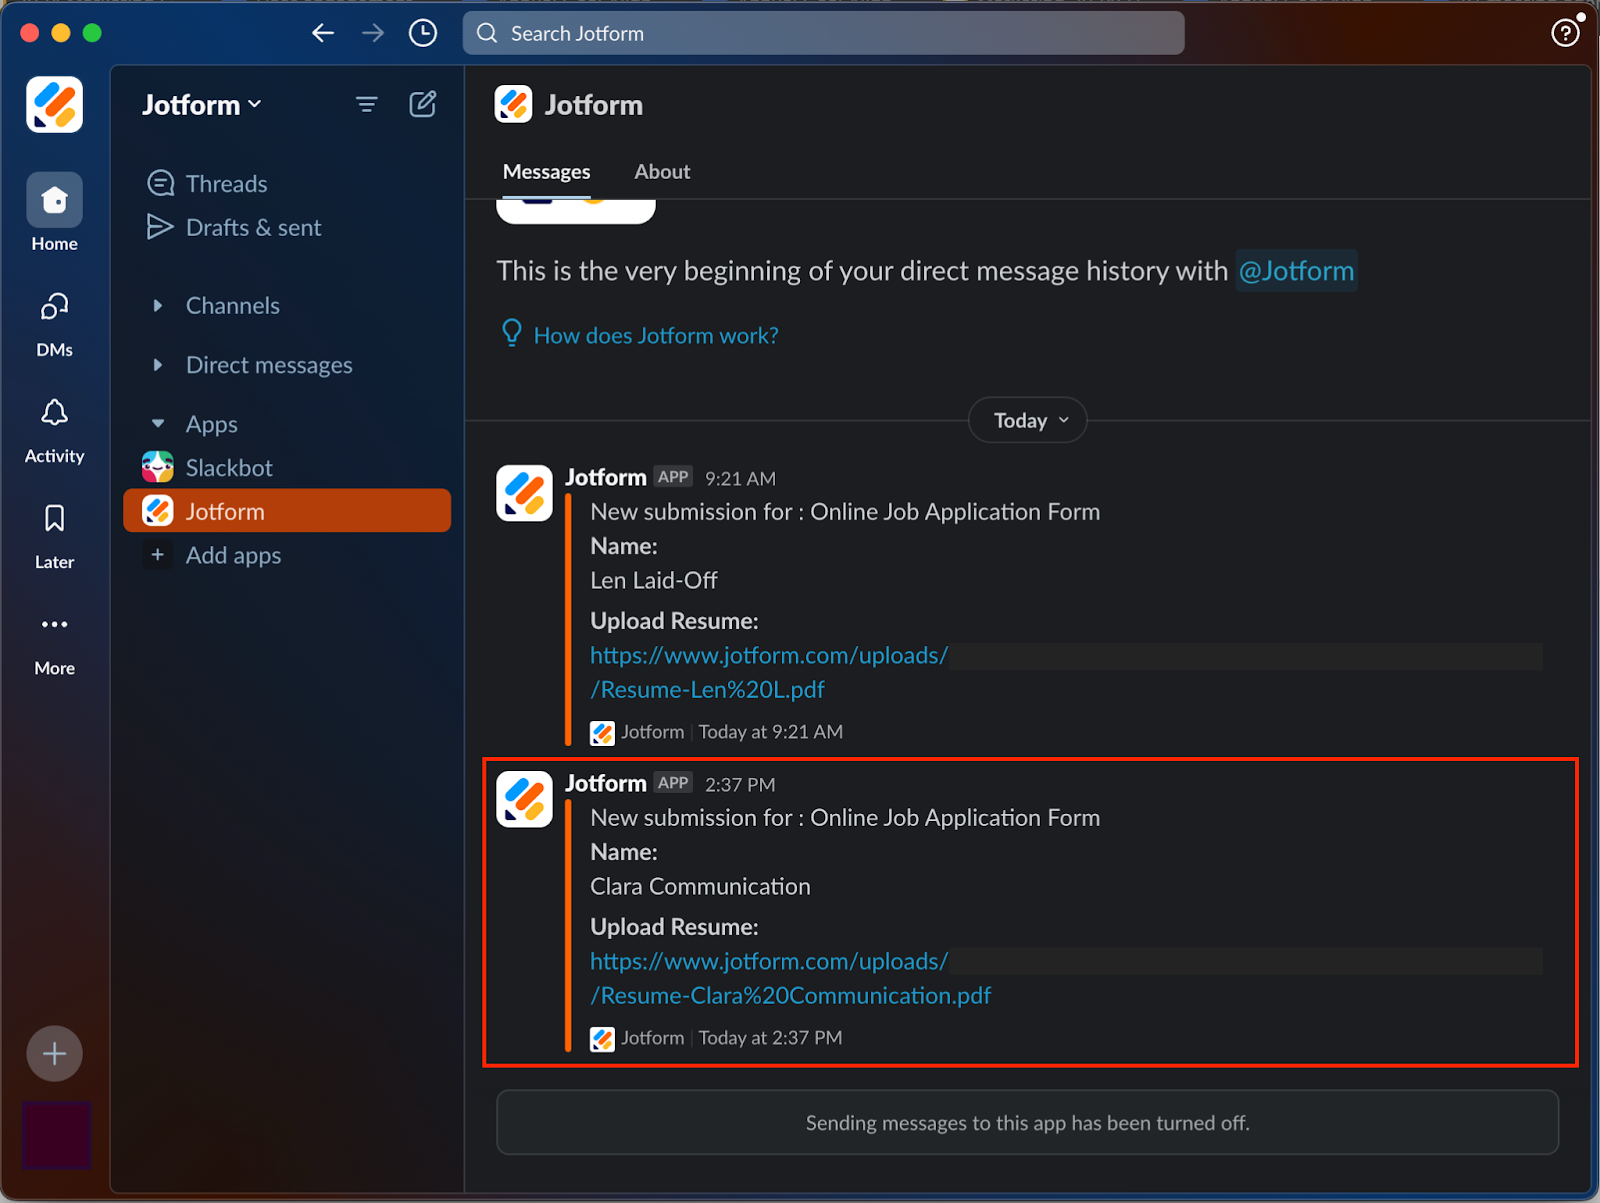
…and automatically notify me (or a chosen Slack channel) with the applicant’s name and resume.
In one fell swoop I’ve constructed a neat way to automate a job application, resume review/storage/sharing, and stakeholder notification. It’s kinda like turning forms into flows. 🤓
As an FYI, you’ll always have access to your workflow updates in the History tab of your Admin panel. Just click your user icon and then Admin in the upper right corner.

The workflow owner will also get an email push notification (if they have the Jotform app) and be able to view the submitted response(s) in their Jotform Inbox.
You can see how this kind of workflow can benefit an HR team in need of a turnkey solution.
Now imagine applying this kind of flow to a variety of industries, such as sales (funneling new leads), event management (vendor handling), operations (contracts), and more.
Integrations feature breakdown: Multiple forms trigger a calendar event
Another great value of this feature is automatically sending multiple forms and using an integration to set up an appointment on your calendar.
To see how this can work, we’ll use a nonprofit volunteer scenario.
Here I’ve created a straightforward flow that allows me to review/approve a volunteer application (form no. 1), which will trigger form no. 2 (an appointment scheduler) to be sent to the applicant.
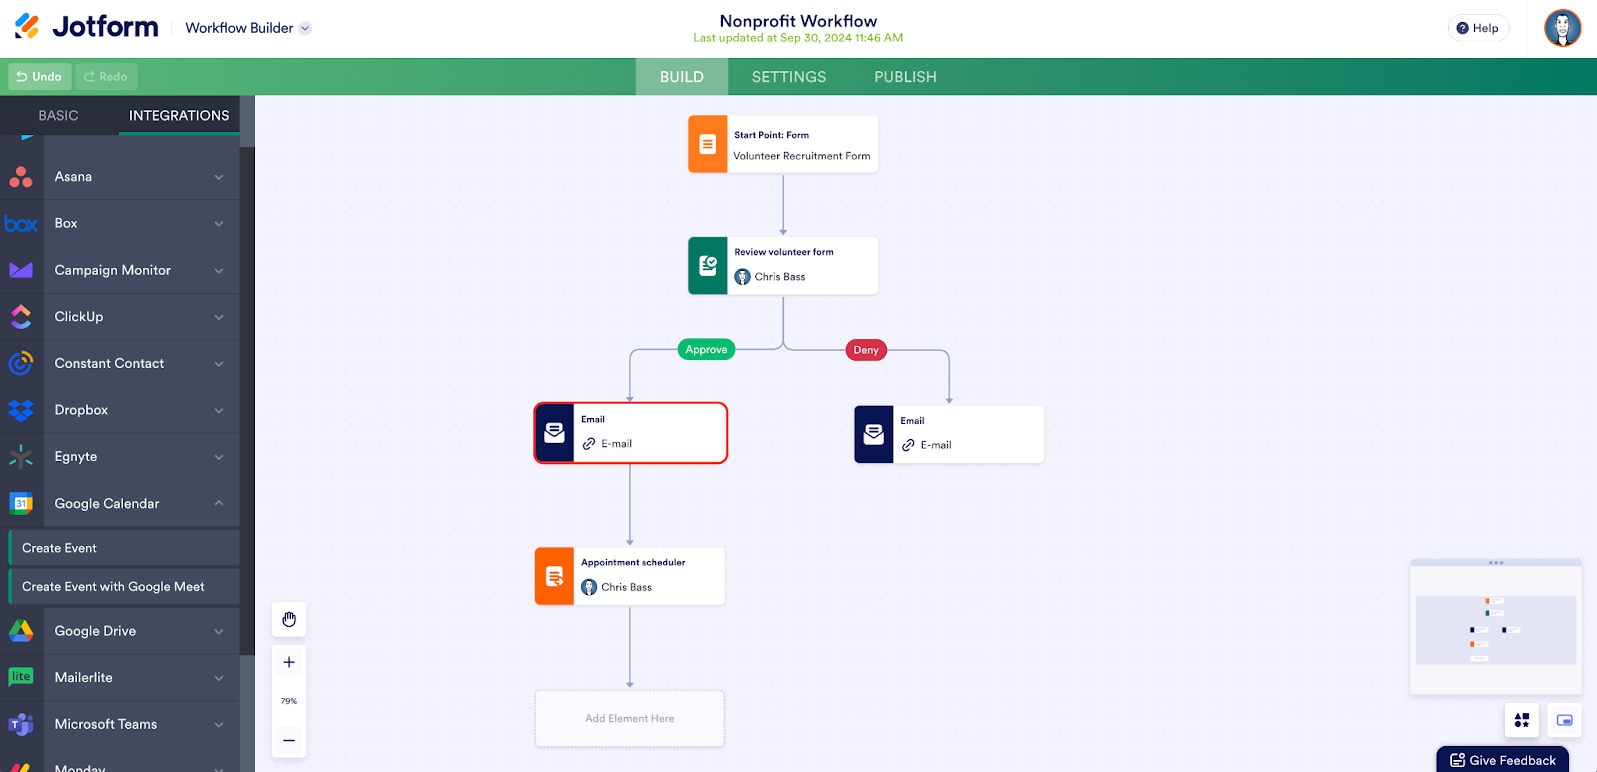
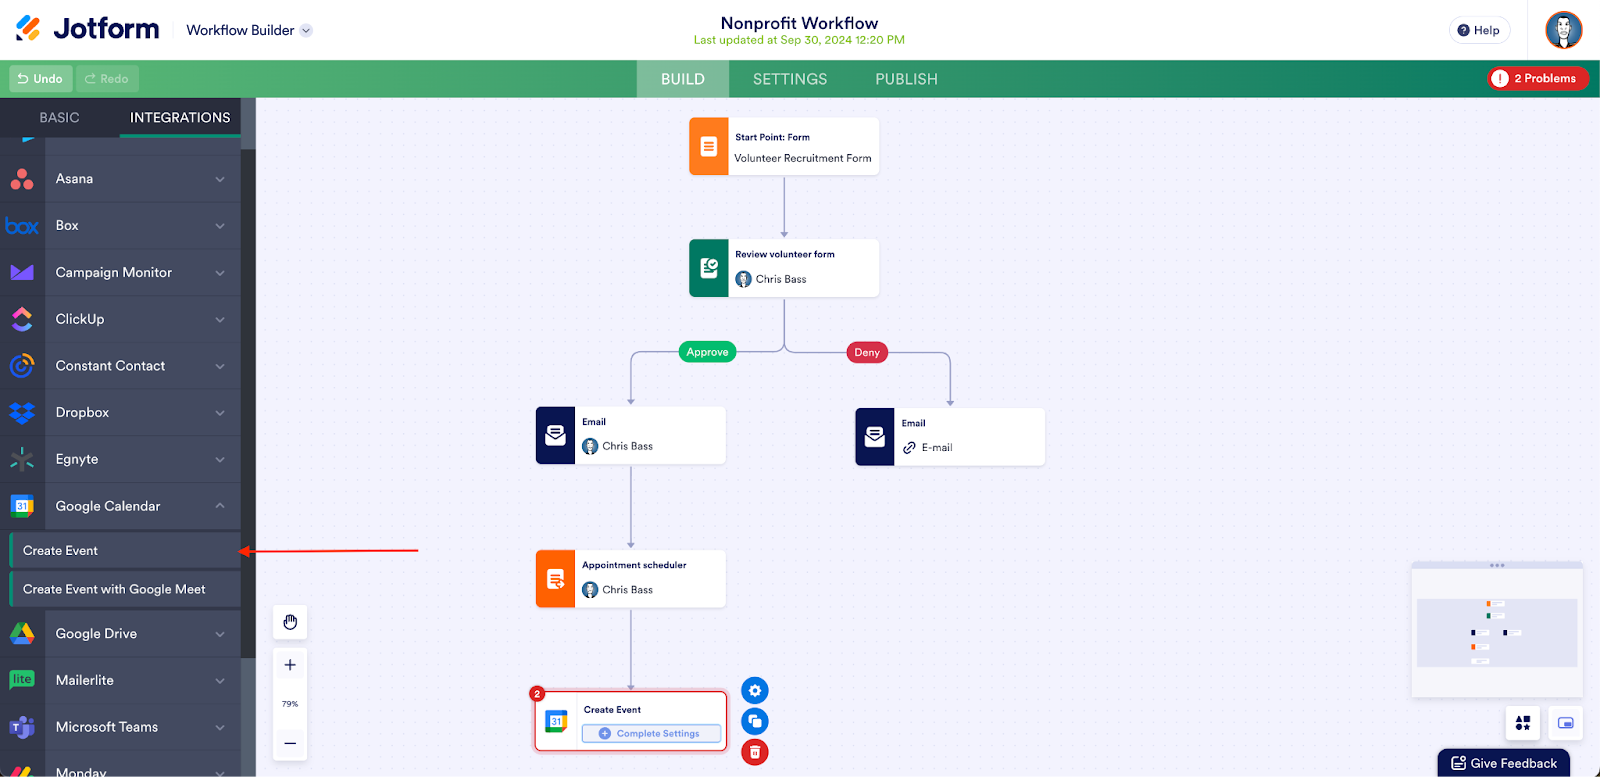
Next, I’ll add the integration — in this case, Google Calendar — so it can create a new meeting based on form no. 2.
Similar to the job application integration example, you’ll first need to authenticate your account.
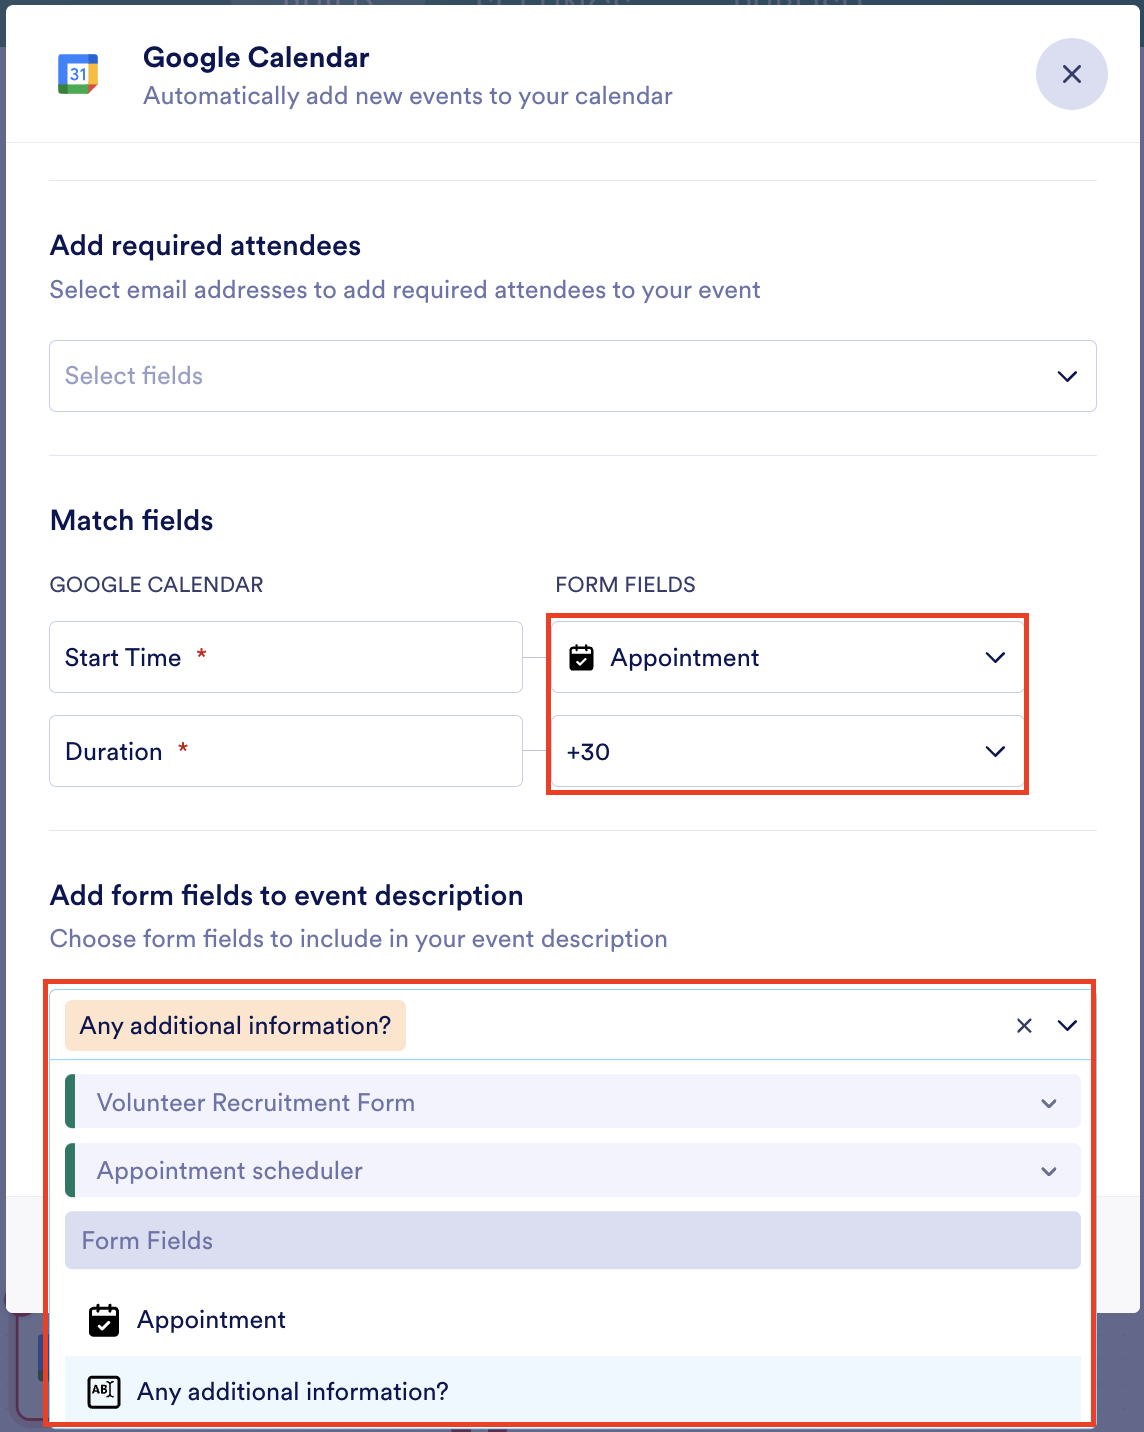
When I specify the integration details within Google Calendar, I can customize how I want the integration to behave based on details from either form in my workflow.
I’ve used the name field from the Volunteer Recruitment Form to create my meeting title…
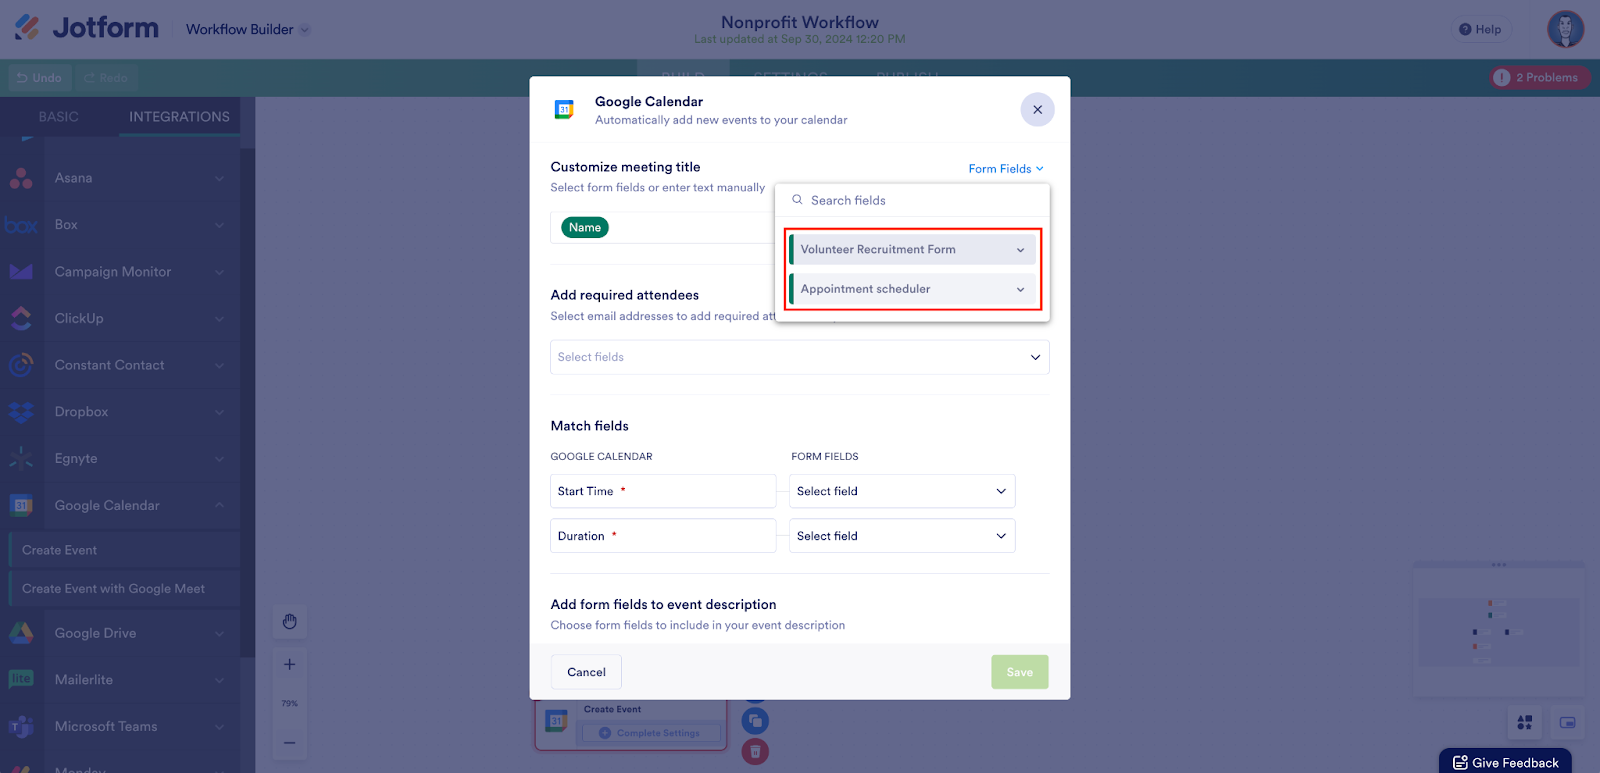
…and the details from the Appointment Scheduler Form to format my Google Calendar events.
Now my workflow is complete. When a new form is submitted, my first step will be approving it in Jotform Inbox.
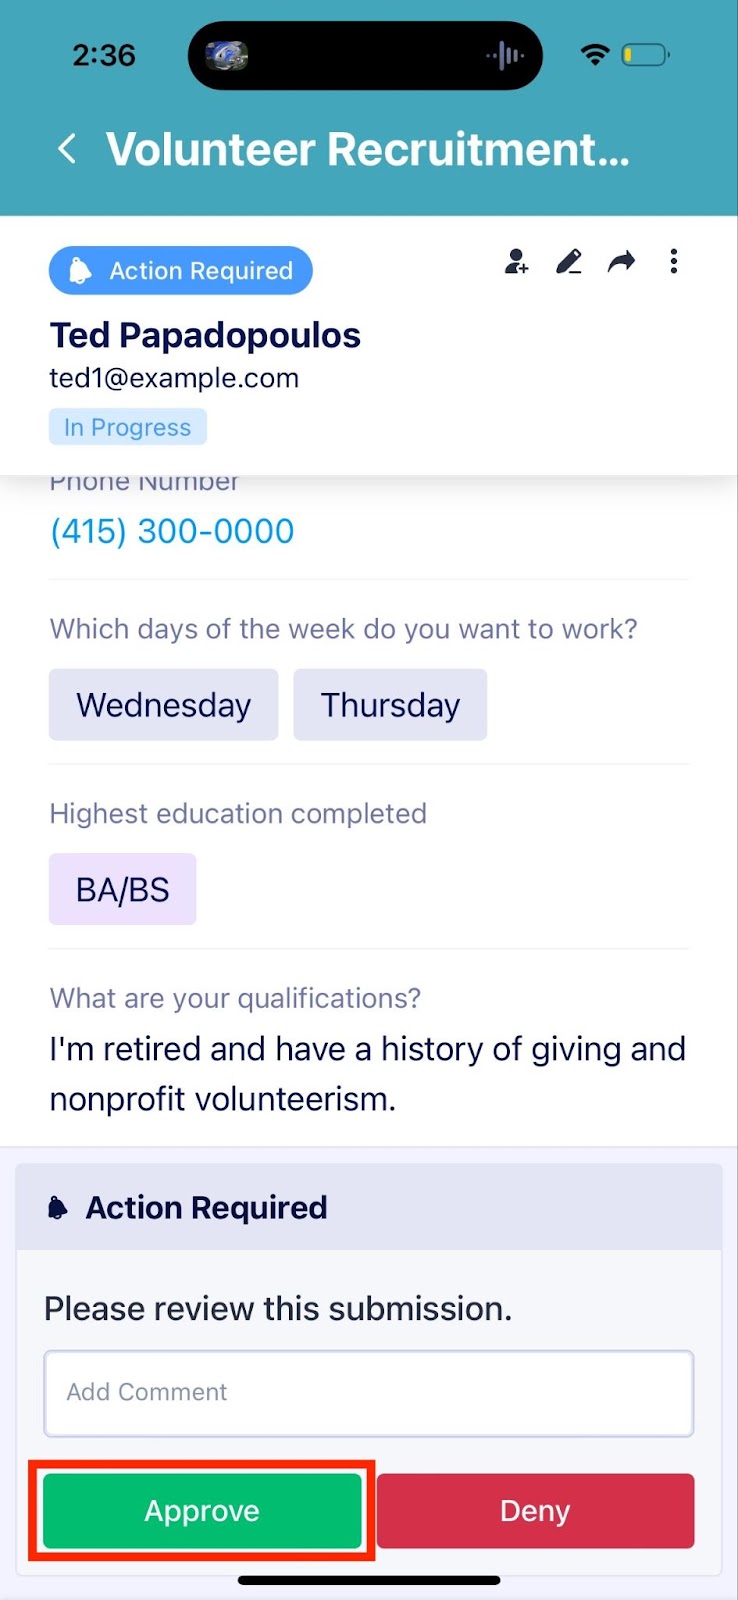
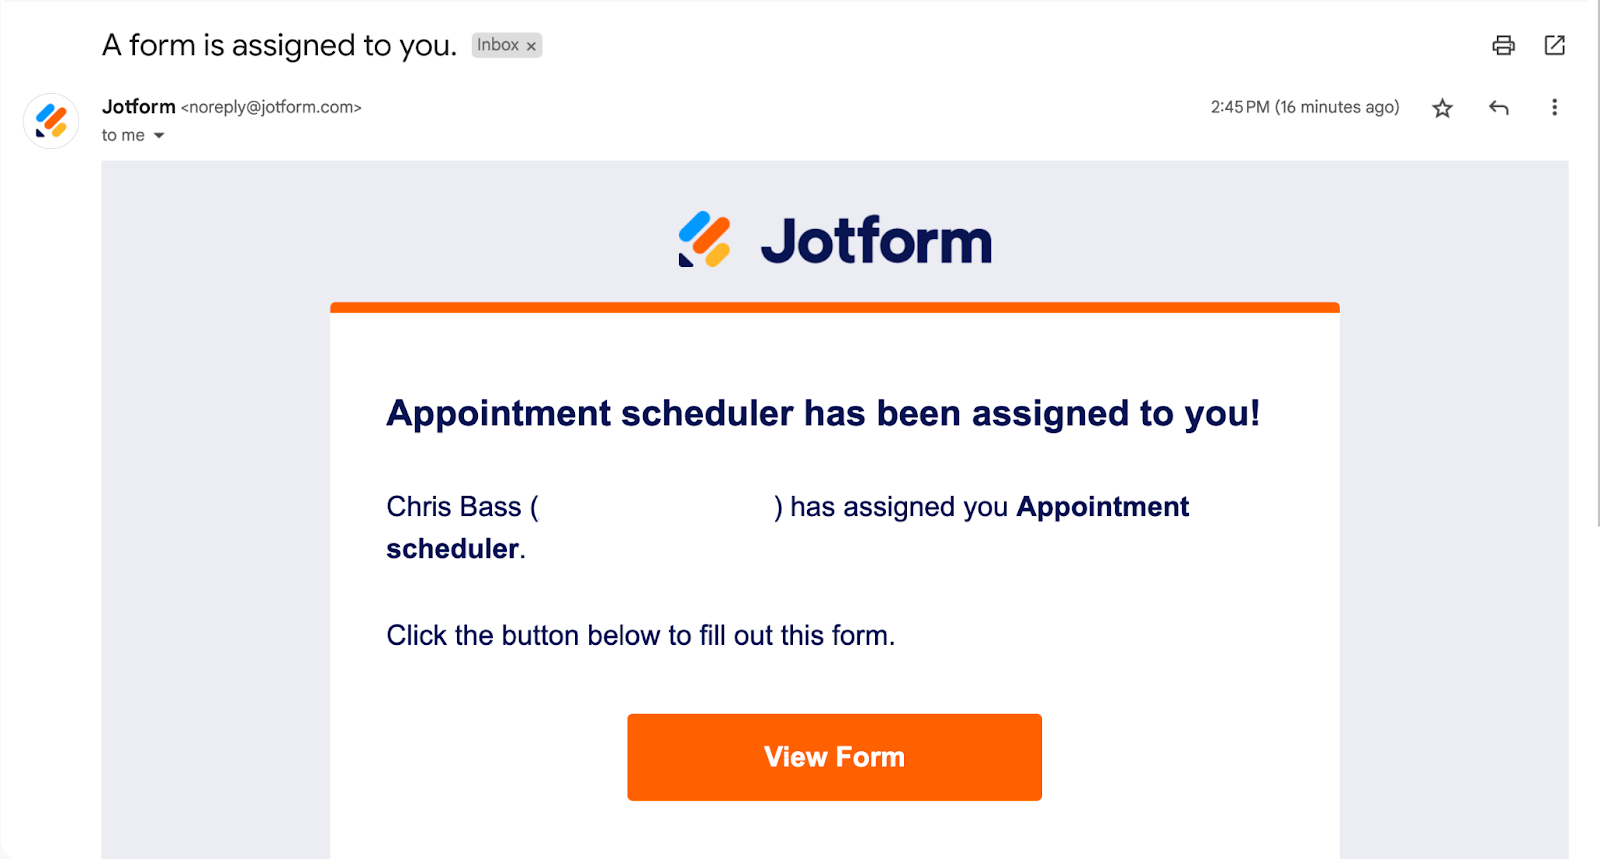
Once I approve the form, the volunteer applicant will get an email to schedule a call.
When the volunteer picks the date and time (and fills out additional info) for a call, an event will automatically be scheduled in my Google Calendar.
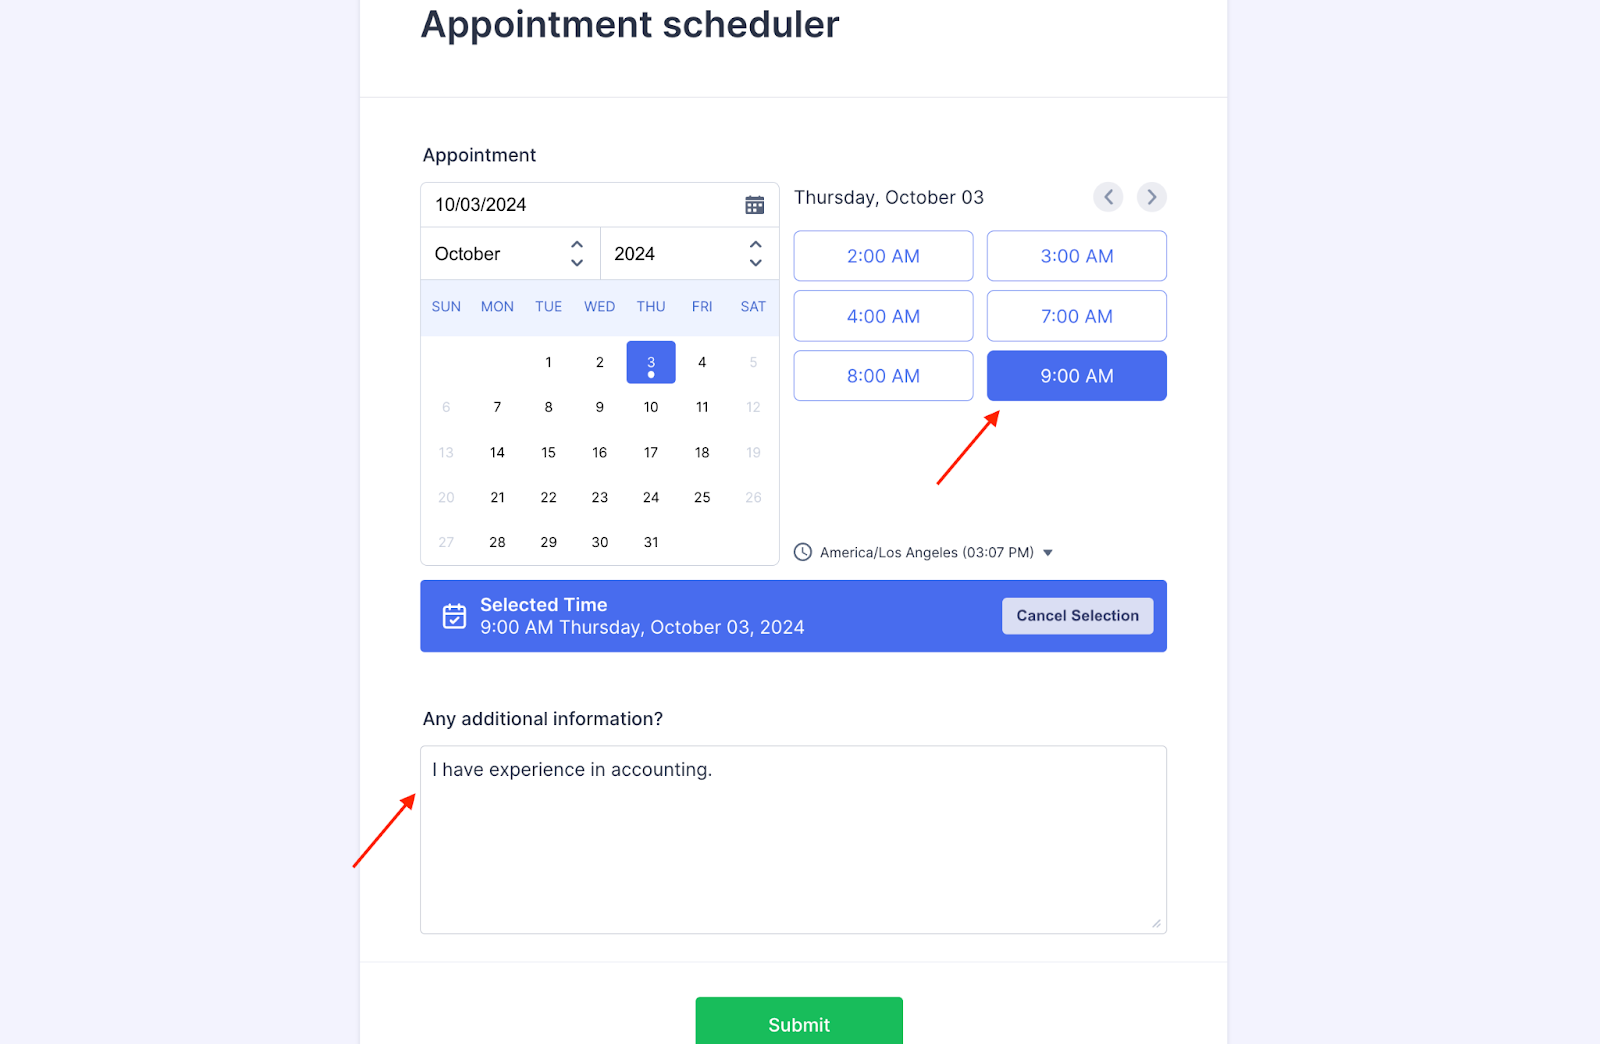

The event has been scheduled on my calendar with the volunteer’s name as the title and the information from the field I selected included.
Need nonprofit workflow templates? We’ve got you covered
With over 20 integrations to choose from (and multiple combinations available), there are limitless workflow configurations you can use, along with your form submissions, to fit your needs.
Pairing integrations and approvals with your form submissions offers you and your end users a better experience and a higher level of efficiency.
Payment feature streamlines clunky workarounds
The new Payment Form element exists mainly because we realized many of you were using follow-up forms as links within Thank You pages or in your workflow to collect money.
Not coincidentally, these follow-up forms were collecting millions of dollars for your organizations, so getting it right meant a lot to us (and to you).
The new Payment Form element lets you easily request payments directly within your workflow, eliminating the need for a workaround.
For example, let’s say we run a tattoo parlor and need our first form to handle a new customer request. If the request is approved, that first form triggers the payment form to collect the required deposit within the tattoo workflow.
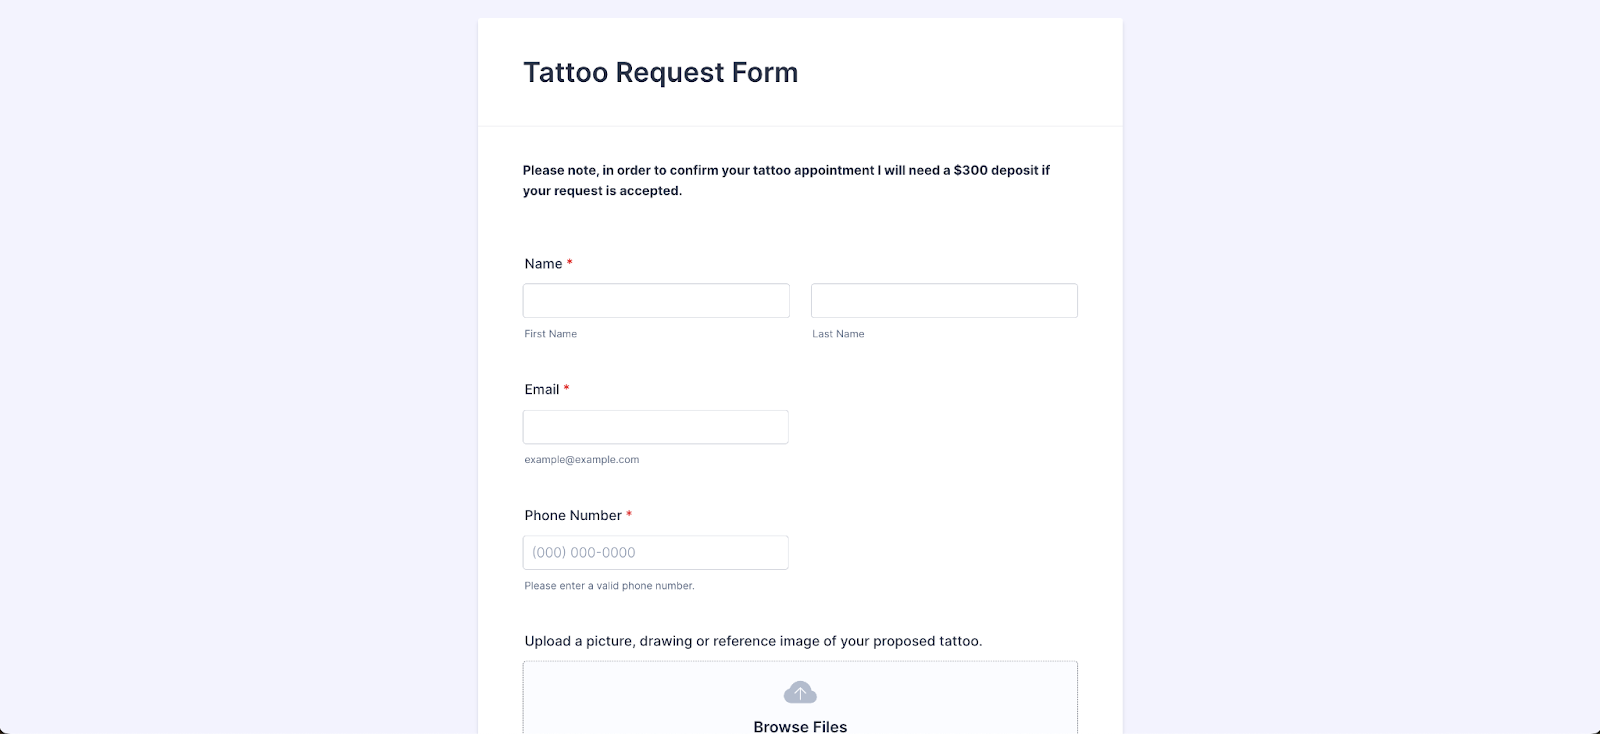
In this scenario, I’ve created two forms: the tattoo request form and the separate deposit (payment) form.
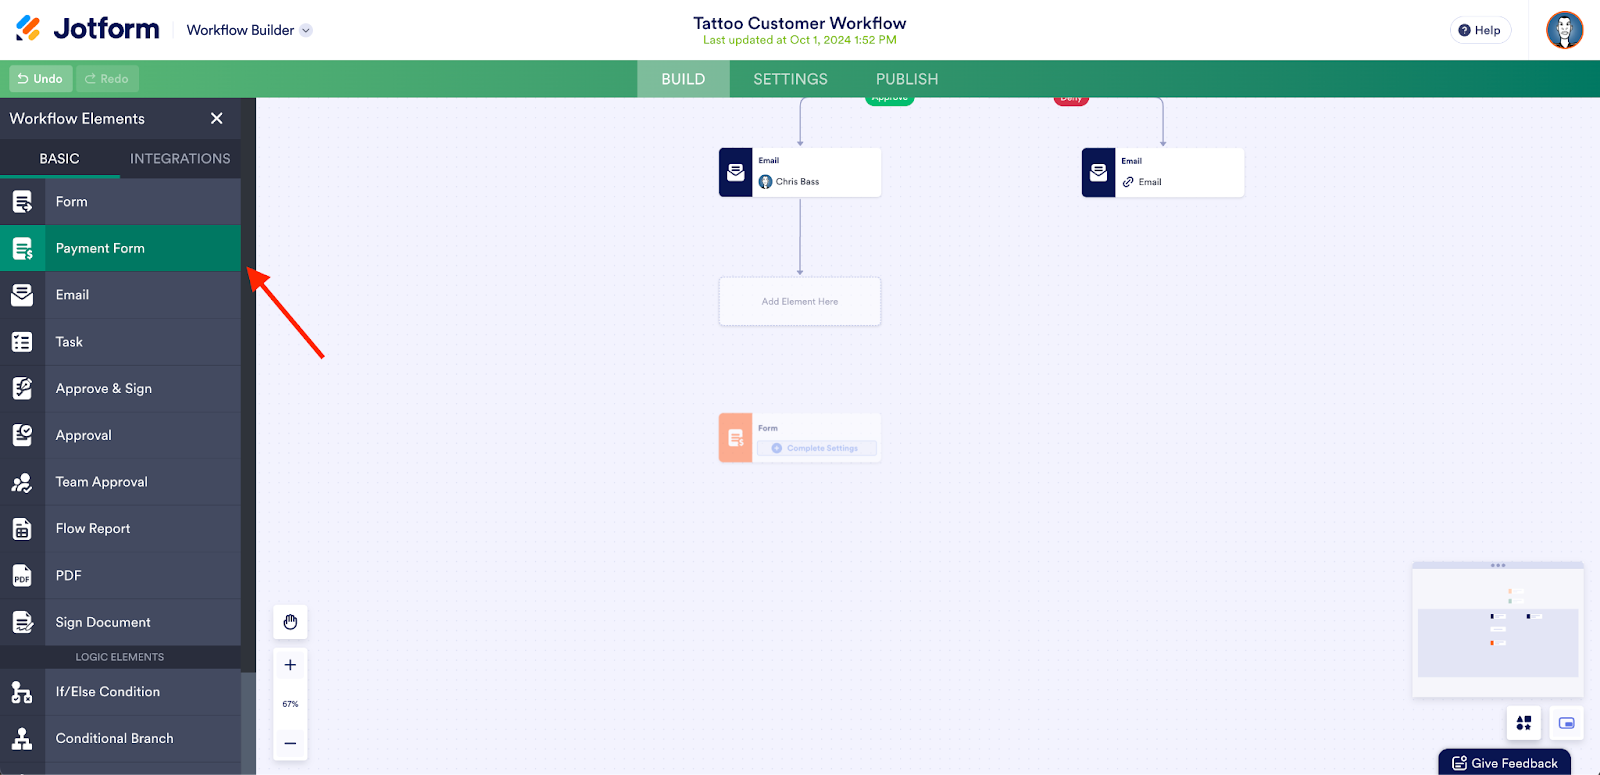
The request form kicks off my workflow. I’ll then select the Payment Form element from the menu and add it to the approved side of the flow.
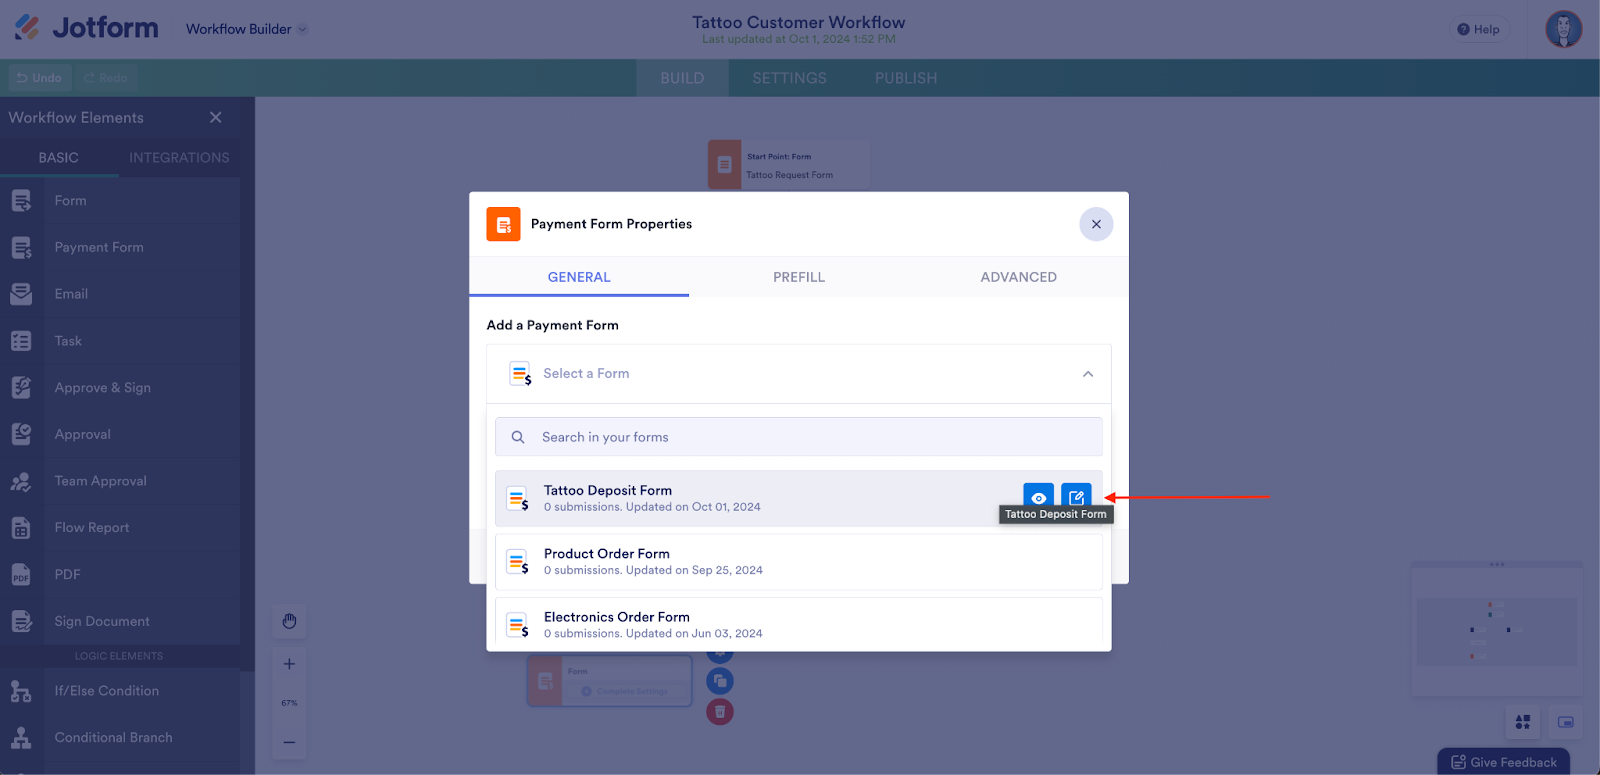
When I format the element, the main option is to add a payment form. The nifty thing is that the Payment Form element only lets you select forms with an active payment field in them.
From this dropdown, I’ll select the simple deposit form I created. The assignee email address will default to the email entered into the previous form.
My completed workflow looks like this.
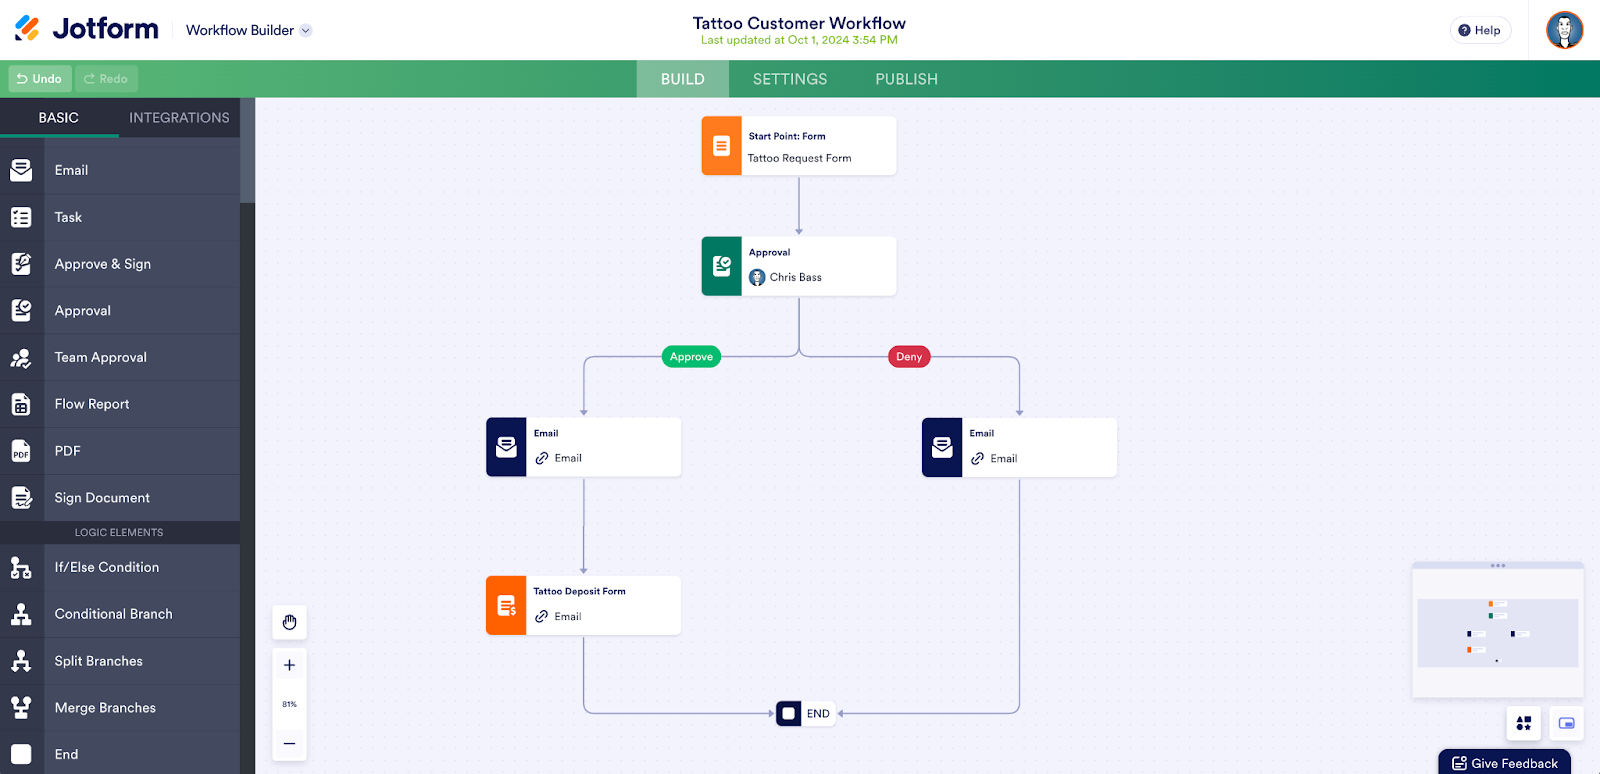
When my tattoo request form is submitted and approved in Jotform Inbox, the customer will automatically receive an email with their deposit form (which, by the way, you can prefill based on their initial form entries).
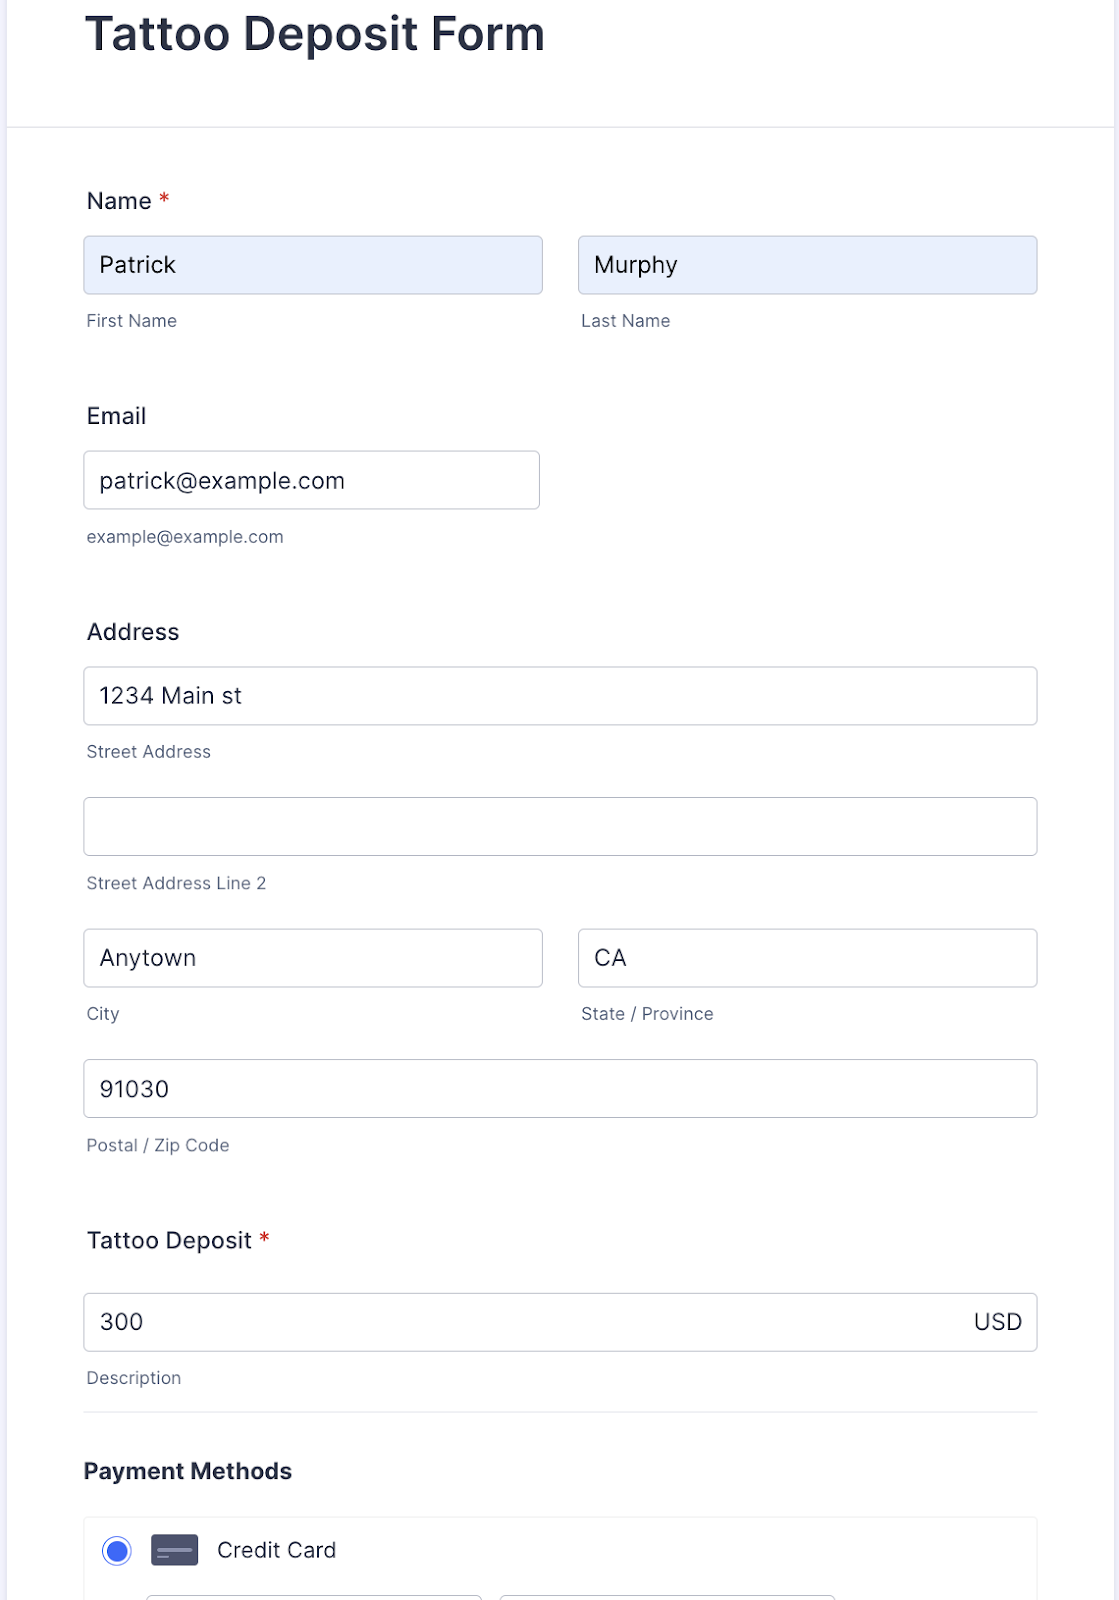
It’s that simple. Your customer enters their payment information, submits the form, and you have a new paid appointment confirmation in Jotform Inbox. Collecting payments within your workflow is a breeze.
*Bonus points if you use Google Calendar or another integration to automate the appointment on your calendar! 😉
Task feature marries technology and people processes
As always, your product questions aren’t just questions. For us, they’re a window into how you need to use Jotform.
We received so many questions asking us to add task-related capabilities to the Approval element that it made sense to create a separate Task element that fits more naturally into your workflow.

With the new Task element, it’s now possible to assign manual tasks as part of your automations, helping you combine technology, people, and business processes in the same workflow.
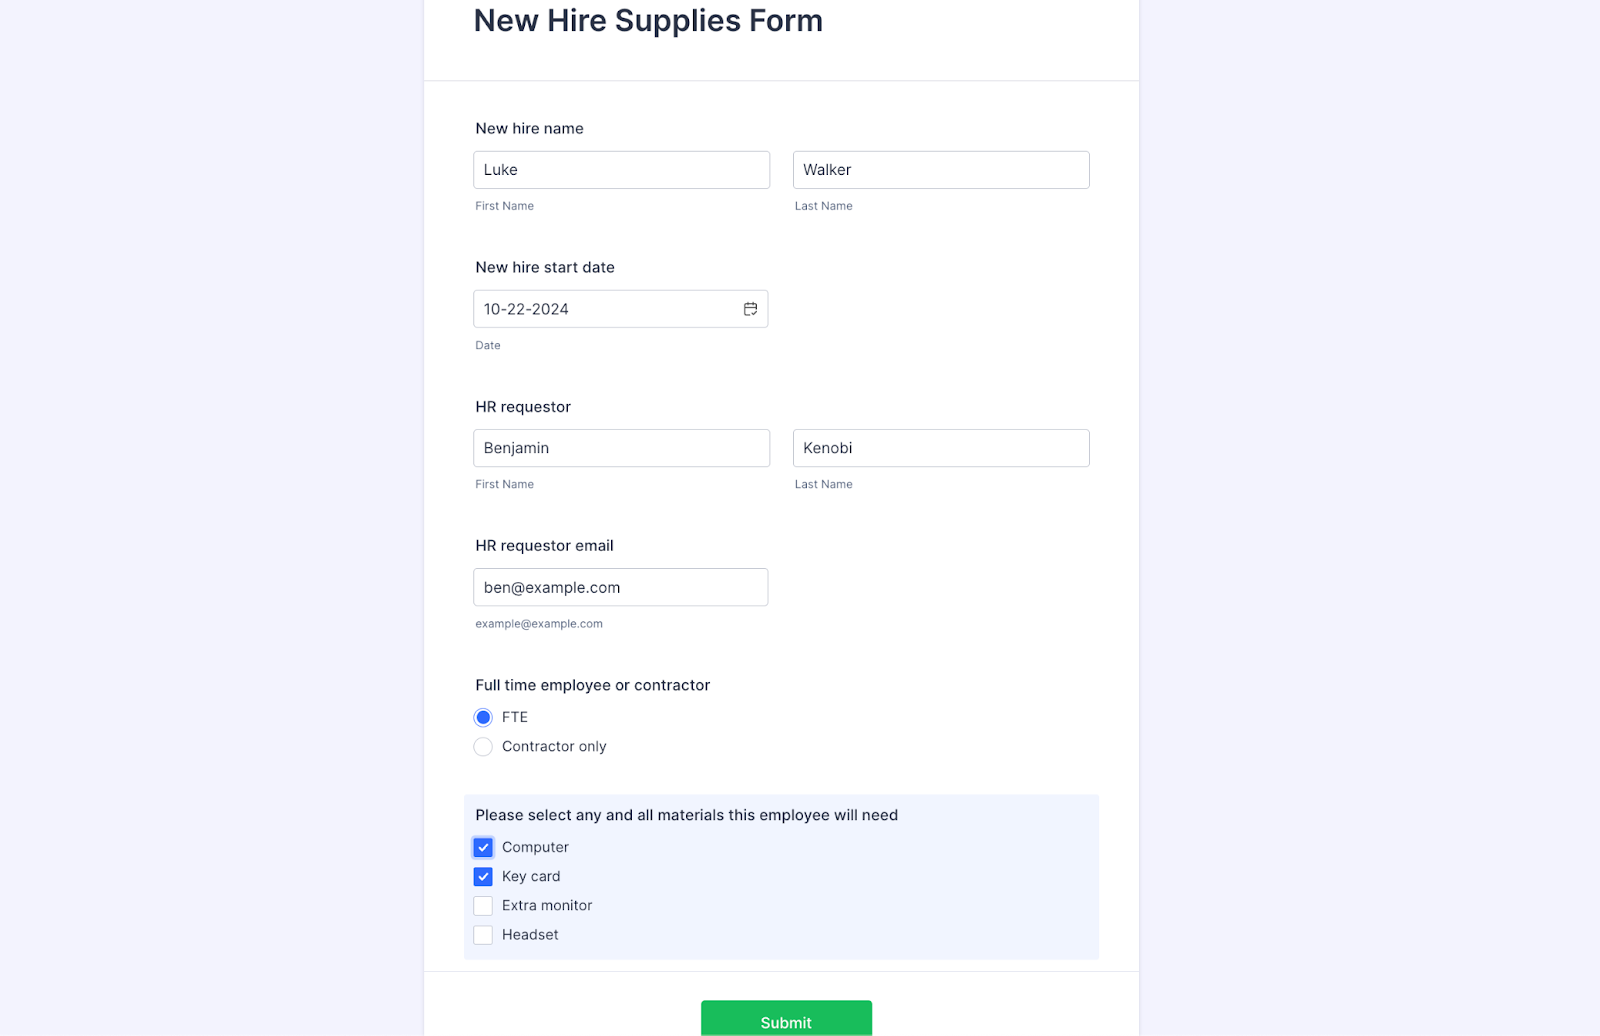
In this example, someone is starting a new job, and the internal HR and IT teams need to work together to issue a computer and key card for the employee.
The New Hire Supplies Form kicks off the process.
In my workflow, I first add my Form and Email elements. Next up is the Task element.

When you click the Complete Settings button on the Task element, you’ll see two tabs (General and Advanced) where you can customize your Task details.
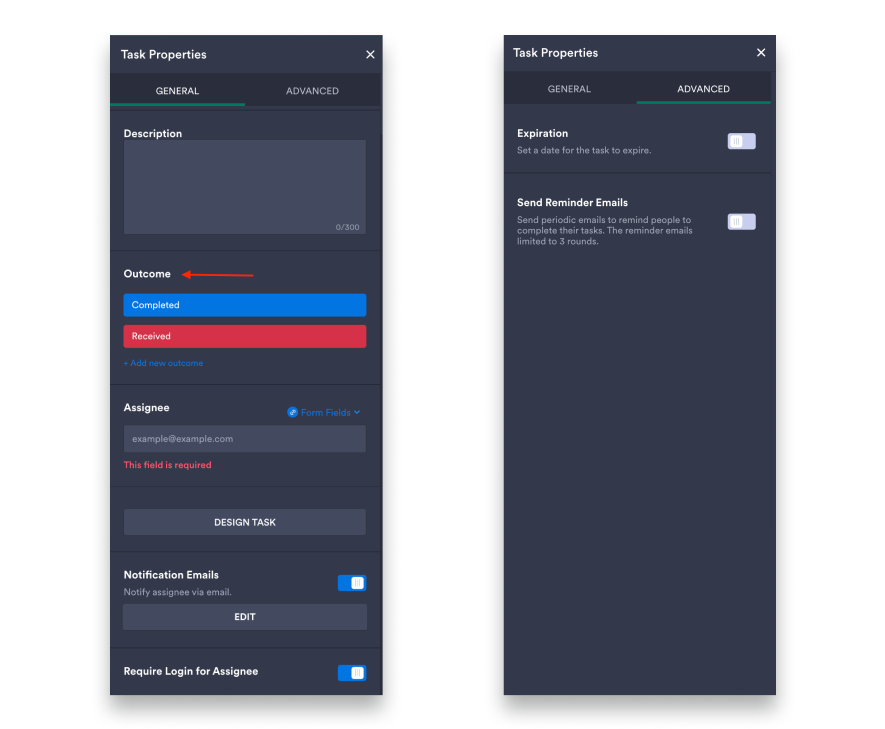
In the General tab, aside from naming and describing your task, you can also create a variety of outcomes. Since my task is pretty straightforward, the two outcomes I’ve made are “received” and “completed.”
Then you’ll assign your task, elect whether to send notification emails (highly recommended!), and, if your assignee is outside of your organization, choose whether to require a Jotform login.
The other cool option in the General tab is the Design Task feature. When you click the button, it will open a user-friendly canvas specifically for your task.
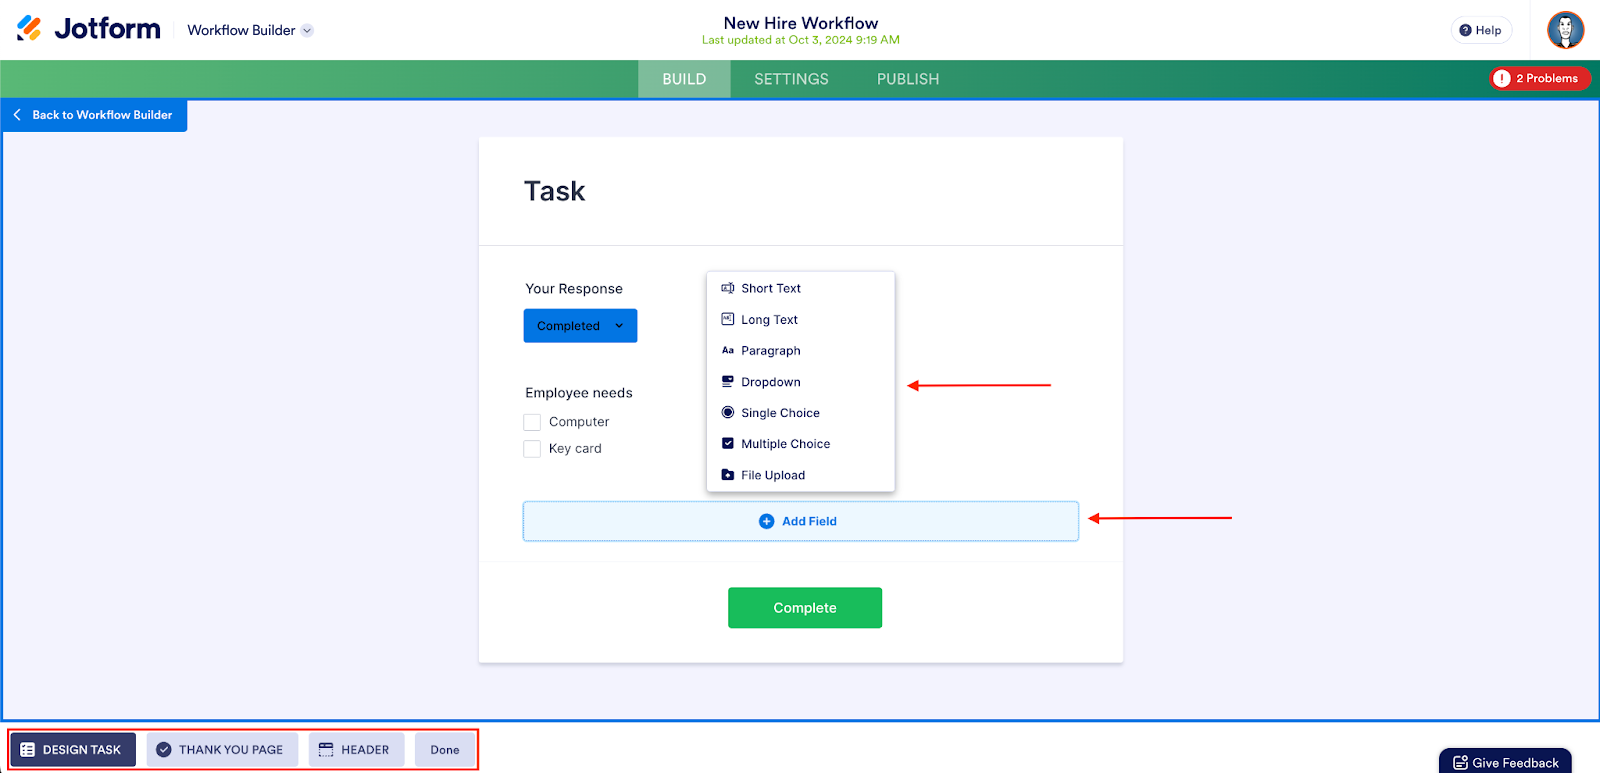
On the canvas, you can customize the task with field types that fit your business needs. For example, you’ll want to add the File Upload field if your task requires a contract, picture, or PDF for verification.
Additionally, you can use the shortcut buttons on the bottom left of the page to further customize your task-related interfaces.
When you’re done setting up your task, click the Back to Workflow Builder button in the top left.
The Advanced tab of the Task Properties enables you to set an expiration date and automate periodic reminders for the assignee to complete the task.
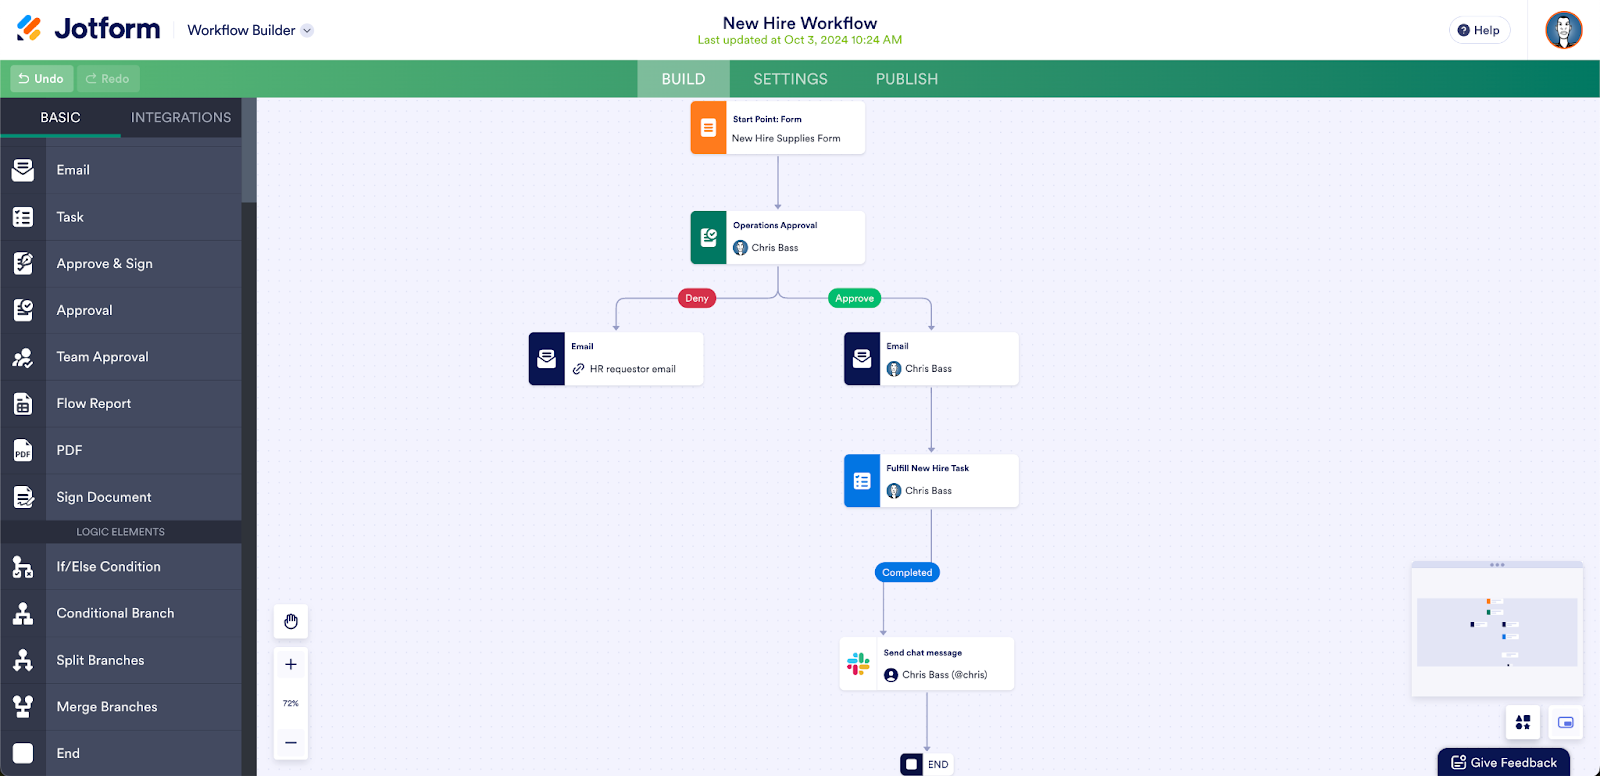
Now that my task element is set, I’ll finish my workflow by adding a Slack integration element.
This way, an automated message will go to HR, giving them a heads-up that when the task is completed, the computer and key card will be ready to pick up.
When someone from HR submits my form and it’s approved, the relevant stakeholder is assigned the task via their email.
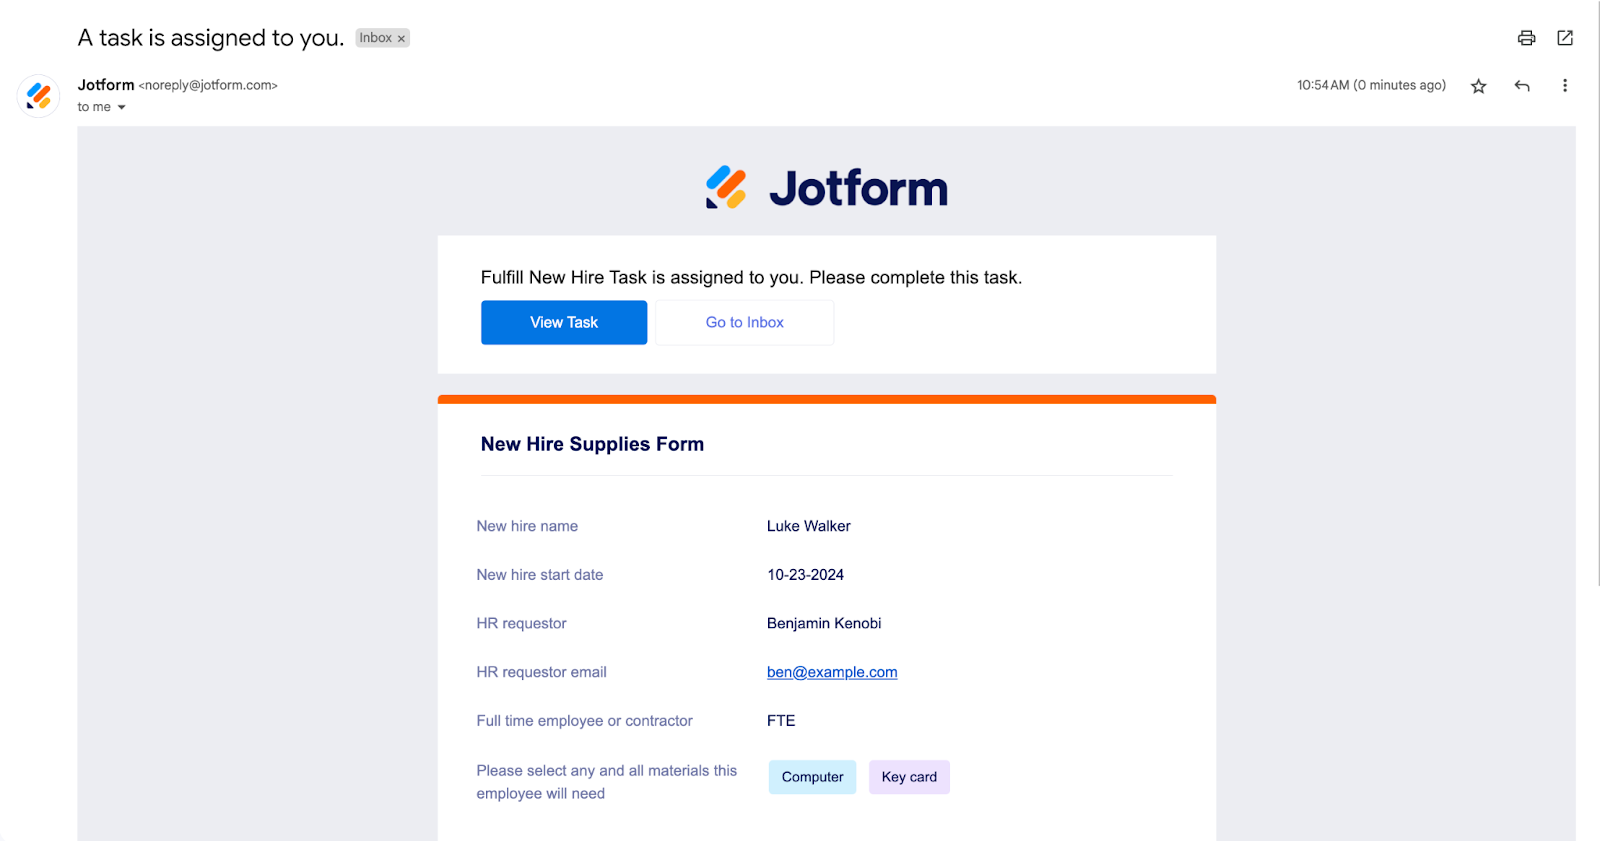
Upon viewing the task, they see the details and can click Complete when done.

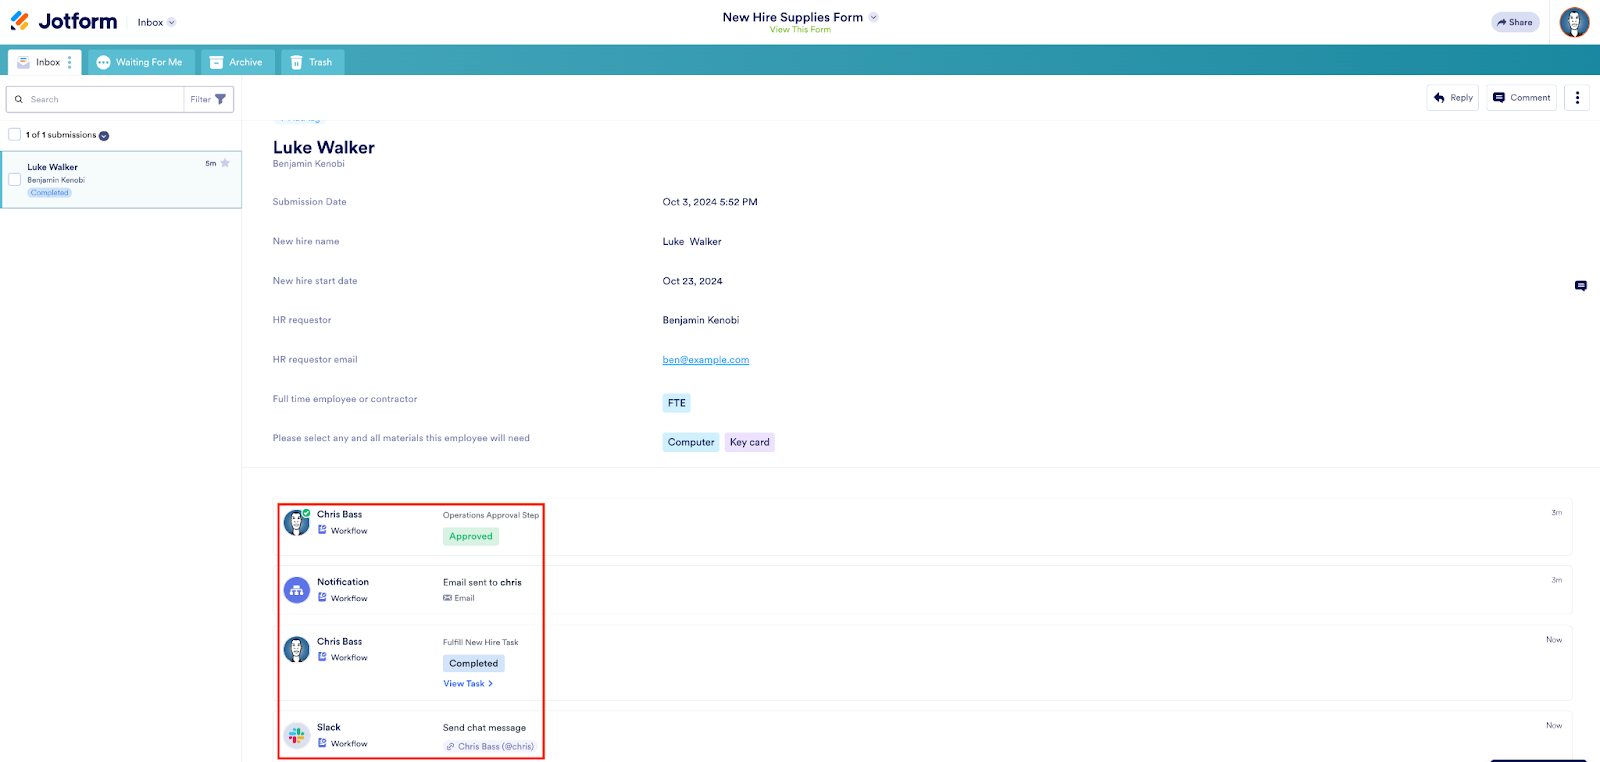
Based on my workflow, this automatically triggers the Slack notification to HR that the Luke Walker request has been fulfilled.

Finally, as the workflow owner, I can follow and view the progress of my flow within Jotform Inbox.
Combining task management with the existing tools in Workflows not only helps you automate follow-up actions based on form responses, it enhances your overall productivity.
Did you know?
The most popular form to kick off a workflow is a registration form. Often a patient, customer, sporting event, or volunteer registration begins a workflow that requires approvals, follow-up payments, signatures, and tasks.
White labeling your tasks
One way we’re making it easier for businesses and brands to customize their workflows is by enabling them to white label assigned tasks.
Workflow owners can use the Header shortcut button (in the Design Task canvas) to customize task, action, and decision pages, creating a more professional experience and building customer trust along the way. Learn about this option with Jotform Enterprise.
Versatile Jotform Workflows use cases
If you’re new to workflow management solutions (or so buried under paperwork you find it hard to breathe), you may be wondering who typically benefits from form-based workflow solution software.
The short answer is almost everyone, but here’s a quick primer!
| Who uses form-based workflow management software? | ||
|---|---|---|
| Profession | Reason for use | Automation needs |
| Human resources | Job applications, employee onboarding & training, leave requests, salary bumps | Approvals, e-signatures, notifications, task management, PDFs, CRM integrations |
| Sales teams | Lead notification, management and ownership, contract management | CRM and communication integrations, e-signatures, notifications |
| Nonprofit & education | Scholarships, grants, proposals, volunteering | Approvals, CRM integrations, task management, donations |
| Food service | Order forms and vendor management | Notifications, payments, task management |
| Information technology (IT) | Employee resources, system upgrades, ticket tracking | Approvals, notifications, project management integrations, task management |
| SMBs & entrepreneurs | Lead notification and management, order forms, vendor management | Approvals, CRM, storage and communication integrations, e-signatures, notifications, payments, task management, PDFs |
| Procurement | Vendor and contract management and purchases | Approvals, e-signatures, notifications, PDFs, workflow reports |
| Finance & operations | Expense reimbursement, budget approvals, system requisitions | Approvals, e-signatures, notifications, workflow reports, task management, project management integrations |
A word about data security
If you’re wondering about security, know that your data and workflows are well protected with two-factor authentication; password protection; data encryption; GDPR, CCPA, and FERPA compliance; optional HIPAA features (for healthcare workflows); PCI certification; and secure payment processing. Learn more about how Jotform handles security.
Conclusion
Jotform Workflows combines approval, integration, conditional logic, payment, e-signature, and task management features to simplify your form-based processes and make your life easier.
If you work in the human resources, sales, nonprofit, operations, food service, IT, or event management fields, you probably often face business process bottlenecks at work, such as
- The inefficiency of managing and collaborating on data
- The inability to have workflow outcomes trigger the next steps in a project
- The failure to automate online payments
Solving these problems is why most workflow software exists. But Jotform Workflows is taking accessibility to the next level.
We’re solving these common issues within an easy, no-code, drag-and-drop solution, and offering it for free, saving you some serious cash on an advanced workflow management solution 🤑.
You can enjoy almost all of the features in Jotform Workflows without upgrading to a paid plan; however, white labeling customization is available for Enterprise customers only.
With Jotform Workflows, you’ll benefit from
- Streamlined automation and complex workflow management
- Seamless third-party app integrations that eliminate the need to switch between tools
- A unified process solution that covers forms, tasks, and payments
- Increased efficiency as a result of less time spent on repetitive tasks
- Full customization so you can tailor workflows to your needs
Ready to create your workflow? Here are a few new and customizable workflow templates to help set you up for success. Feel free to explore our library. There are over 200 templates in all!
- Employee Promotion Request Workflow Template
- Expense Report Workflow Template
- Purchase order approval workflow
- Product Return Process Workflow Template
- Lead Nurturing Workflow Template
- Event Marketing Workflow Template
- Vendor Management Workflow Template
- IT Service Request Approval Workflow Template
- Project Proposal Workflow Template
- Hiring Workflow Template
- Project Proposal Workflow Template
Also, to learn more about the new and enhanced Jotform Workflows, we’ve got a slew of online help guides to help you get started. Here are just a few
- How to Edit Your Existing Workflows
- How to Add an Integration to Workflows
- How to Add a Payment Element to Jotform Workflows
- How to Create a Task in Jotform Workflows
- How Do You Disable an Approval Workflow?
- How to Track an Approval Workflow in the Jotform Mobile App
We hope you’re as excited as we are about the new Jotform Workflows. Feel free to let us know what you think either by leaving a comment here or via the feedback button in the Workflow (or Form) Builder. 👋


Send Comment: