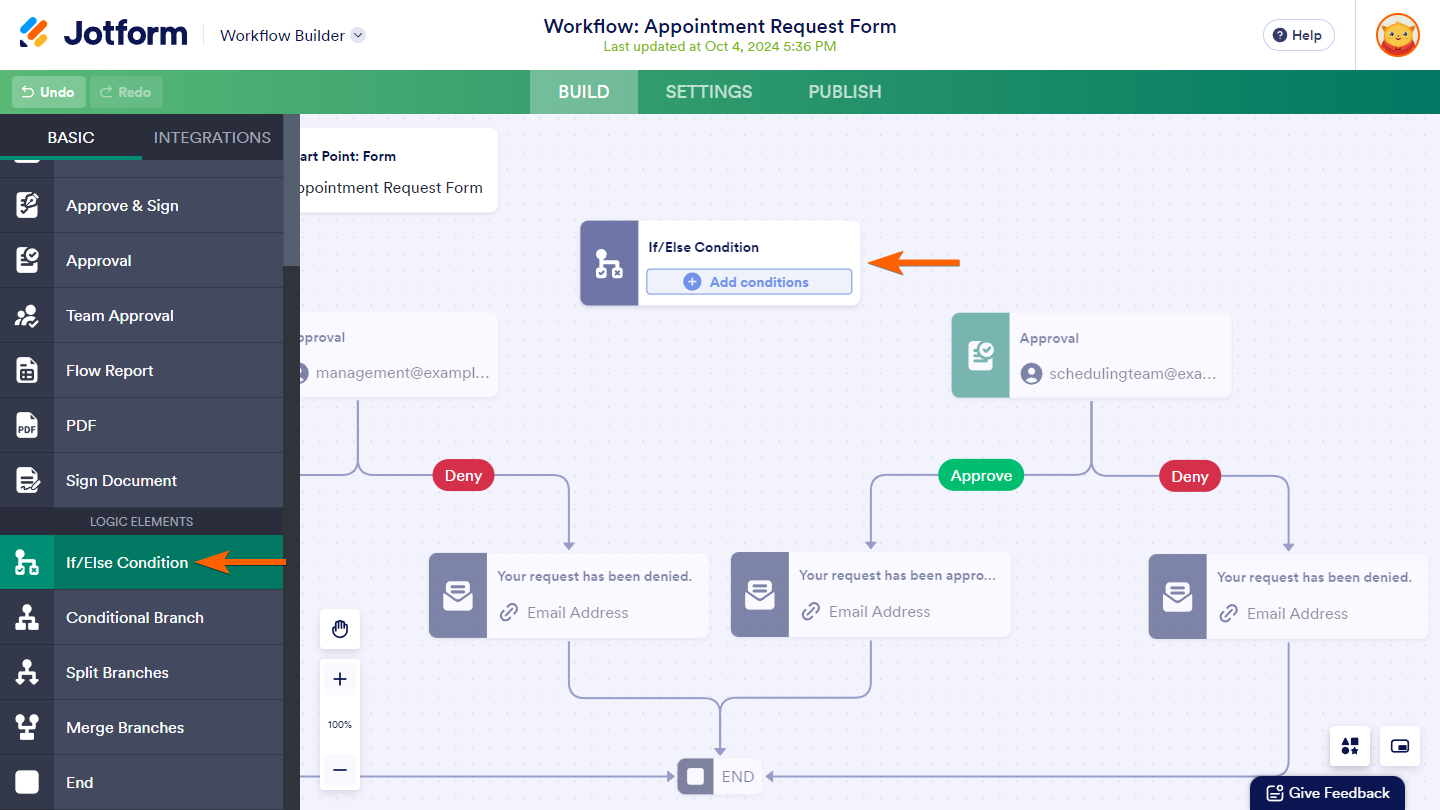
In Jotform Workflows, the If/Else Condition element allows you to set up logical decisions based on form answers, helping automate the workflow’s next steps. This element executes the next step in the workflow by determining whether the condition is true or false. If the condition is true, the workflow proceeds in one direction; if false, it takes an alternate path. For example, when processing requests for approval, the workflow can determine if additional approval is needed based on the information submitted, such as the type or amount of the request. In an appointment request workflow, the condition might evaluate the requested date or time, checking if it fits specific criteria before approving or sending it for review. These flexible conditions help guide requests along different paths, ensuring that the right actions are taken automatically based on the submission details.
Adding the If/Else Condition Element
To begin using the If/Else Condition element in your workflow, follow these simple steps:
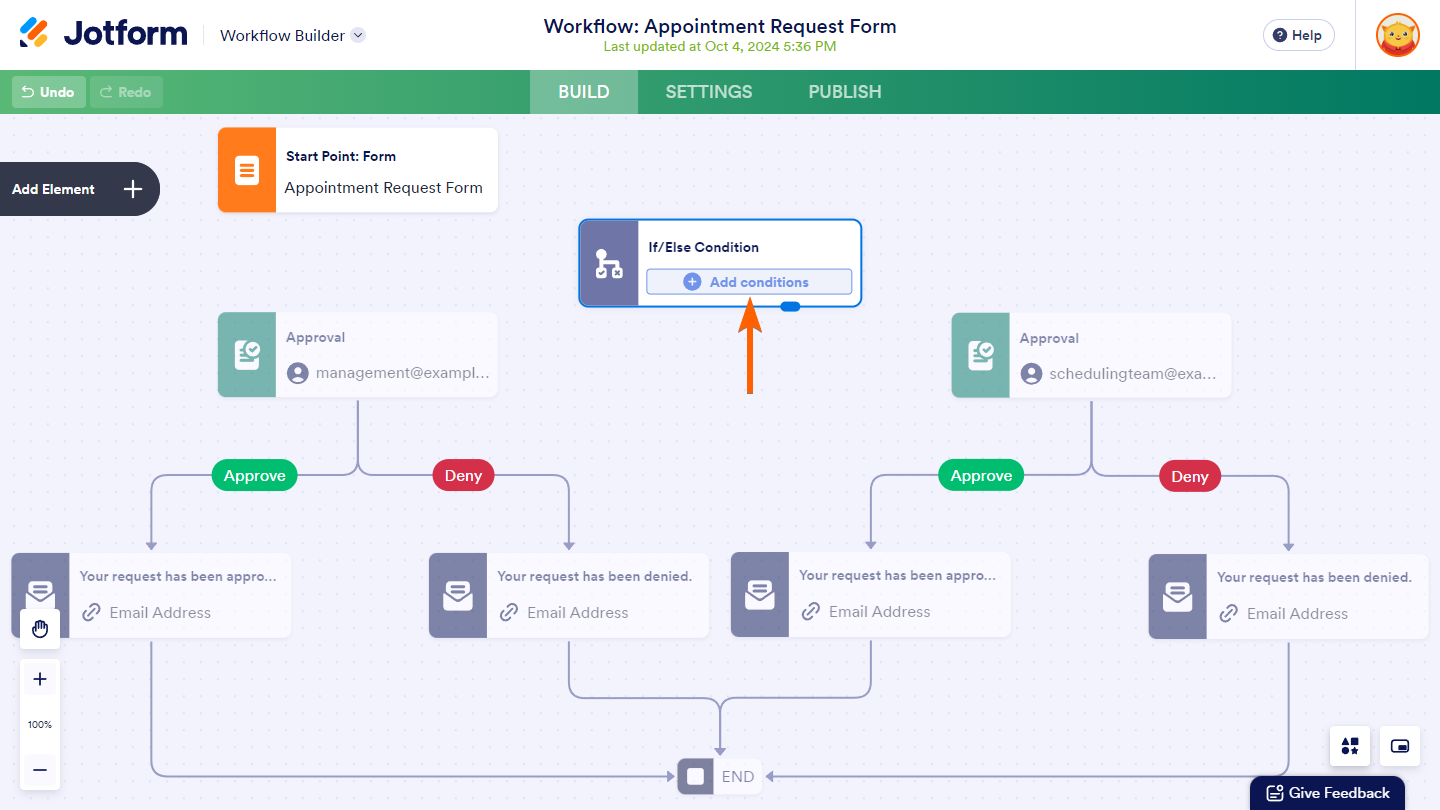
- In Workflow Builder, click on Add Elements on the left side of the screen to open the Workflow Elements menu.
- Under Logic Elements of the Basic tab, drag and drop or click on the If/Else Condition element to add it to your workflow.
Setting Up the If/Else Condition Element
Similar to setting up logical conditions for creating smart online forms, you can easily apply the same approach when configuring the If/Else Condition element in your workflow. One thing to remember is that its outcome will always be either true or false—true if the conditions are met and false if they aren’t.
Adding Conditions
To set up the If/Else Condition element, you need to define the criteria that will determine whether it is true or false by adding a specific condition that must be met for the workflow to proceed in a particular path. Here’s how to do that:
- In Workflow Builder, click on the Add conditions button on the If/Else Condition element.
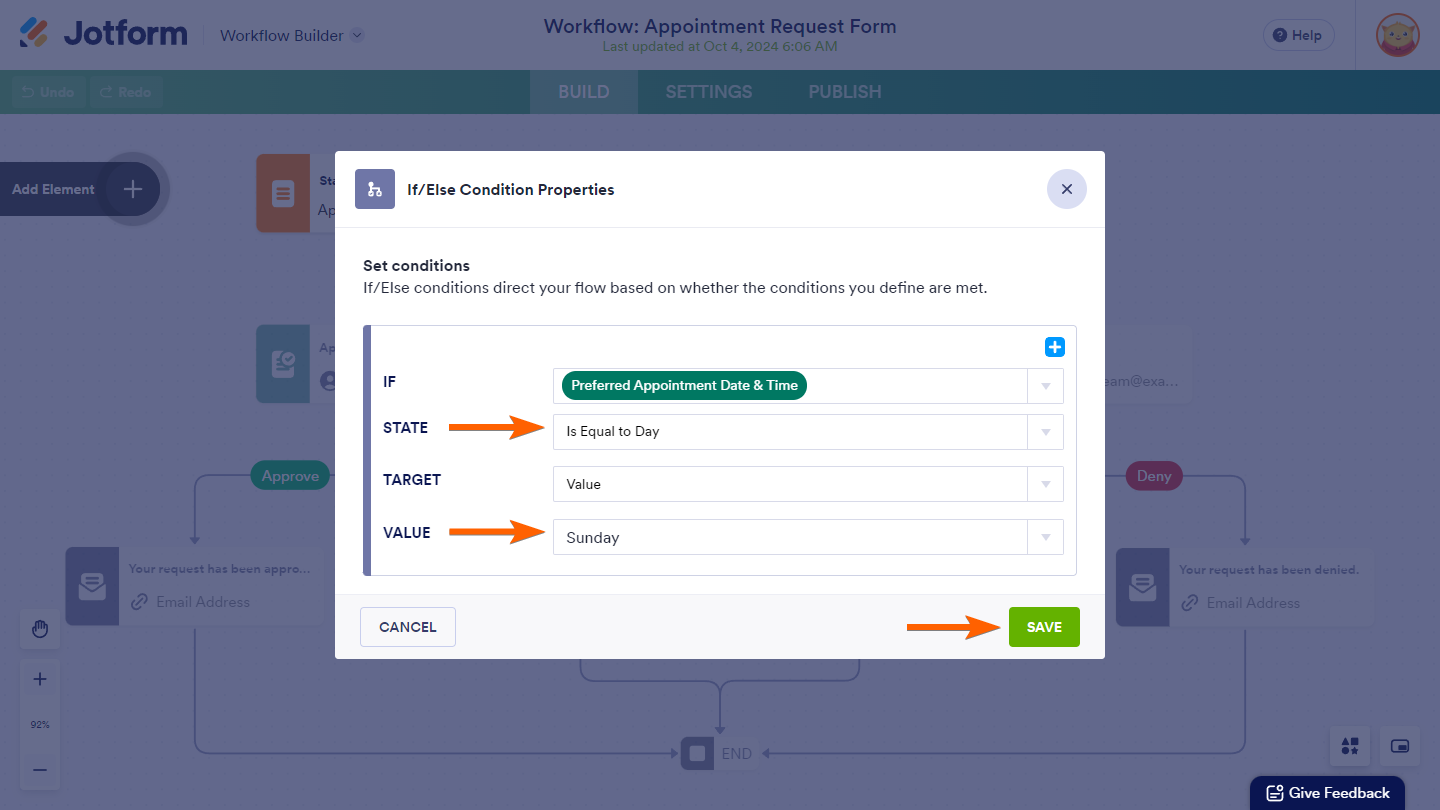
- In the If/Else Condition Properties window, select a field from a form included in your workflow.
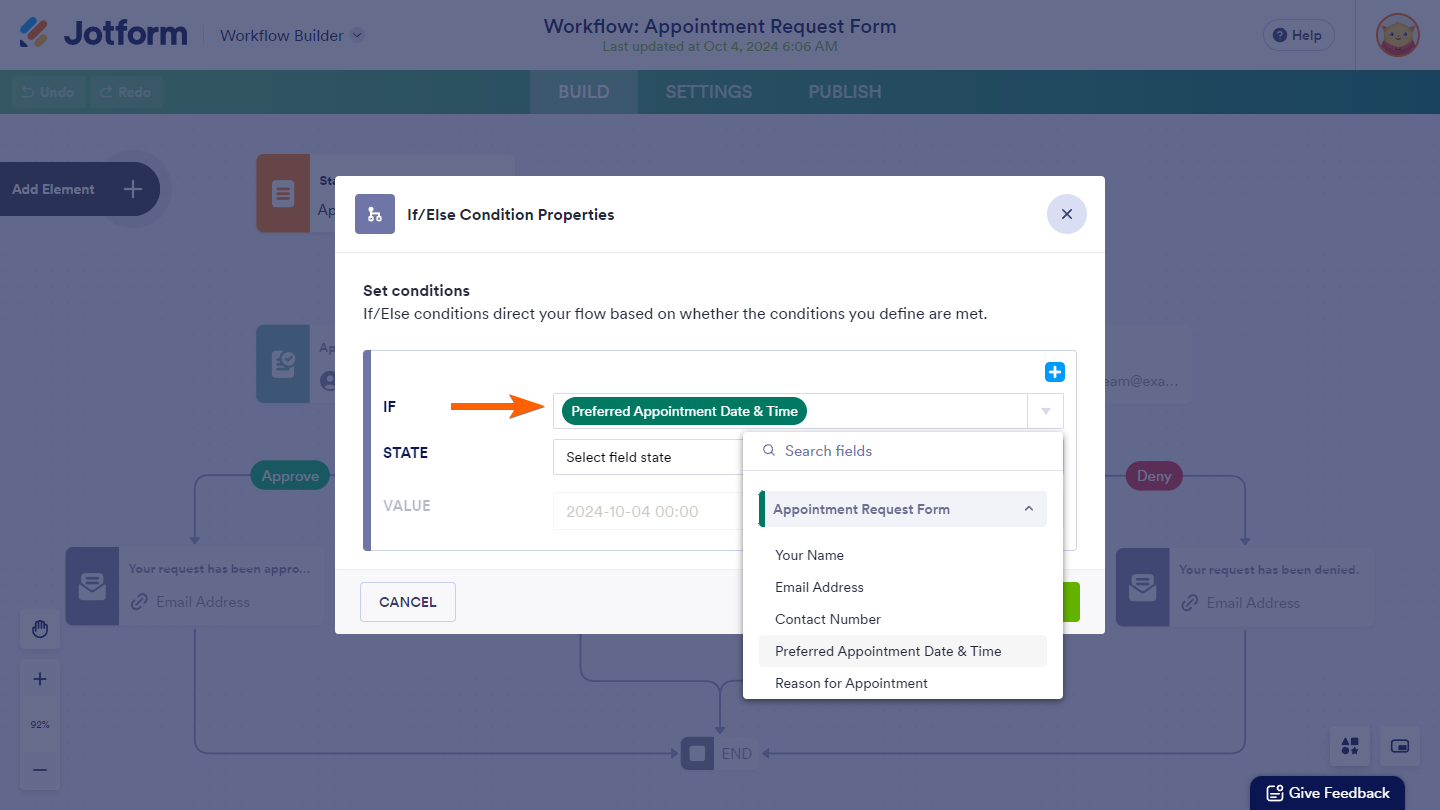
- Next, specify the status you want the condition to check for on that field.
- Then, enter or select the value or another field in your form depending on what your selected status requires.
- Once done, click on the Save button.
Defining Multiple Conditions
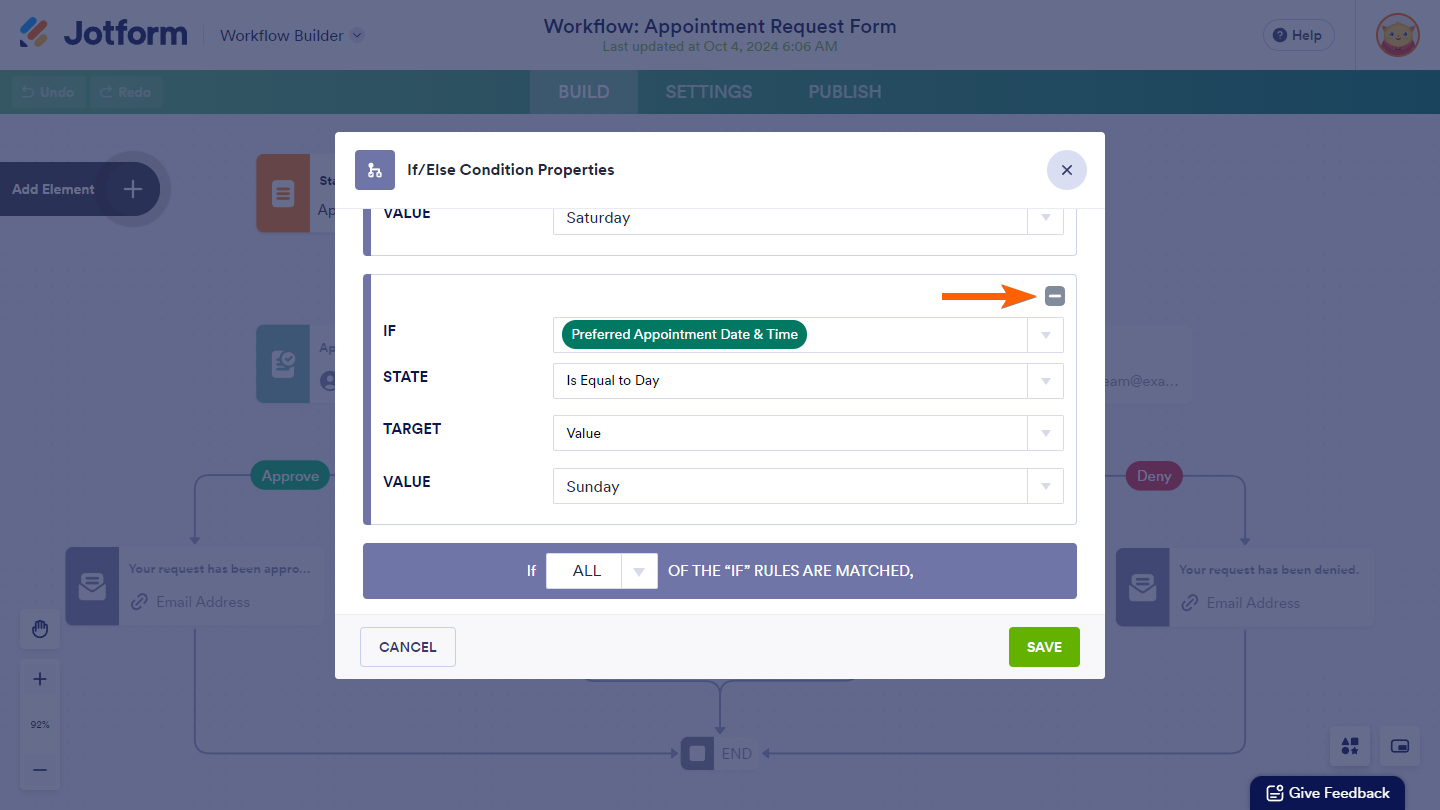
To add multiple conditions for the If/Else Condition element and make your workflow more dynamic, click on the Plus icon on the topmost condition in the If/Else Condition Properties window. This allows you to define additional criteria that must be met for the workflow to follow a particular path.
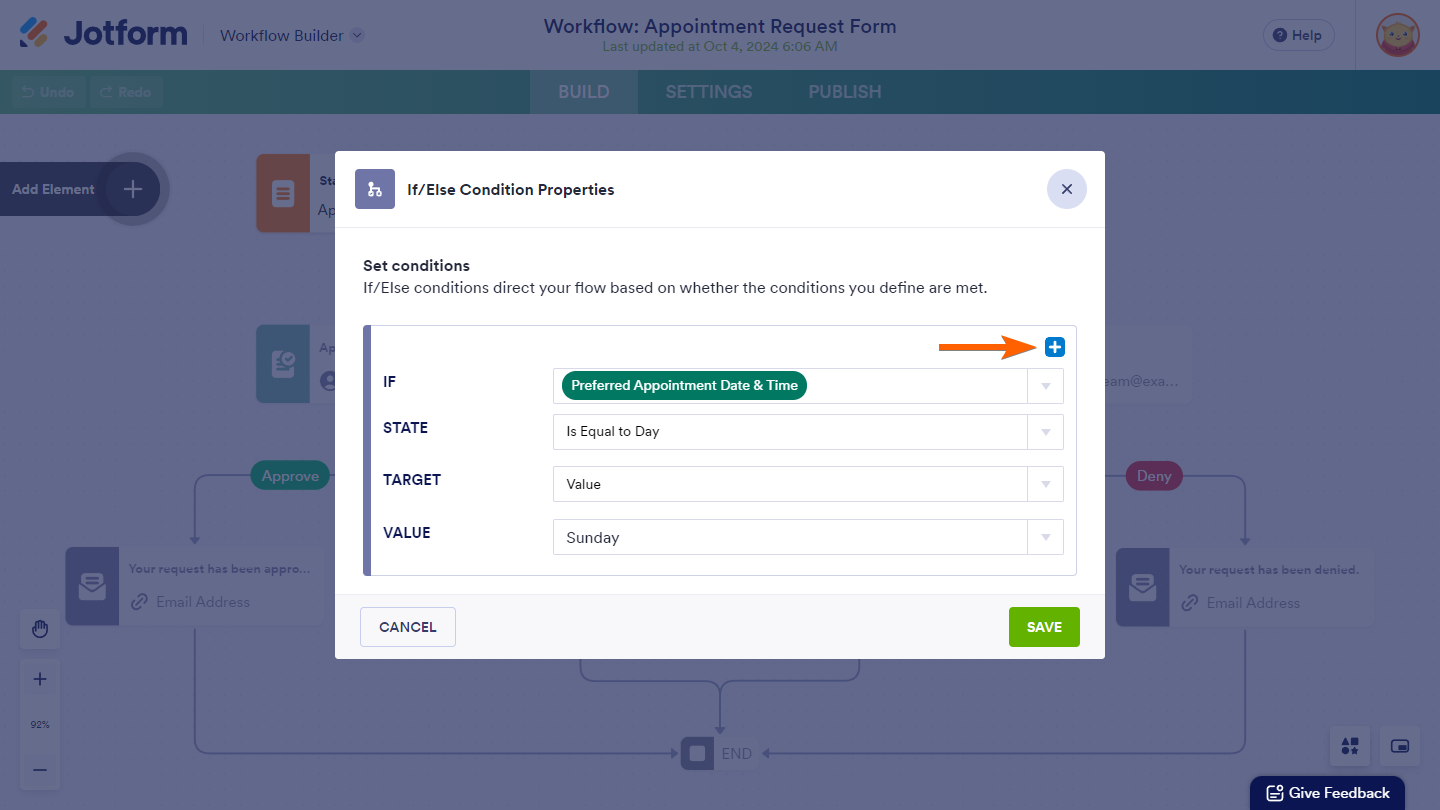
Then, at the bottom of the window, choose ANY from the dropdown if you want the condition to be true when at least one condition is met. Select ALL if you want the condition to be true only when all conditions are met.

Removing Conditions
If certain conditions are no longer relevant, you can remove them by clicking the Minus icon, which appears on each condition when there is more than one in the If/Else Condition Properties window. This helps keep your workflow clean and aligned with current needs.
Notes
The changes you made on the If/Else Condition element are not automatically saved. You must click on the Save button every time to apply your changes.
Renaming the Element
To keep your workflow organized, rename the If/Else Condition element by double-clicking its name and typing a new one. This makes it easier to identify its purpose and trace different paths in the workflow later if needed.
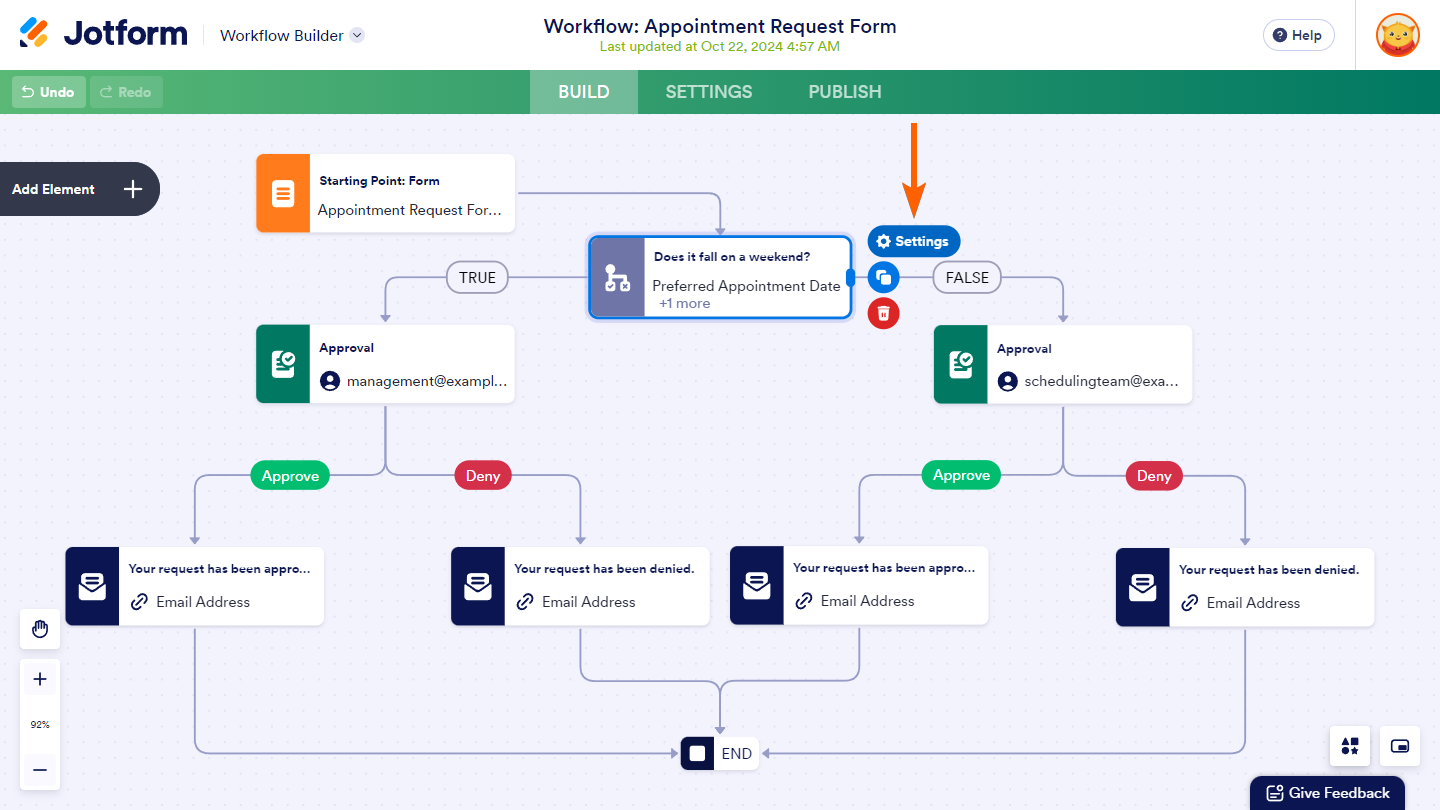
Connecting If/Else Condition Element
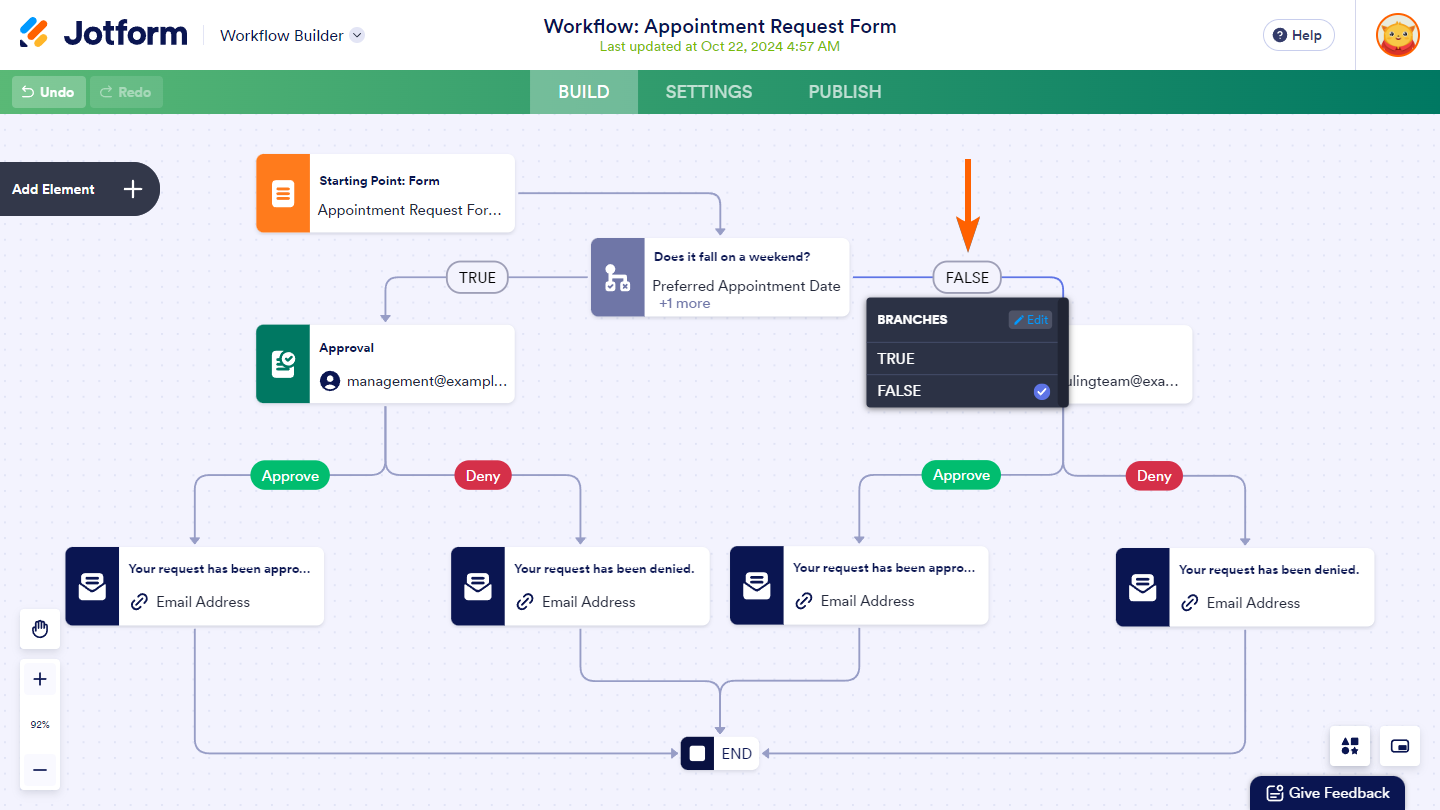
You can draw a flow line to and from the If/Else Condition element to connect it with other elements. To learn more, refer to How to Add and Connect Elements in Jotform Workflows. Once connected, click on Select Branch and choose either True or False from the Branches menu.
Updating Conditions and Branches
As your workflow evolves, you may need to modify the existing rules to better suit its needs, such as adjusting conditions or adding new criteria to refine how true or false outcomes are determined. To update the conditions, you can click on the Gear icon on the right of the If/Else Condition element to open the If/Else Condition Properties window.
You can modify your selected branches by clicking on them to reopen the Branches menu and choose between True or False again. This flexibility helps you keep your workflow aligned with your current criteria and logic.
Pro Tip
Double-clicking the condition on your If/Else Condition element or clicking the Edit button in the Branches menu also allows you to open the If/Else Condition Properties window.
Deleting If/Else Condition Element
To delete the If/Else Condition element, click on the Trash icon on its right.
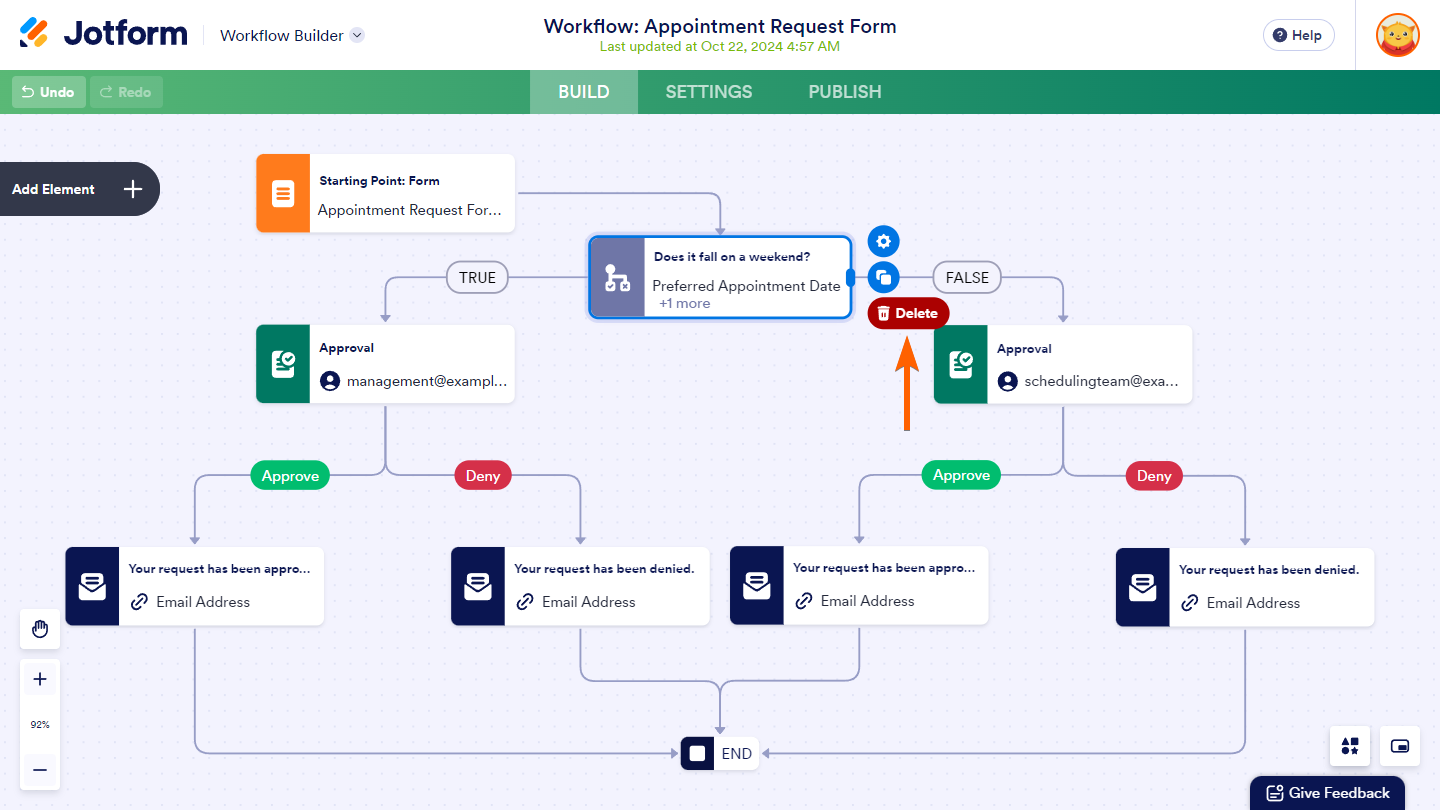
Then, click on the Confirm button in the confirmation window to proceed.
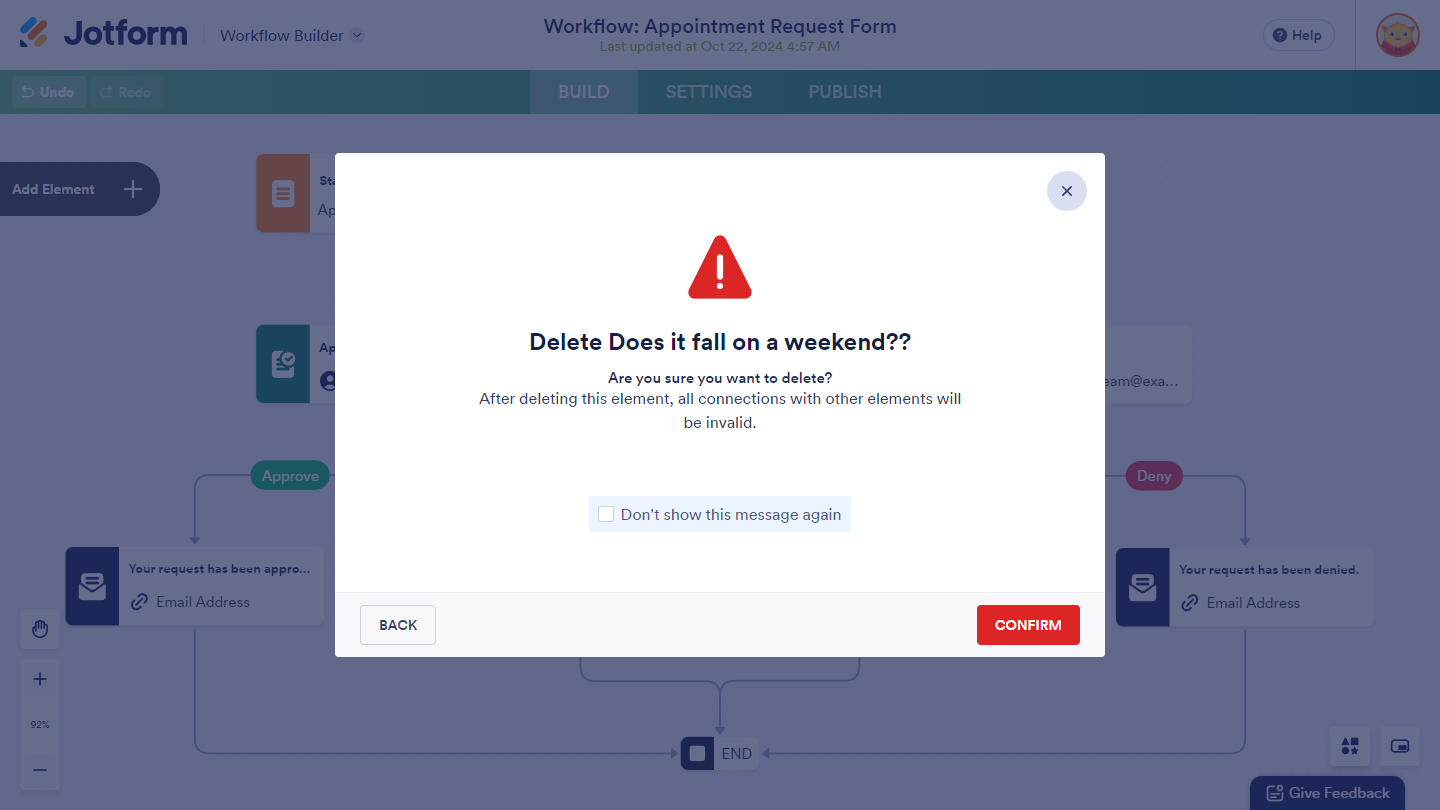
This lets you keep your workflow organized by removing outdated conditions. Once you remove the element, you can follow the same steps to add a new If/Else Condition element to your workflow.
Pro Tip
To delete all conditions within the If/Else Condition element, you need to start over with the element, as you cannot delete the last condition. The element must have at least one condition to be saved.

Send Comment:
5 Comments:
154 days ago
Bonjour,
J'aimerais que le mail s’envoie si la date indiqué dans le formulaire correspond a la date du jour. Comment faire ?
More than a year ago
I've messed something up and I was only being given the option to Deny on requests I wanted to approve. I think I deleted an "end" statement. So I put one in at the end of each item...but still not working. Your help would be so appreciated...it's our busy season for sign ups:)
More than a year ago
I have the same If/else condition set up with an "approval" right after the true outcome, yet I am not getting an approval email following the if/else step. Please help, I've tried everything!
More than a year ago
Is it possible to have an appointment automatically deleted from the google calendar integration if a submission is denied?
More than a year ago
We have three rental application outcomes: approved, denied, conditional. What does comments and filled mean? For example, if the approver comments say: need animal vet records, if approver selects that the comments are f can it true it moves to the approved process and false goes to denied?
Do you have a chat function or phone number to ask these questions?
Thanks in advance.