
Creating a Google Form quiz
- Set up your Google Form
- Enable quiz mode
- Configure quiz settings
- Add quiz questions
- Set up answer keys
- Preview and test your quiz
- Share and distribute your quiz
Quizzes aren’t just for classrooms anymore — they’ve become an essential tool for boosting engagement across industries. Studies show interactive quizzes can increase learning retention rates by up to 50 percent in education, while marketers report quiz-based campaigns generate higher lead conversion rates than static content. Whether you’re teaching, training, or building an audience, quizzes grab attention and keep people engaged.
Google Forms makes it easy to create quizzes with automatic scoring. You can add multiple choice, short answer, or checkbox questions, assign point values, and even provide instant feedback. The best part? It’s free, accessible, and integrates smoothly with Google Workspace.
It’s time you learn the step-by-step process to build your own Google Form quiz with scoring — from creating questions to reviewing results.
Bear in mind that Google Forms does have its limitations. If you need features like detailed analytics, custom branding, or more interactive question types, consider Google Forms alternatives that go beyond the basics.
What Google Forms quizzes can (and can’t) do
Think of Google Forms as a solid entry-level quiz builder: You flip on quiz mode, and suddenly you can assign point values, set correct answers, and even add instant feedback. For multiple choice, checkboxes, and dropdowns, the tool does the heavy lifting by automatically grading responses. For you, this means less time tallying and more time focusing on the real value — what the results actually tell you.
However, not every question type can be scored automatically. Open-ended formats, such as short answers or paragraph responses, require manual review, slowing down the process. Forms also lack more advanced options, such as weighted scoring and partial credit, making it best suited for straightforward assessments.
To help with tracking and analysis, Google Forms integrates seamlessly with Google Sheets. Each response can be logged in real time, providing a simple way to monitor results, chart performance, and share data with colleagues. For educators, this doubles as a lightweight gradebook, while marketers and trainers can use it to measure engagement and overall effectiveness.
Step-by-step: Create your first Google Form quiz
Are you ready to create your first form? Follow along as we show you how to use Google Forms step by step.
Step 1: Set up your Google Form
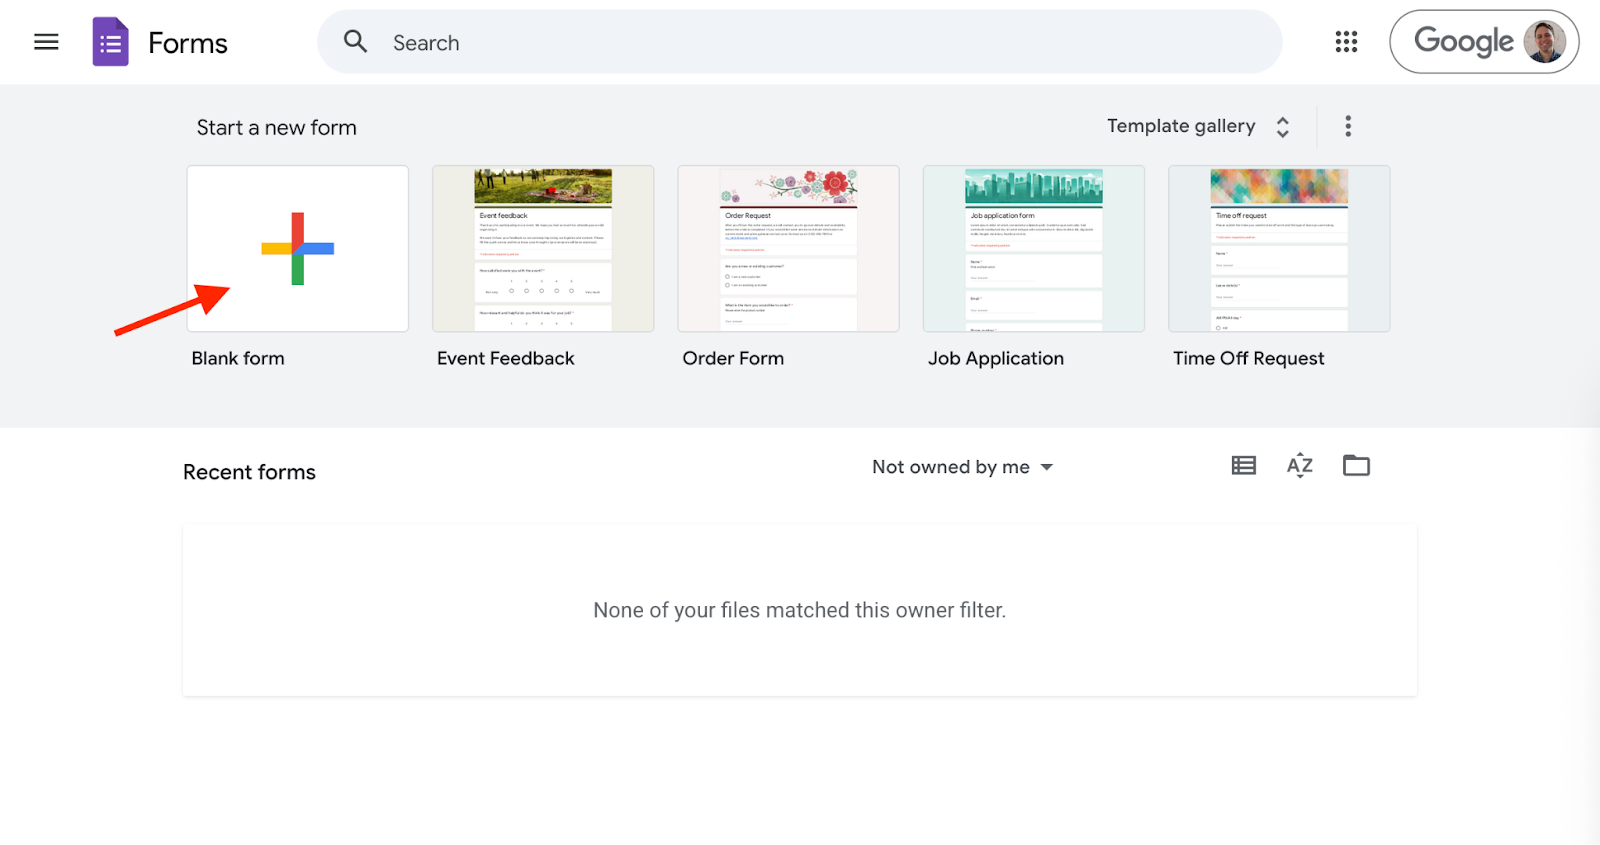
Head to Google Forms and click the blank form to start fresh. Give your quiz a title and description, so participants know what to expect. This is also a good place to add instructions or context, whether it’s “Chapter 5 Review” for students or “Marketing Knowledge Check” for your team.
Pro Tip
Use a clear, engaging title — it sets the tone and encourages participants to take the quiz seriously.
Step 2: Enable quiz mode
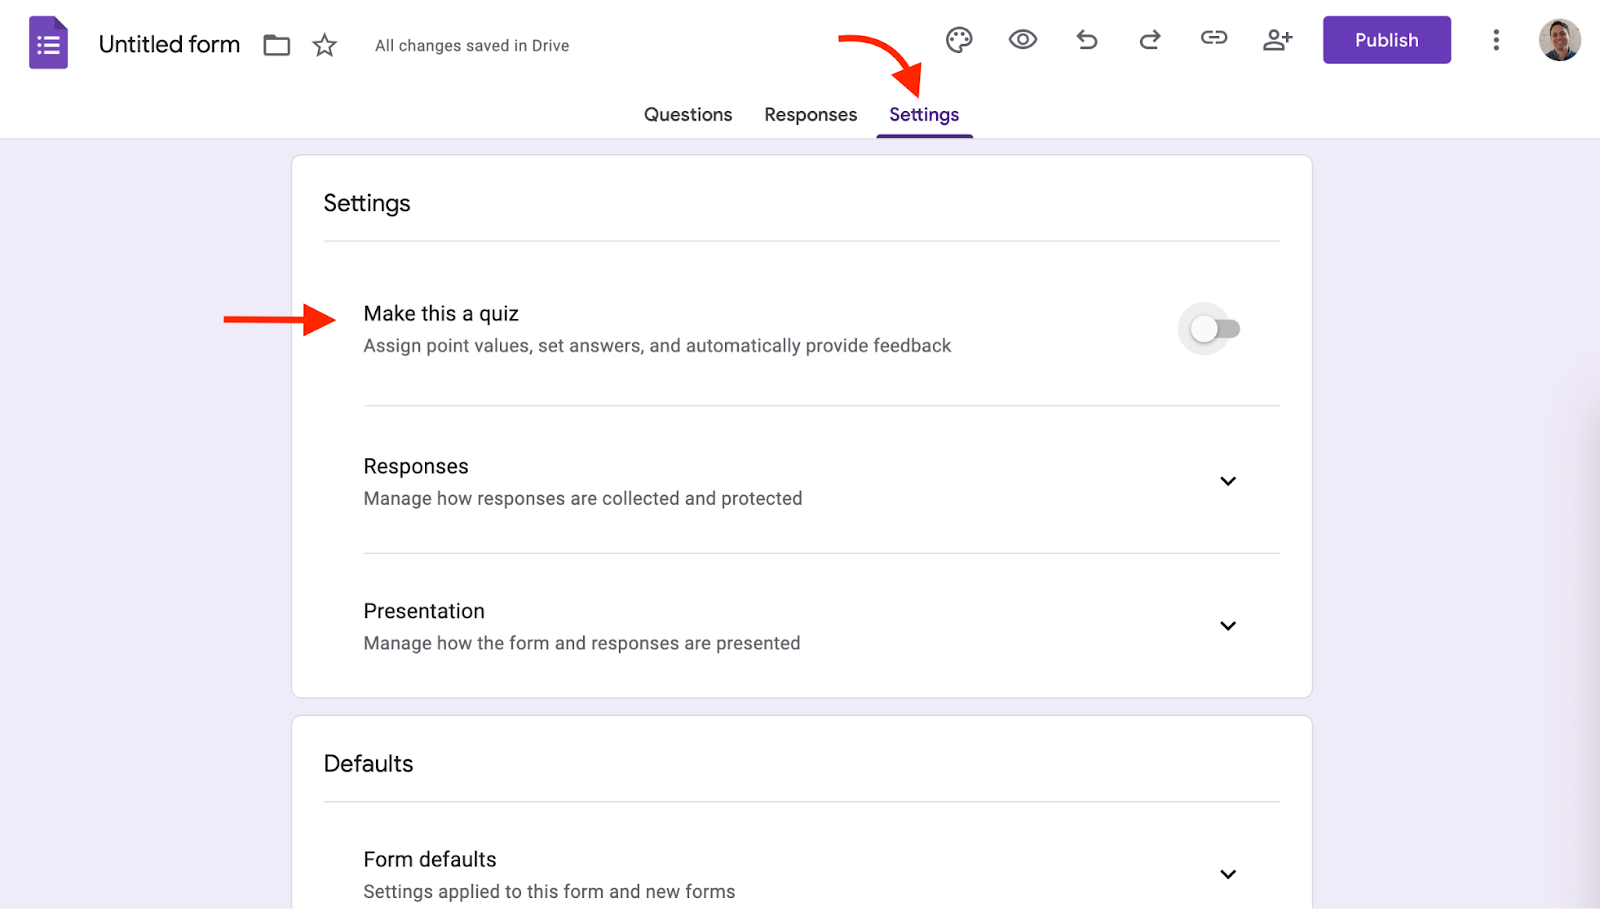
Click the Settings tab in the top-center. Select the option titled Make this a quiz to unlock the ability to assign point values and create answer keys.
Pro Tip
If you plan to collect email addresses or limit attempts, set those options here too; it saves time later.
Step 3: Configure quiz settings
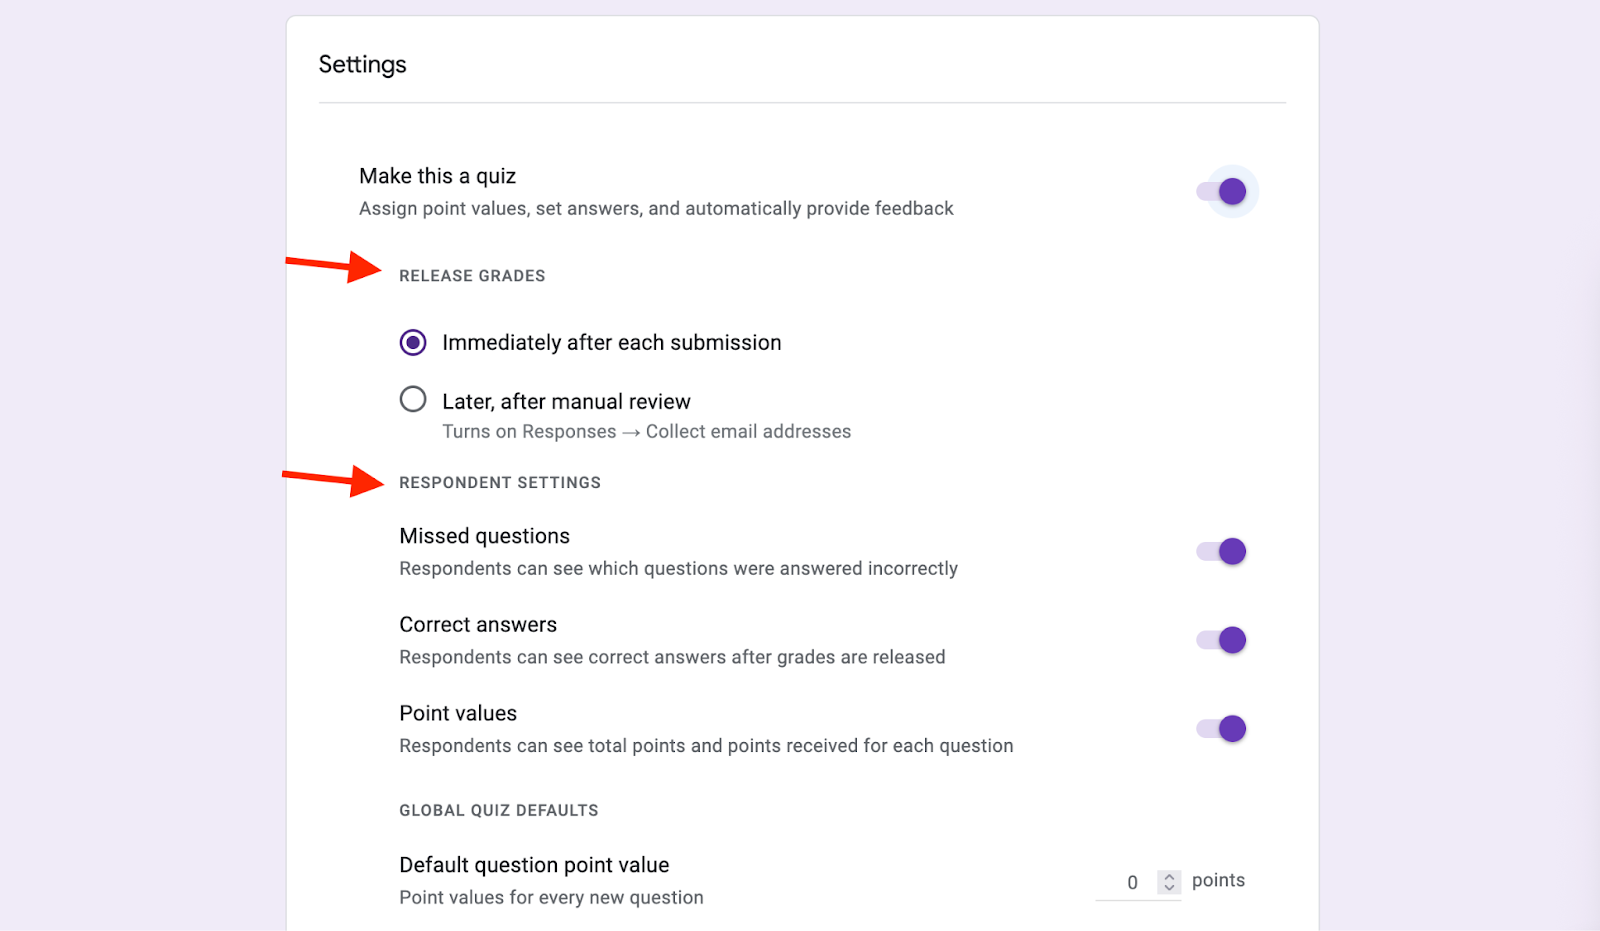
While you’re still under Quizzes in Settings, decide how you want scoring to work. You can
- Let respondents see their scores immediately after submitting or only after you’ve reviewed answers.
- Choose whether they can see missed questions, correct answers, and point values. Adjust these options depending on your audience. Instant feedback may be ideal for practice, while delayed results may be more suitable for formal assessments.
Pro Tip
For higher-stakes quizzes, disable Show correct answers to prevent sharing among participants.
Step 4: Add quiz questions
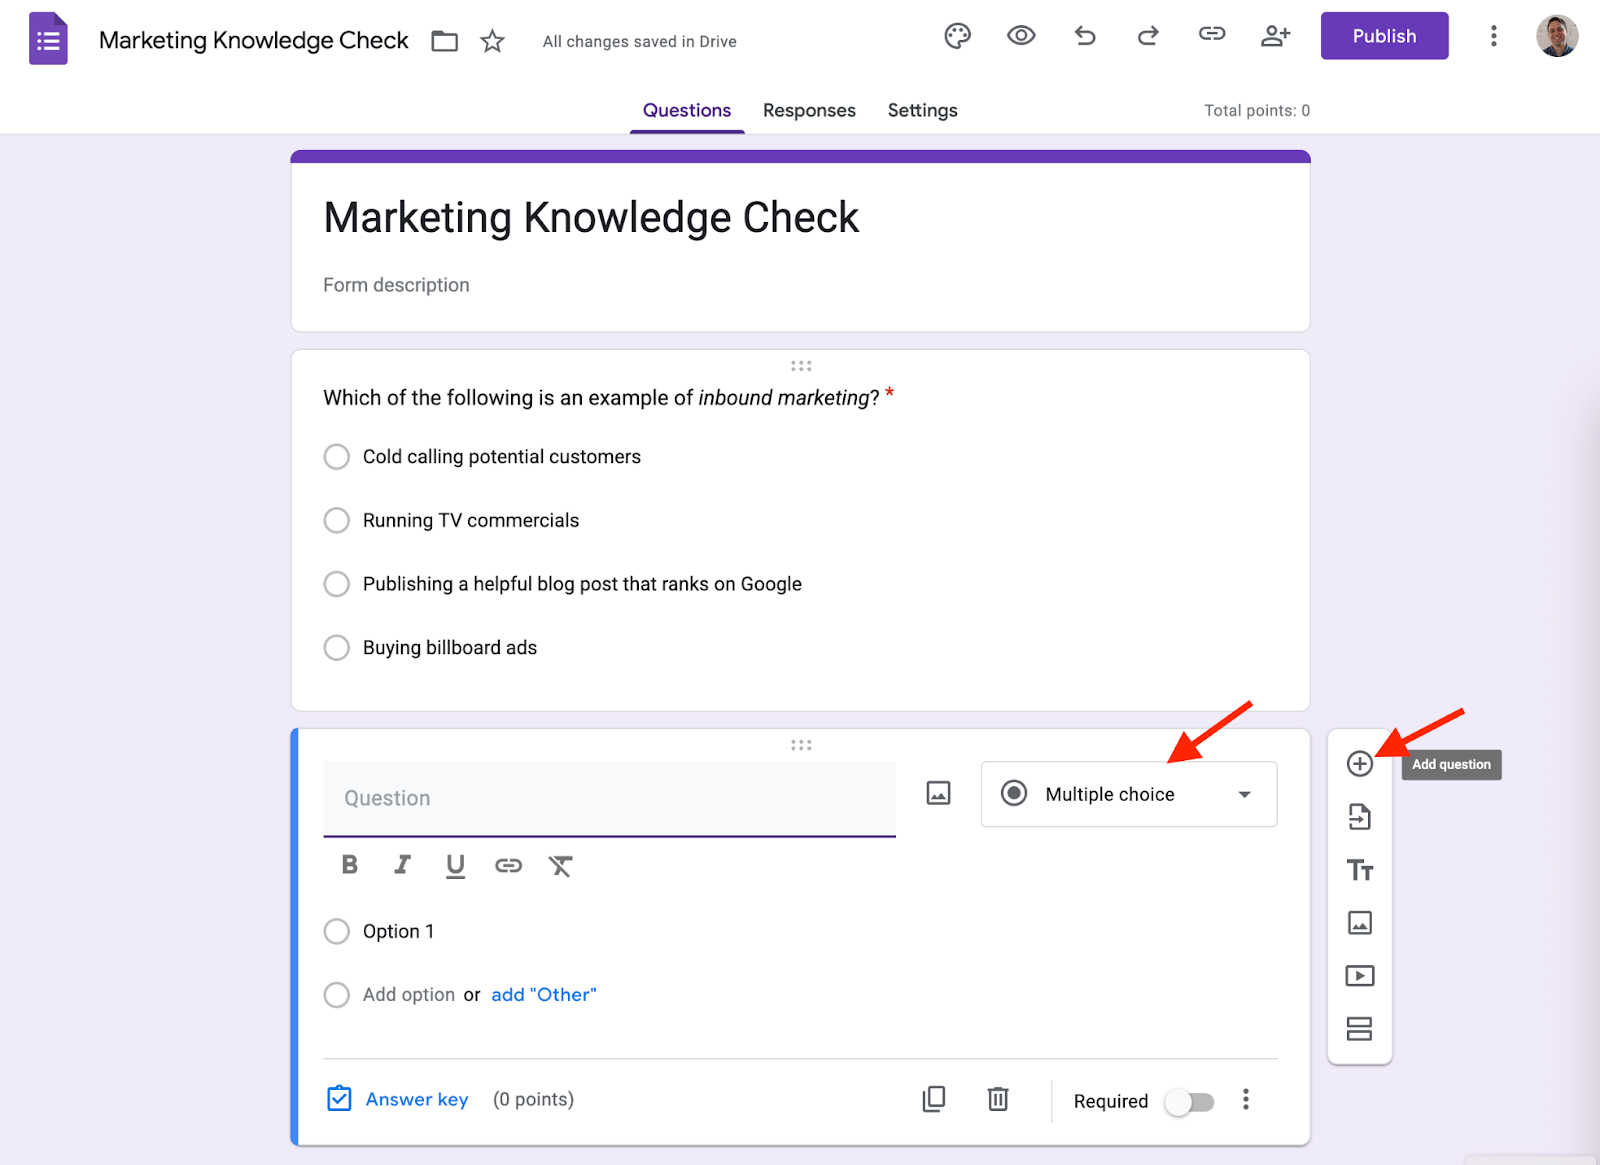
Back in the form, use the plus (+) button to add questions. Google Forms supports formats including multiple choice, checkboxes, dropdowns, short answers, paragraphs, and more. For automatic grading, stick to the first three question types. You can also add images or videos to make your quiz more engaging.
Pro Tip
Break longer quizzes into sections to make the experience feel less overwhelming for participants.
Step 5: Set up answer keys
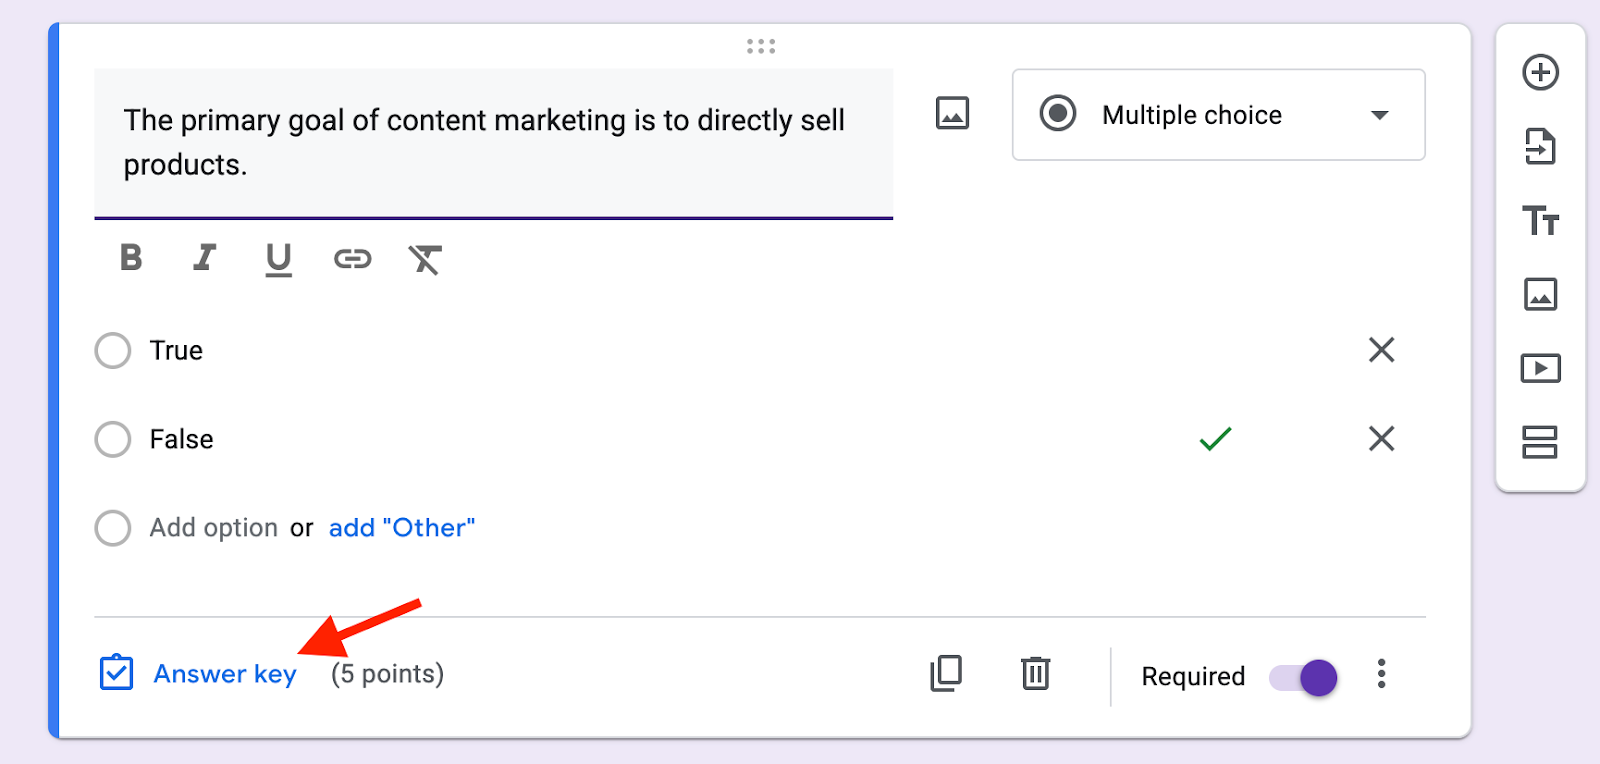
After creating a question, click Answer key at the bottom. Here you can mark the correct answers, assign point values, and even add optional feedback. That feedback can include text, links, or videos — a useful way to reinforce learning or guide participants to further resources.
Pro Tip
Add resource links in your feedback (like a study guide or product page) to turn mistakes into learning opportunities.
Step 6: Preview and test your quiz
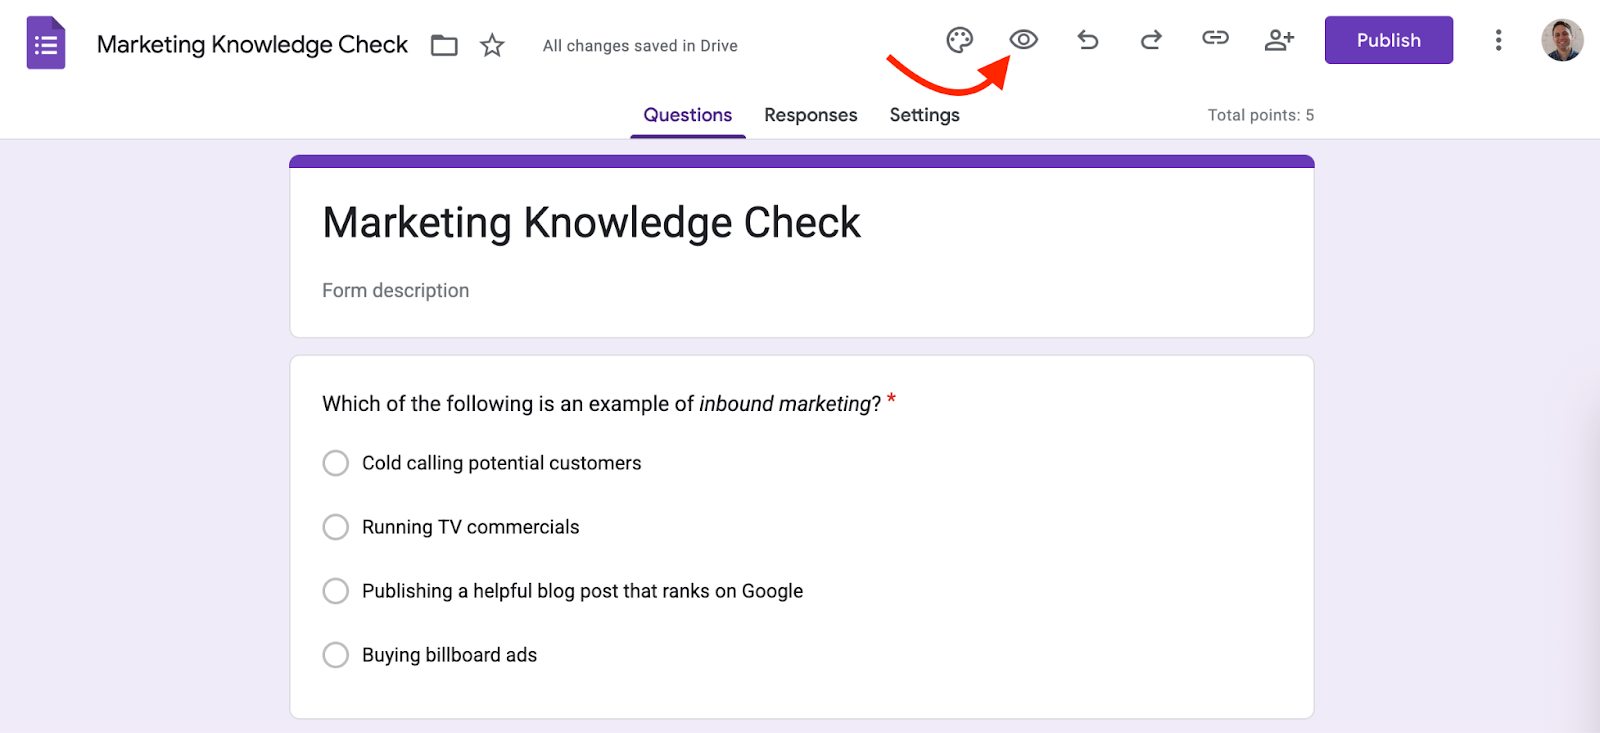
Before sharing your quiz, you always want to preview it. Click the eye icon (👁️) at the top to take the quiz yourself and ensure questions, scoring, and feedback work as intended. This quick test run helps you catch mistakes before participants see them.
Pro Tip
Share the preview with a colleague or friend since a fresh set of eyes often spots issues you might miss.
Step 7: Share and distribute your quiz
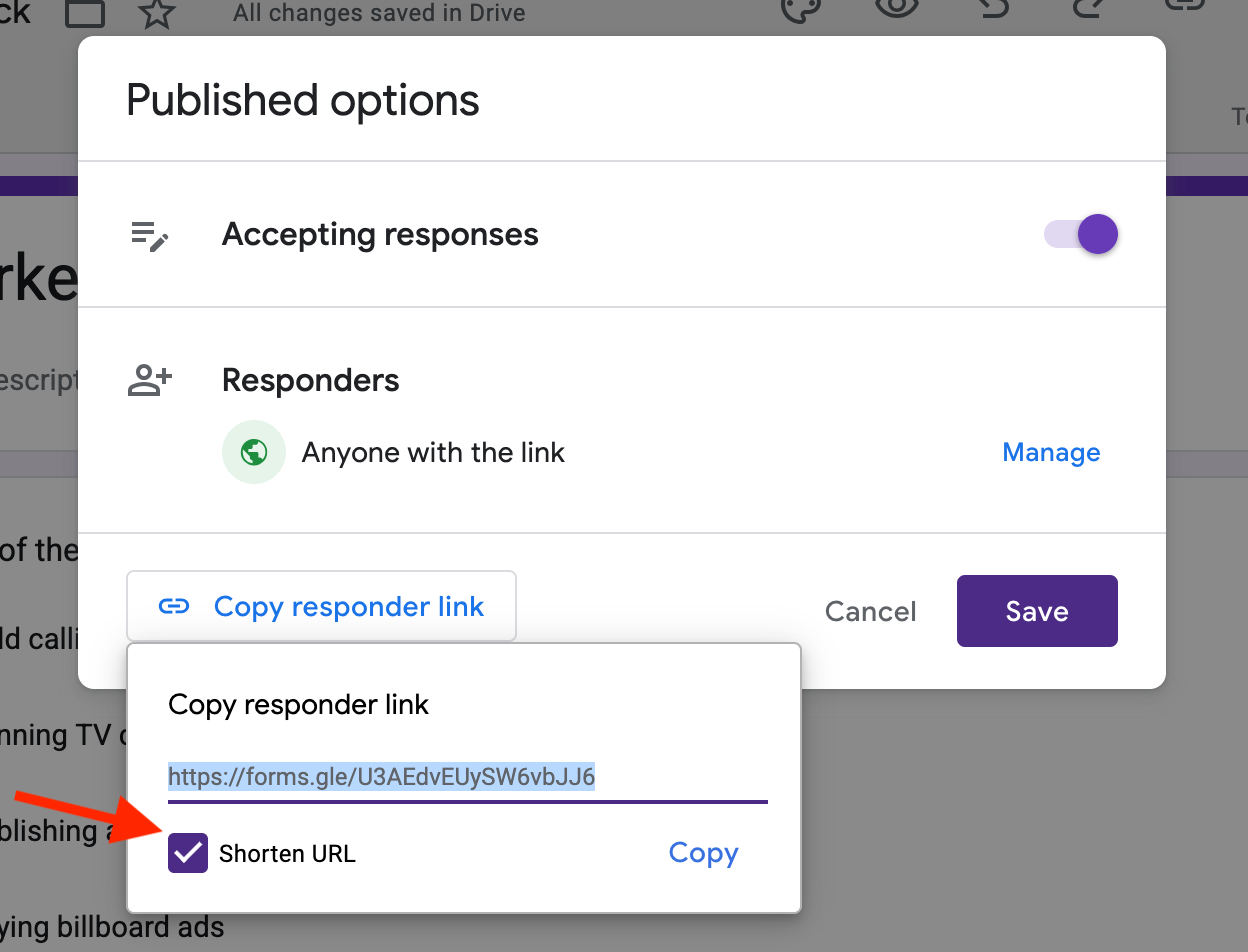
Once you’re satisfied, click the purple Publish button. Now you can share your quiz via email, copy a direct link, or embed it on a website. If you’re working with students, you can distribute it through Google Classroom for seamless assignment tracking.
Pro Tip
Shorten the share link using the built-in Shorten URL option. This looks cleaner and is easier to post on social media or slides.
Where Google Forms quizzes fall short
Google Forms is a solid tool for simple quizzes, but its limitations become clear once you move beyond the basics. These are some of the most common challenges you’ll run into:
- Limited question types for auto-grading
Only multiple choice, checkboxes, and dropdown questions can be graded automatically. Short answer and paragraph responses require manual review, and there’s no support for partial credit or weighted scoring. - Basic design and customization
You can change colors and header images, but you don’t have options for branding or advanced layouts, so quizzes often end up looking plain and generic. - No advanced logic or adaptive flows
Google Forms supports simple branching where a user is directed to a specific section based on an answer to a question, but it doesn’t allow true conditional logic or personalized learning paths. Every participant gets the same experience. - Limited analytics and reporting
While responses can be exported to Google Sheets, built-in reporting is minimal. You won’t find detailed performance insights, group comparisons, or real-time dashboards. - Mobile responsiveness issues
Short-form quizzes work fine on phones, but taking a longer quiz on smaller screens can feel clunky and hard to navigate. - Security and access controls
Apart from restricting responses to users within a domain or requiring email logins, there’s no way to randomize questions, enforce time limits, or prevent cheating. - No real-time feedback or personalization
Everyone gets the same quiz with the same scoring. There’s no option for adaptive feedback or tailored learning based on individual responses.
Why look beyond Google Forms for quizzes
Google Forms is a great starting point, but it wasn’t built with advanced assessments, training, or marketing campaigns in mind. If you need more than the basics, exploring alternatives can unlock features that make quizzes more powerful, engaging, and data-rich.
Advanced features that Google Forms doesn’t offer
Modern quiz platforms go beyond multiple choice and checkboxes, offering tools that let you design truly interactive experiences. For example, alternatives often include
- AI-powered quiz generation that helps you create questions and answer keys in seconds
- Advanced question types, such as ranking, image-based selections, and sliders, all of which can provide more dynamic assessments
- Custom branding and design flexibility, so your quizzes look polished and on-brand
- Conditional logic and branching to adapt questions based on participant responses
- Advanced analytics and insights with real-time dashboards, segmentation, and progress tracking
A better experience for participants
Alternatives also focus on delivering a smoother, more engaging quiz experience. The following features can elevate your quizzes from simple surveys to interactive tools that educate and convert:
- Mobile-optimized designs make even longer quizzes easy to take on smaller screens.
- Interactive and engaging interfaces include visuals, gamified elements, and intuitive navigation.
- Personalized results and feedback that adapt to each user, helping them learn or stay engaged.
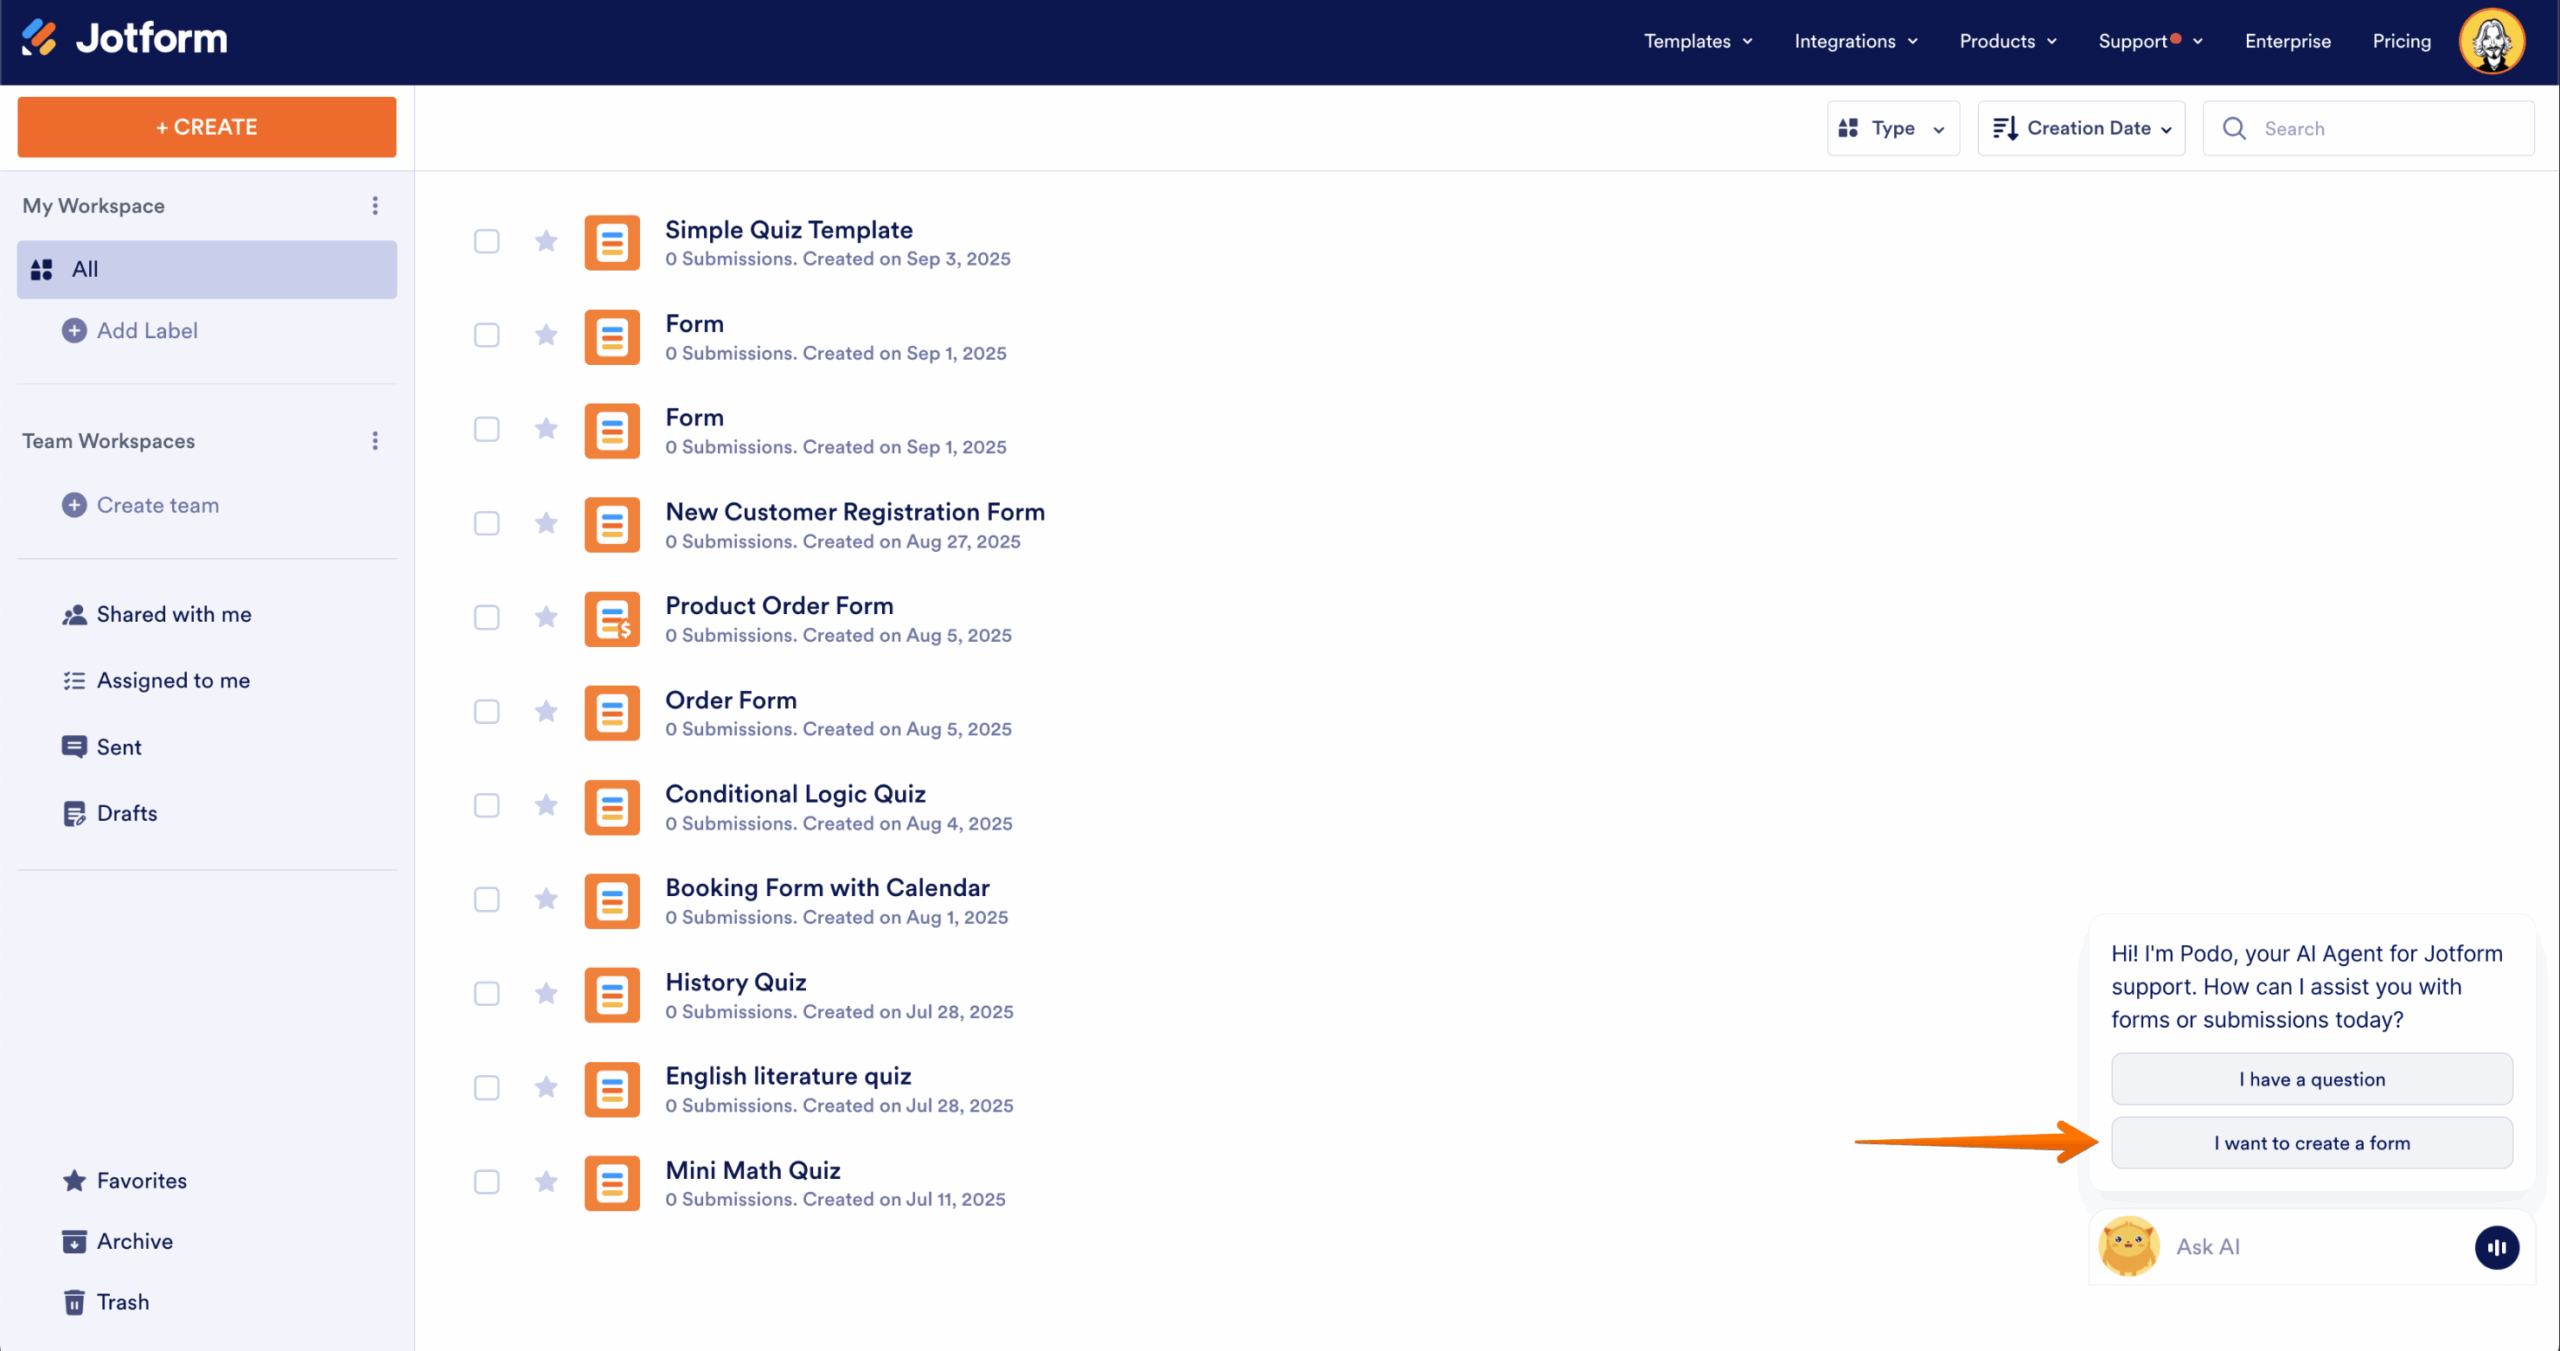
Meet Jotform’s AI quiz generator
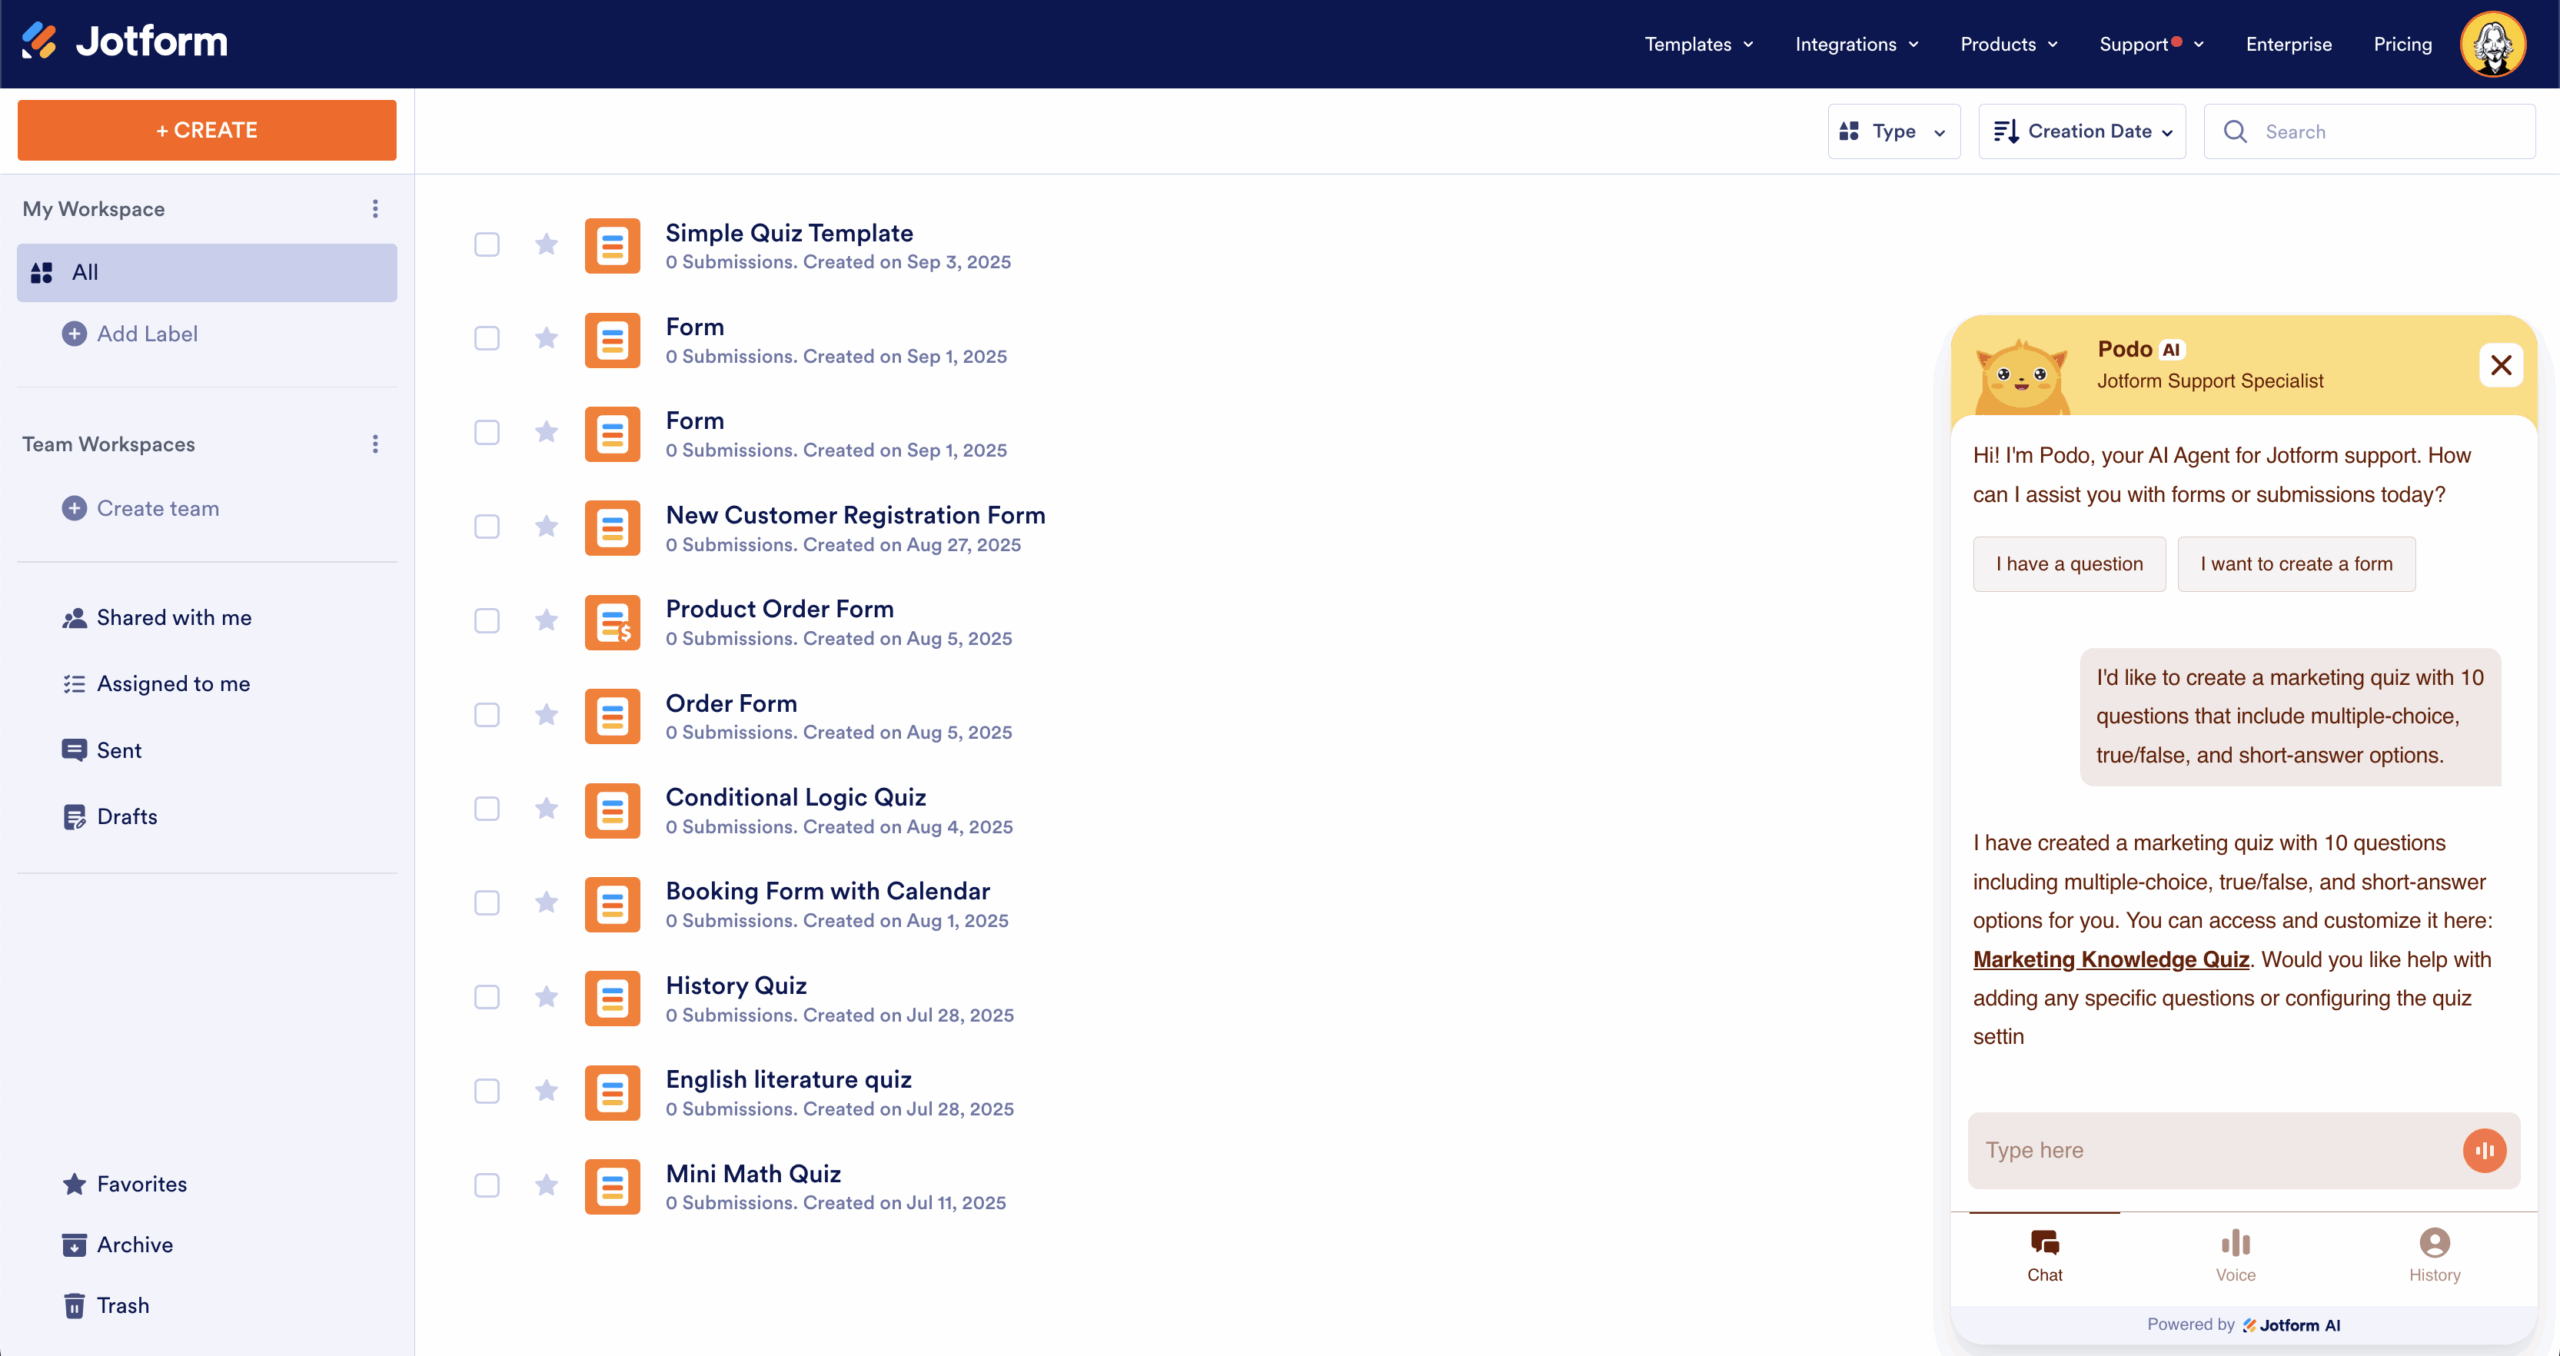
If you’re looking for a tool that goes beyond the basics of Google Forms, consider Jotform’s AI Quiz Generator, combining the ease of Google Forms with AI-powered capabilities that make quiz creation faster, smarter, and more customizable.
What Is Jotform’s AI quiz generator?
There’s no need for you to manually write every question, because Jotform uses artificial intelligence to generate quizzes based on your content. You feed it a block of text, upload a PDF, or even pull from presentations, and the AI instantly creates relevant questions and answers. You also have the option to generate quizzes directly from a simple prompt, giving you flexibility no matter where your source material lives.
Key Advantages Over Google Forms
Jotform AI Quiz Generator | Google Forms | |
|---|---|---|
| Quiz creation | AI-powered quiz generation from text, PDFs, presentations, or prompts | Manual setup; you write all questions and answers |
| Question types | Multiple choice, true/false, short answer, plus advanced options | Multiple choice, checkboxes, dropdown (limited auto-grading) |
| Customization & design | Drag-and-drop builder, professional templates, custom branding | Basic themes, colors, and images |
| Logic & personalization | Advanced conditional logic, personalized results, adaptive flows | Simple “go to section” branching |
| Analytics & reporting | Advanced analytics, performance dashboards, participant tracking | Basic charts and Google Sheets export |
| Mobile experience | Dedicated mobile app for quiz creation and participation | Works on mobile, but limited design control |
| Use cases | Education, training, marketing campaigns, and professional assessments | Lightweight, low-stakes quizzes |
| Try It Now | Learn More | |
How to build a quiz with Jotform AI: A step-by-step guide
Creating a quiz with Jotform’s AI Quiz Generator is even simpler than building one manually in Google Forms. The AI handles the heavy lifting, while you stay in control of the final product. Here’s how it works:
Step 1: Upload a document or enter a prompt
Start by providing the content you want your quiz to be based on. You can upload a text file, PDF, or presentation — or simply type a short prompt for the AI to work from.
Pro Tip
Upload training manuals, lesson notes, or marketing copy to instantly turn existing material into a quiz.
Step 2: Specify quiz details
Tell the AI what you need: the number of questions, preferred language, and question types (multiple choice, true/false, short answer, etc.).
Pro Tip
Mix question types to keep the quiz engaging and test knowledge in different ways.
Step 3: Let AI generate your quiz
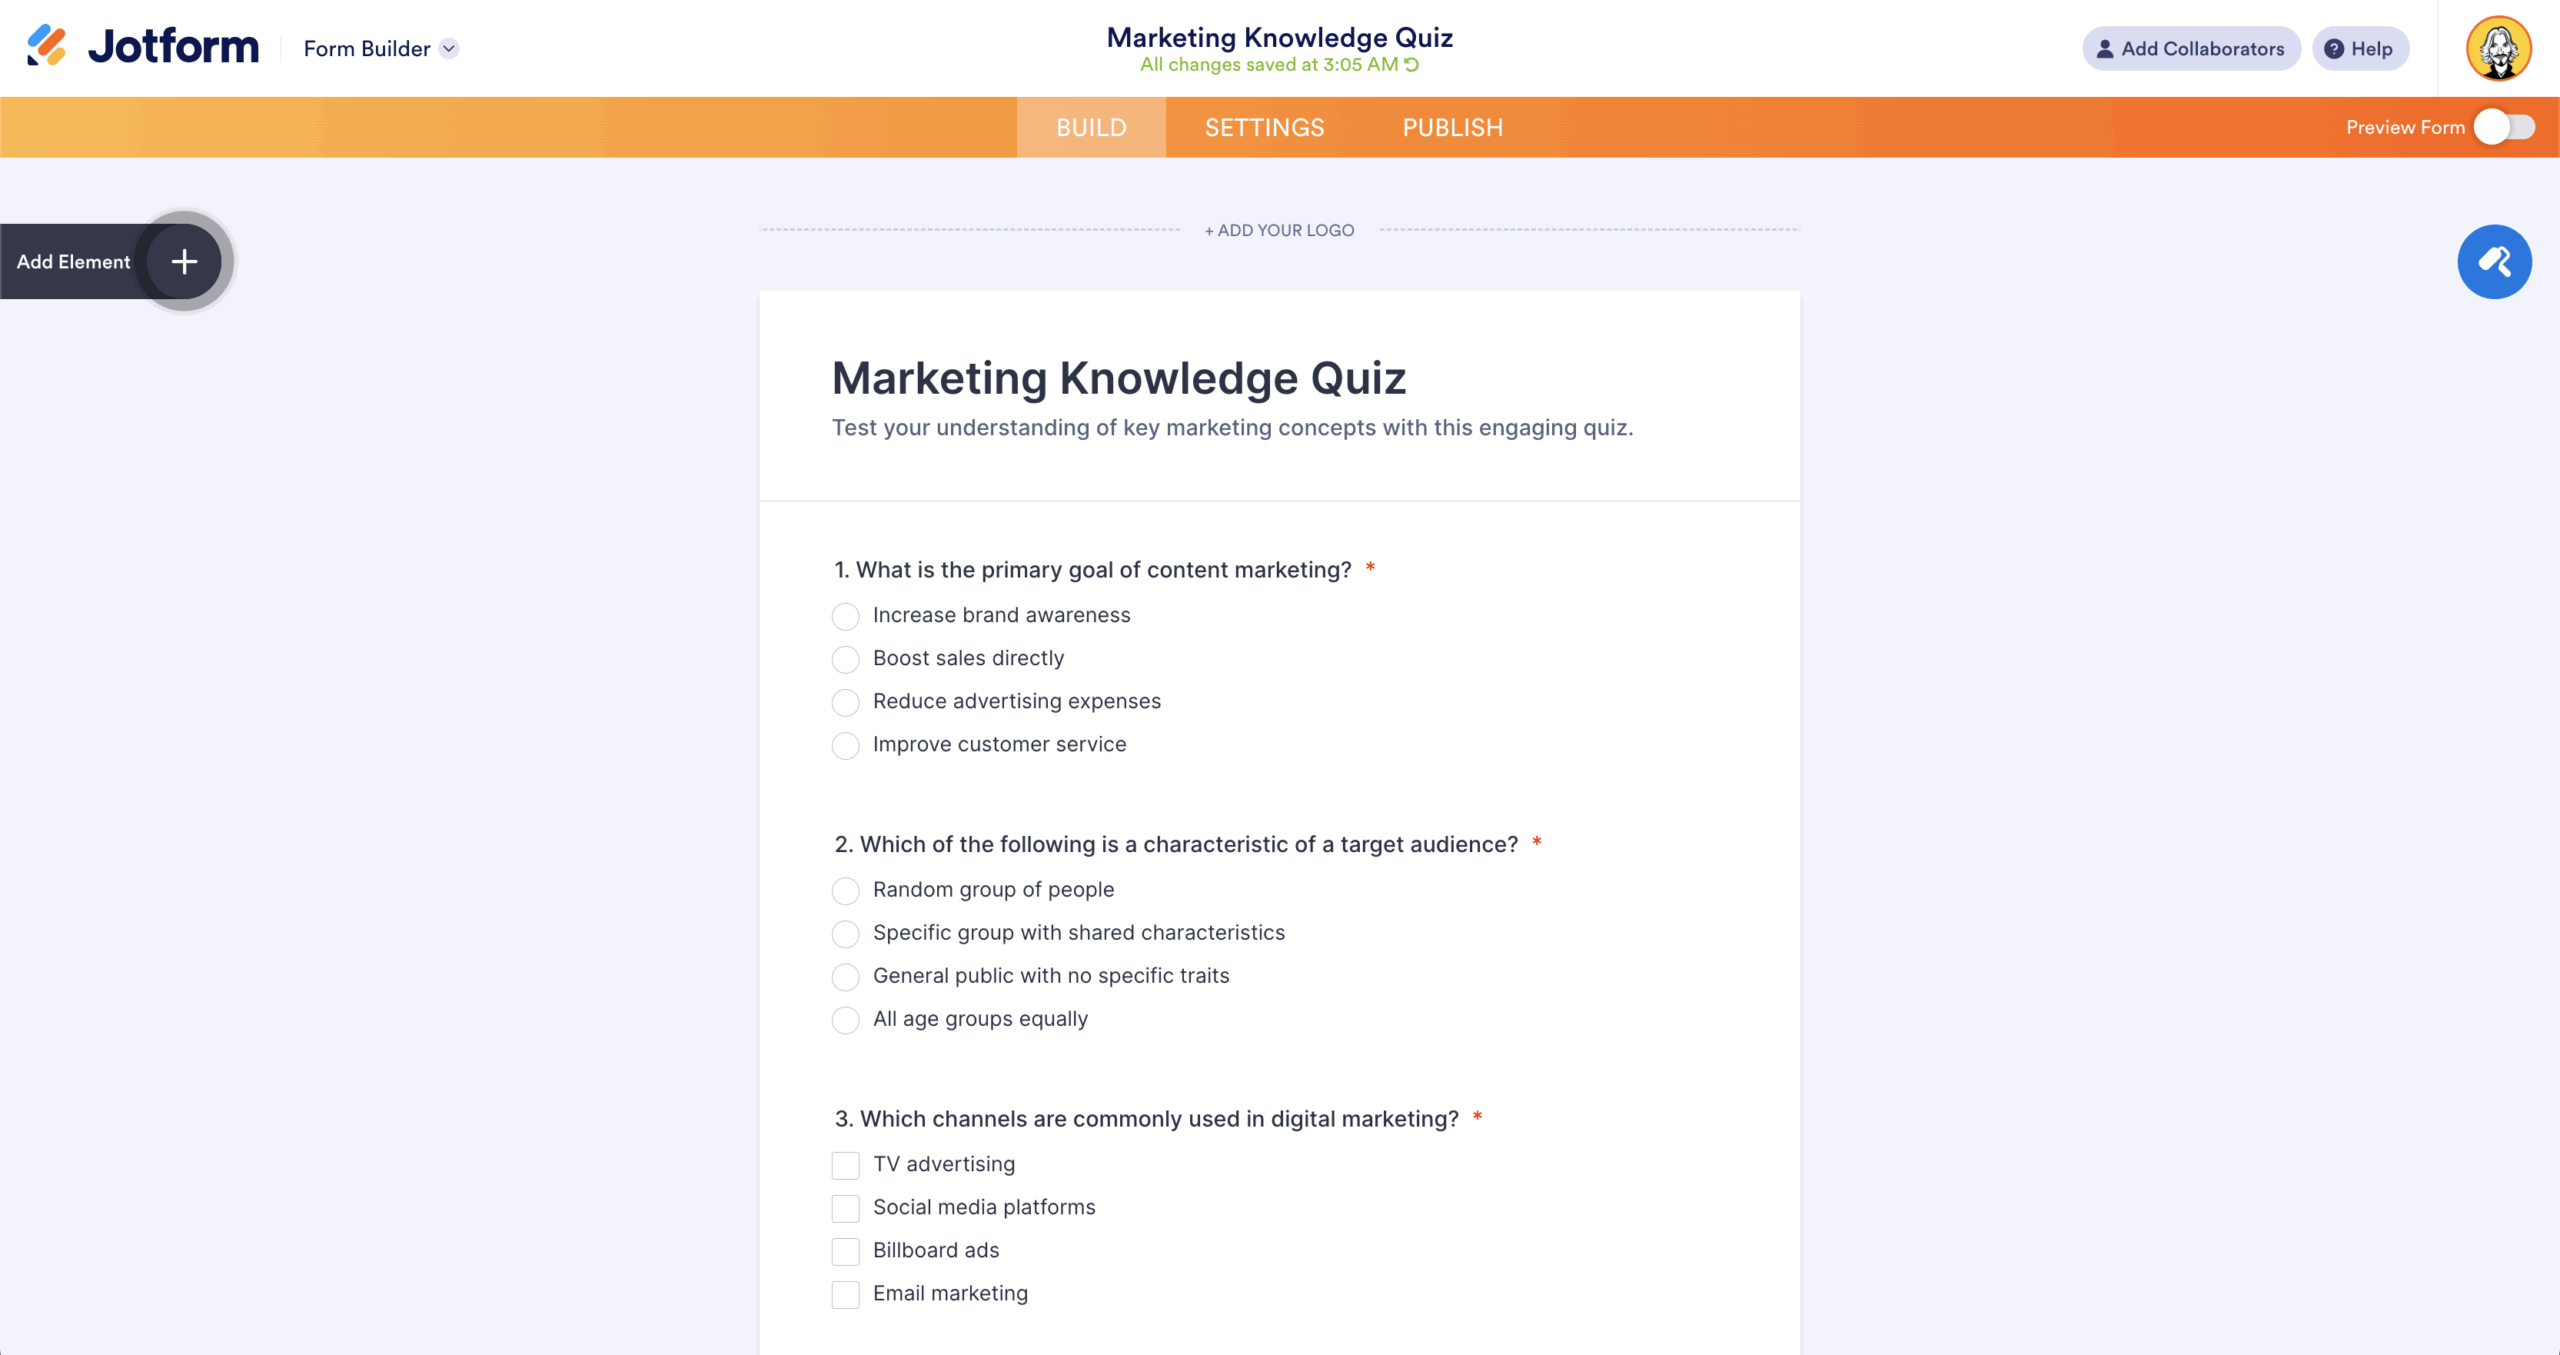
The system instantly creates a set of relevant questions, complete with answers and scoring. What might take hours manually is done in seconds.
Pro Tip
Generate multiple versions of the same quiz from different documents or prompts to keep content fresh.
Step 4: Customize and refine
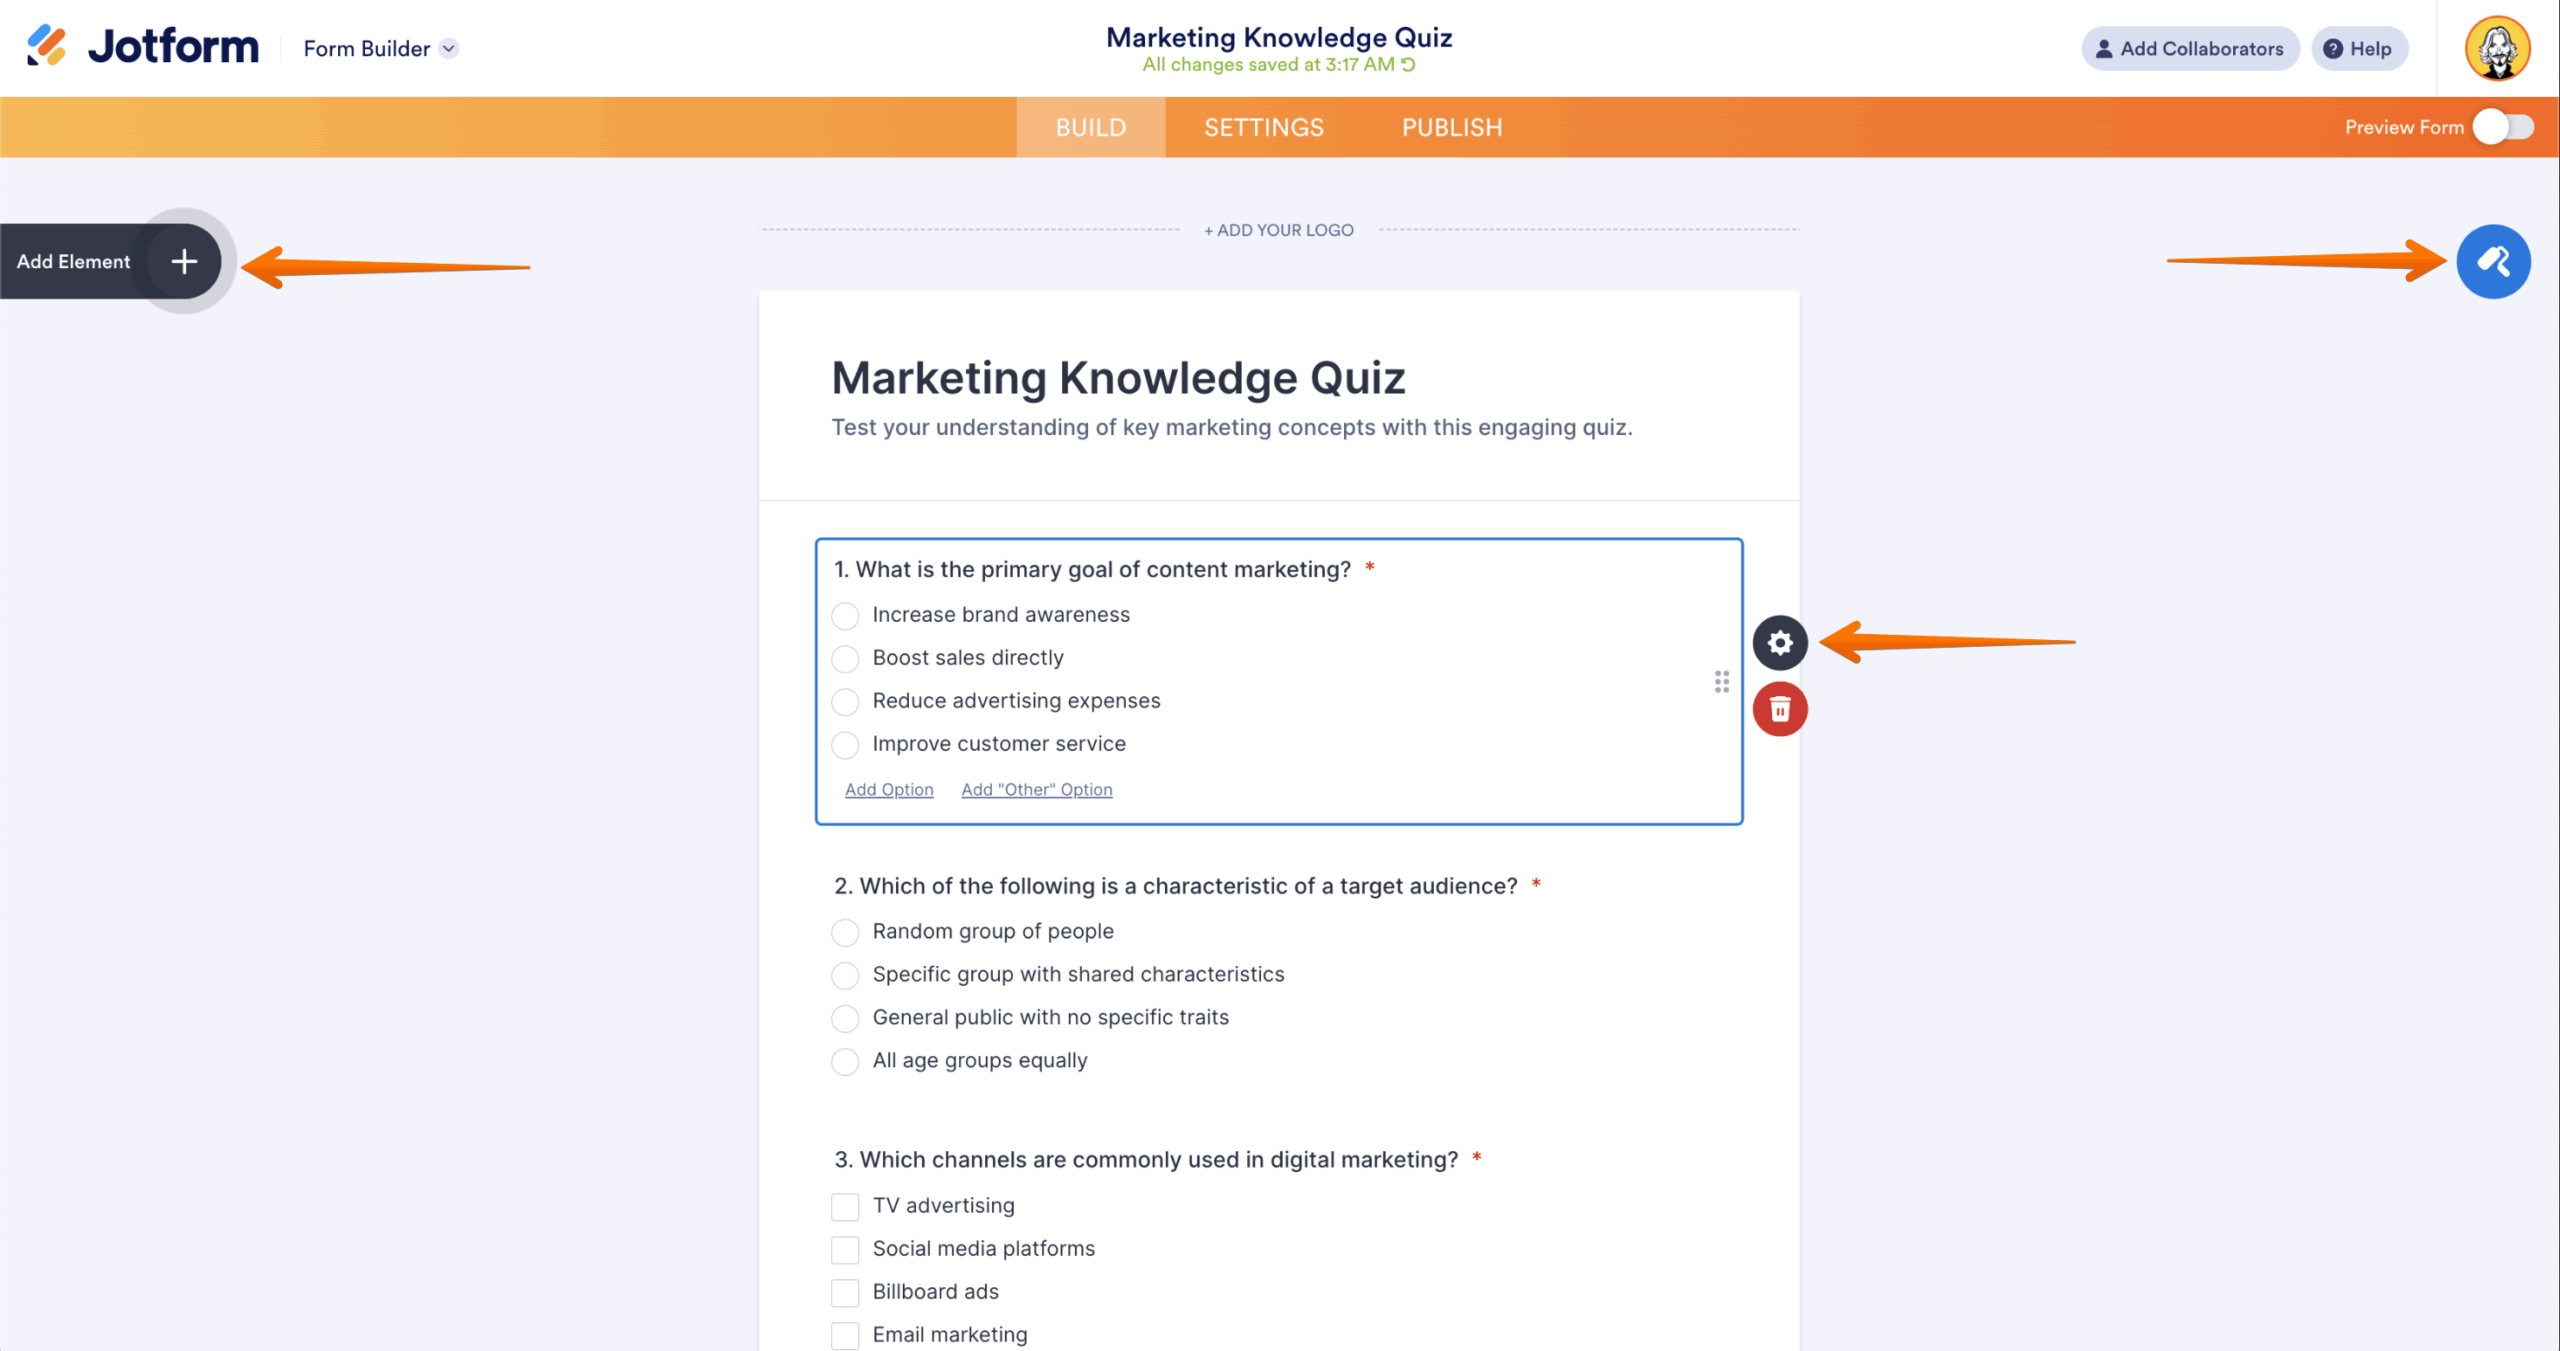
Use Jotform’s drag-and-drop builder to tweak questions, adjust answer options, or reformat the design. You can also apply professional templates and branding to match your style.
Pro Tip
Apply your brand colors and logo to your quizzes so they look professional and consistent with your other materials.
Step 5: Share via multiple channels
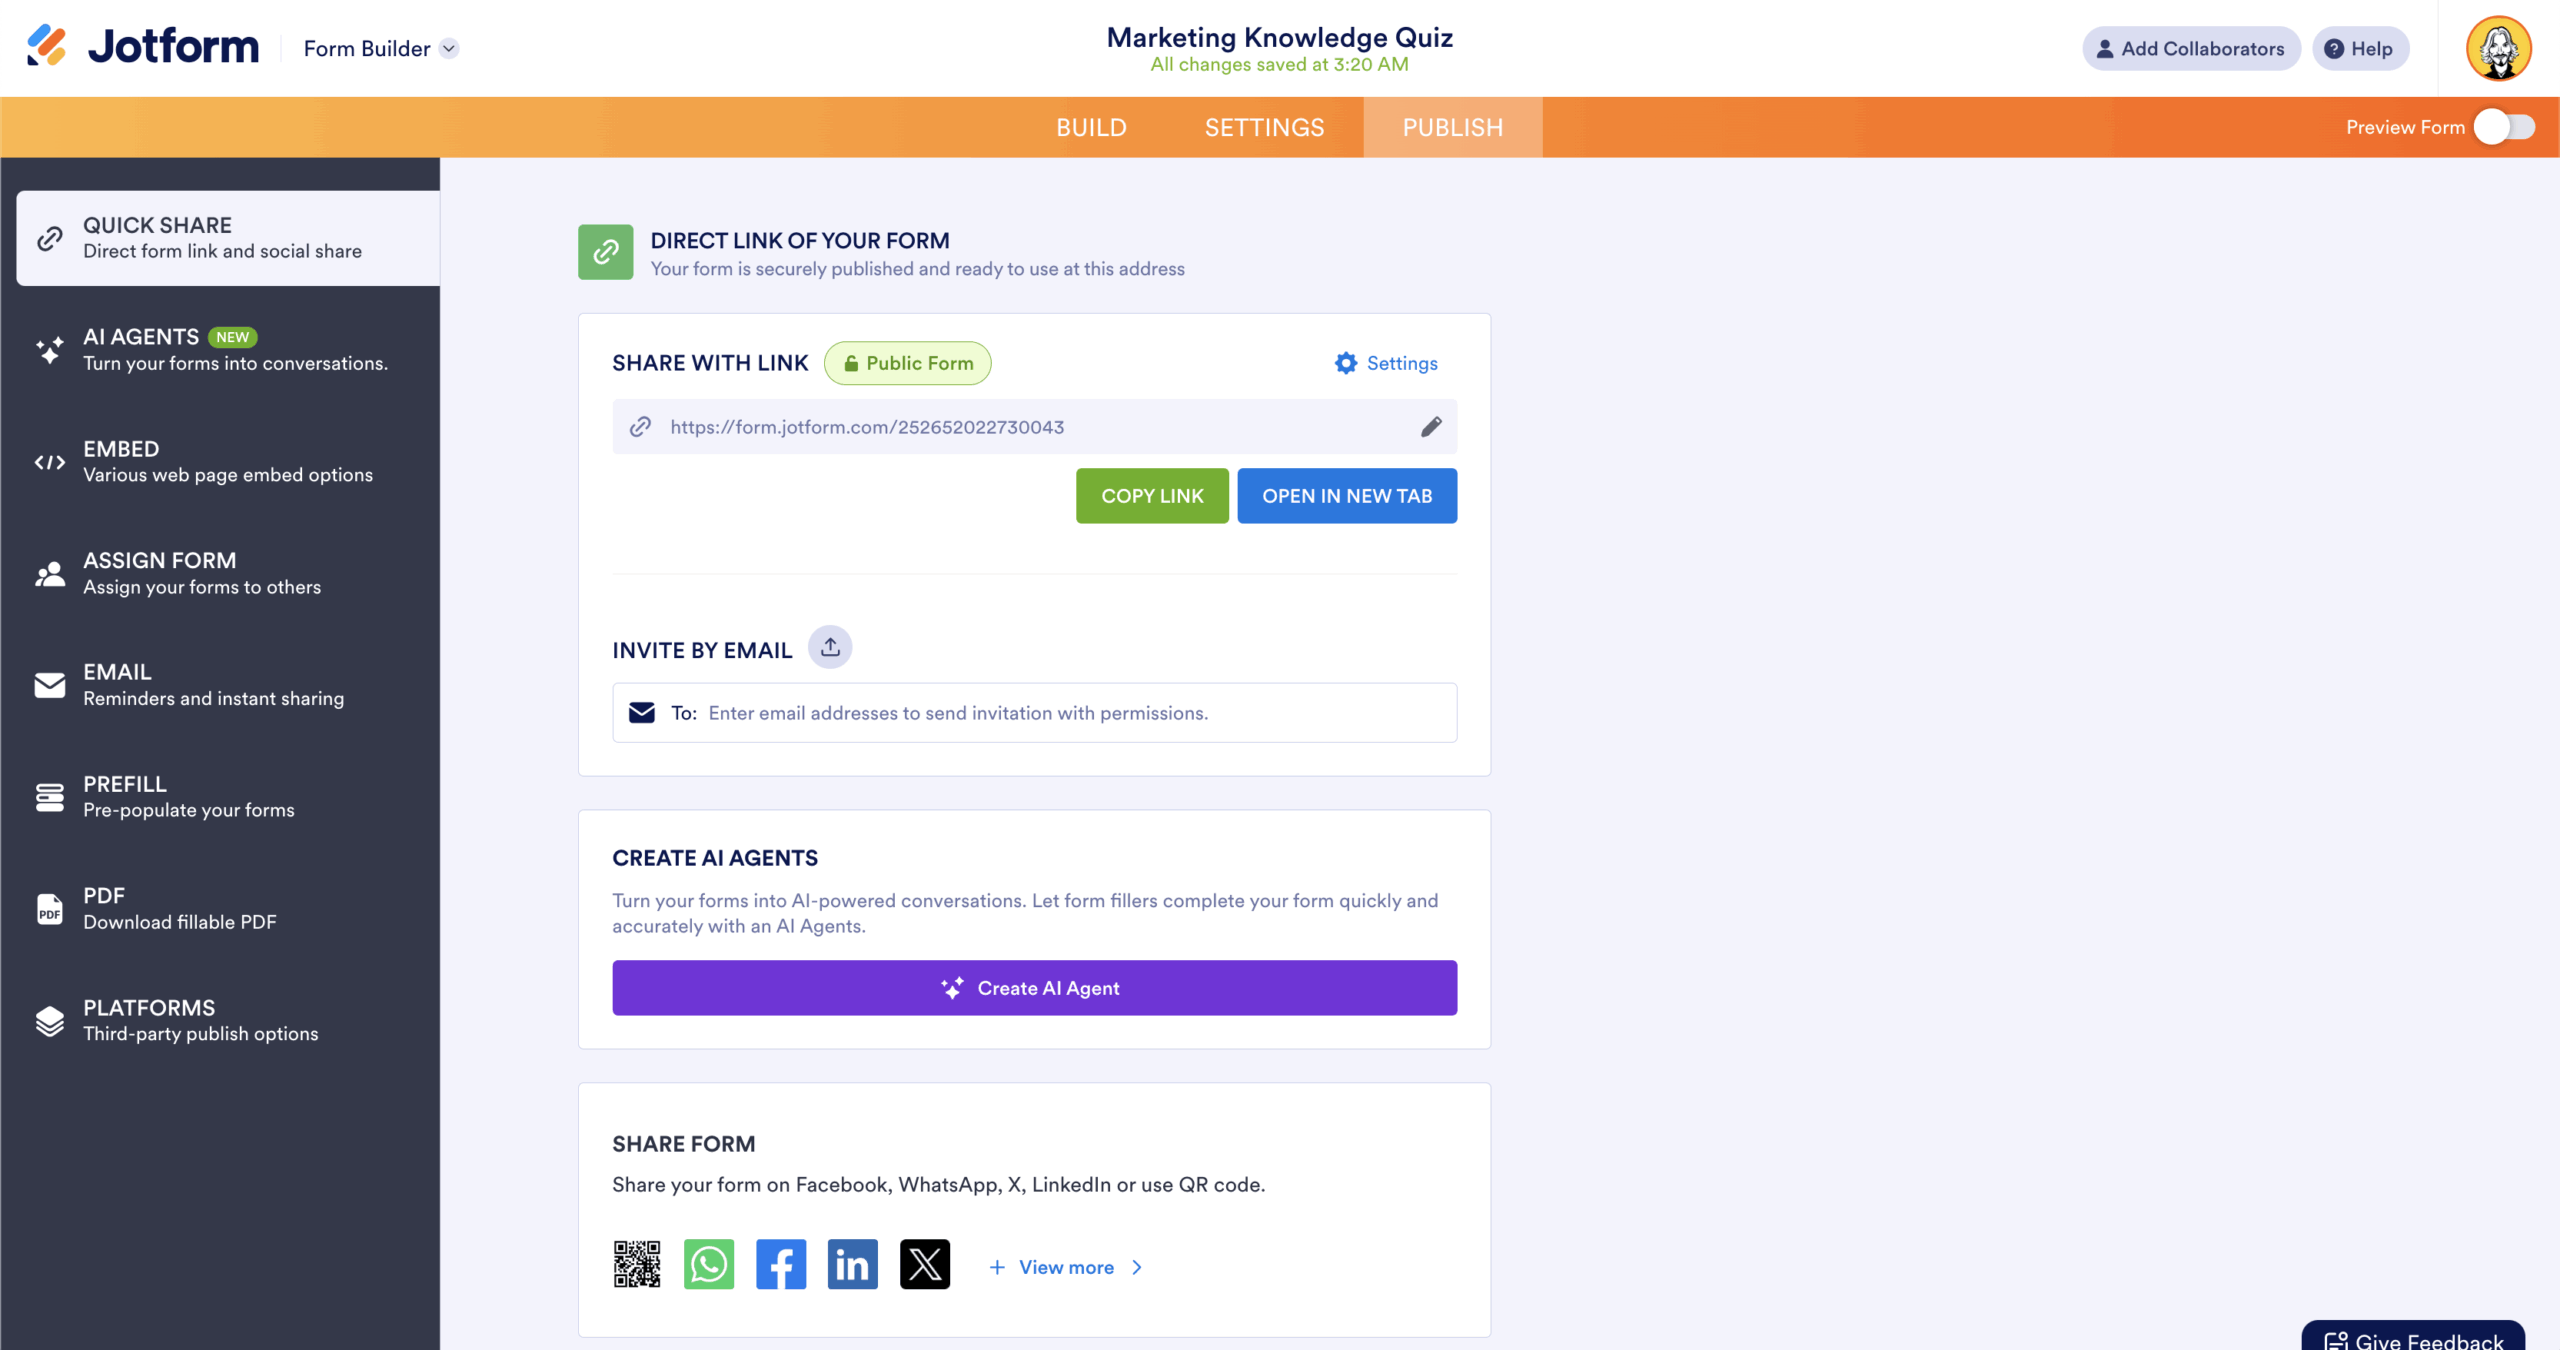
Once your quiz is ready, you can share it as a link, embed it on a website, or distribute it via email and social media.
Pro Tip
Use Jotform’s mobile app to send quizzes on the go or collect responses in person at events.
Step 6: Automated scoring and results
Participants see their scores as soon as they finish, providing instant feedback while you track performance through Jotform’s analytics dashboard.
Pro Tip
Review analytics to spot knowledge gaps in training or find which quiz topics drive the most engagement in marketing.
Ready to build better quizzes?
Google Forms makes it simple to build quizzes with automatic scoring. In just a few steps, you can create questions, assign points, and track results — which makes it perfect for quick classroom assessments, training refreshers, or lightweight engagement campaigns.
But as we’ve seen, Google Forms has its limits. With only basic question types, limited customization, and no advanced analytics, it can feel restrictive if you’re aiming for more interactive or data-rich assessments.
That’s where Jotform’s AI Quiz Generator comes in. By combining AI-powered quiz creation with advanced customization, professional templates, and detailed performance tracking, Jotform offers a smarter and more flexible alternative. It’s designed for educators, trainers, and marketers who want to go beyond the basics and deliver polished and engaging learning experiences.
Ready to take your quizzes to the next level? Try Jotform’s free AI Quiz Generator today and start building smarter, more powerful quizzes in minutes.
This guide is for teachers, trainers, L&D teams, course creators, and marketers who need a quick way to build and grade quizzes, auto-score responses, and turn results into useful insights.


Send Comment: