Organize and filter emails in Gmail with labels
- Create a label on a desktop or laptop
- Create a filter that sends emails to labels
- Edit or delete filters to change what’s sent to labels
Ever clocked out of work after getting down to “inbox zero”, only to be faced with a fresh mountain of unread emails the next day? We’ve all been there.
Sorting through emails can be an agonizing time sink, especially when you have to filter out spam, unimportant items, or messages that can be answered later.
Emails don’t just go away — unless you trash and delete them permanently — but you can automate email sorting processes so messages are organized and prioritized instantly.
Gmail allows you to create filters that can not only delete and archive your incoming messages but also mark them as important or forward them to someone else.
Gmail filters can also automatically apply customized labels to incoming emails. These labels act as curated libraries that contain messages from specific people or include common keywords.
In this guide, I’ll show you how to set up Gmail filters and use them to your advantage, saving precious hours in your workday.
Gmail filter example
It’s important to point out that Gmail labels are different from folders. While folders require files to be stored and organized in one place, you can apply multiple labels to one email and search for that message under each individual label.
As an example, if you work for a large architectural firm and have clients nationwide, you can add labels to each incoming email for individual regions, states, and cities. If you want to search for an email from someone in Atlanta, you can find it in all of the labels for Southeast, Georgia, and Atlanta.
In this case, “Southeast” is your parent label — your dominant or primary label — while “Georgia” and “Atlanta” are your sublabels.

You can add an unlimited number of labels to an email, but if you delete an email, it will be erased from your inbox and every label attached to it.
If you use Gmail as part of your workflow, read on to learn how to create filters and labels in just a few quick steps. I’ll even include some handy visuals for reference.
Create a label on a desktop or laptop
Although you can create a Gmail label on smartphones and tablets, I recommend doing it on your laptop or desktop so you have more control over the process and can quickly apply changes to existing emails
Once you create labels, you can set Gmail filters that apply those labels to incoming emails from specific senders or with certain keywords as they hit your inbox. I’ll outline steps to set that up in the next section.
- In the Gmail toolbar on the left of your screen, click the “+” sign next to “Labels.”

- Enter a name for the label in the dialog box that appears. If you would like to categorize your new label under an existing one, click the “Nest label under” checkbox and make a selection from the dropdown list below.

- After creating your label, click the three dots next to it on the sidebar to open its settings. Here, you can assign a color to the label and change how it appears in your Gmail toolbar. You can also use the same menu of options to modify your label or add a new sublabel under it.


How to create a filter
After creating the labels to organize your incoming emails, you must create the appropriate filters that will flag incoming messages as they arrive in your inbox. Doing this will help you manage your priorities, organize your inbox, and save the time it would take to manually apply labels to individual emails.
- Determine what you’d like to filter by using the search box at the top of your Gmail account. You can, for example, enter a specific email address, a person’s name, or a keyword that may appear in an email. Once you’ve done this, click the sliders icon next to the search box.

- Fill in your details and click the “Create filter” button, located at the bottom right-hand corner of the options menu that appears below the Gmail search box.

- Click on the “Apply the label” checkbox in the new menu of options. Select the label to store future emails — from a specific sender or with a certain keyword — based on your entry in the search box by clicking on the arrow beside the “Apply the label” checkbox.

- Make your desired label selection or selections in the dropdown menu that appears. Reminder: If you place multiple labels on an email, that email will be stored and searchable under all of the labels.
- Click the “Create filter” button at the bottom right-hand corner of the menu options box once you’ve selected the label you want.
How to edit or delete filters
Your labels — and what’s sent to them — may change over time. Editing or deleting the filters that send emails to your labels will take a few steps, but going through this process will ensure you don’t lose track of the action items that matter to you.
- In Gmail, click the Settings icon that looks like a cog on the upper right of your screen.

- Click on the “See all settings” button in the menu that appears.

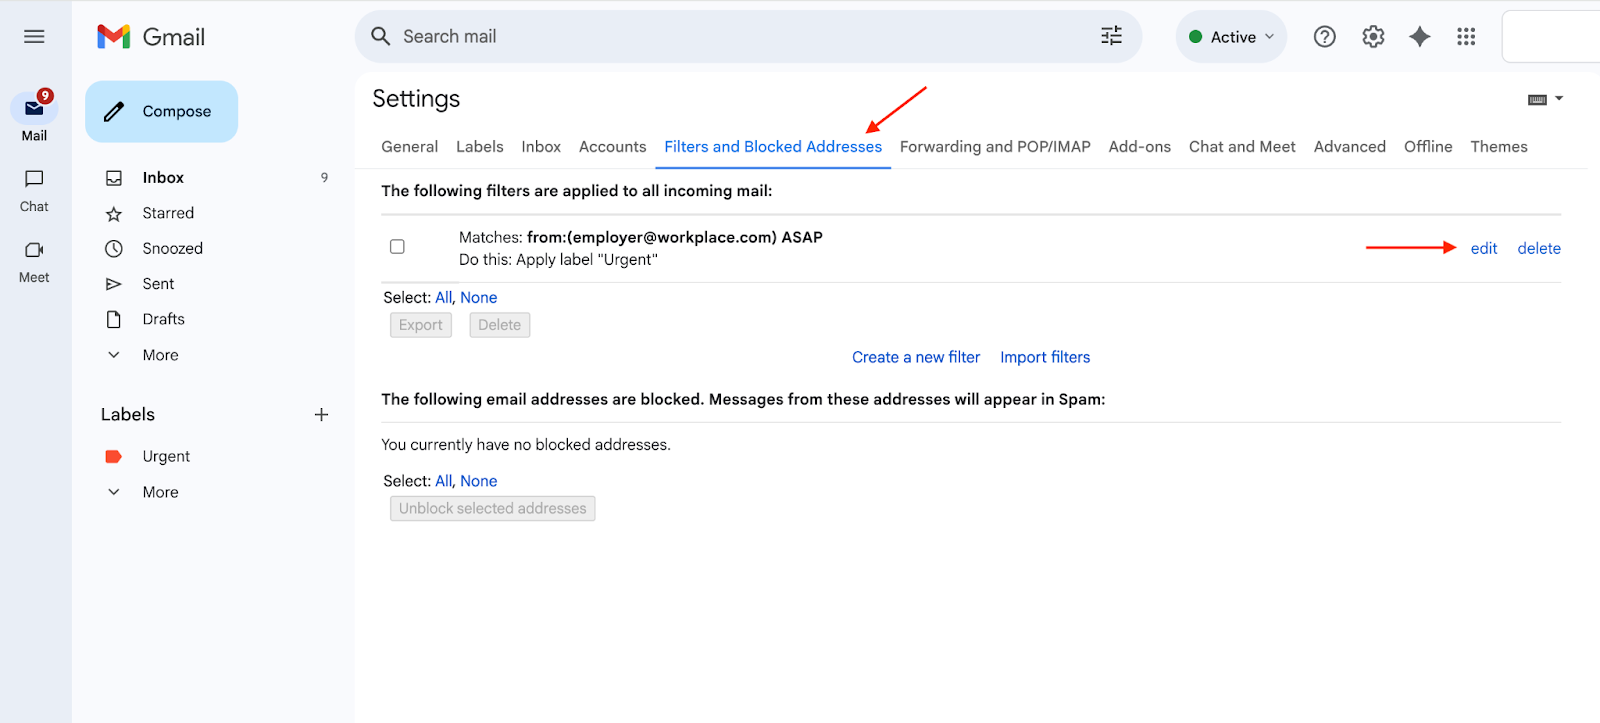
- Click on the “Filters and Blocked Addresses” tab. Make the appropriate changes to the label that you want by clicking the “edit” or “delete” links next to it.
Save time with Jotform’s AI-powered email assistant
Looking for more ways to streamline your email workflow or email marketing efforts? Jotform’s Gmail Agent was created with your daily communication needs in mind.
Key features and benefits include
- Faster response times: When new emails arrive, Gmail Agent drafts replies instantly, cutting down hours of email time.
- Consistent voice: Gmail Agent automatically learns your preferred tone and style based on previous emails.
- Total control: Nothing gets sent without your personal stamp of approval.
- Work smarter: Gmail Agent can filter out emails that don’t require a response and automatically apply smart labels for better inbox organization.
- Privacy and compliance: Gmail Agent is verified by Google, holds CASA Tier 2 accreditation, and meets SOC 2 Type 2, GDPR, and HIPAA compliance standards. Your data is always encrypted and never shared.
Best of all, Gmail Agent works with your existing Jotform AI Agent to keep communication consistent across various channels, from web forms to emails. Knowledge bases are shared and all email drafts appear in the agent’s Conversations Inbox for full visibility. This helps you save time, stay consistent, and deliver better customer service.
Ready to save hours by writing smart, on-brand replies to incoming emails without having to dig through old threads? Securely connect your Gmail account to your Jotform AI Agent for free and start optimizing your email management today.
This article is for busy professionals and entrepreneurs to students and everyday emailers who use Gmail and want a simple, step-by-step way to organize their inbox and cut down on wasted time.


Send Comment:
8 Comments:
More than a year ago
I wonder if you can help me with a related gMail issue? My inbox is OK, complete with the usual 'Sent', 'Drafts' and 'Bin' etc.
However something seems to have changed recently. All my Labels appear underneath the Inbox listing but they now have a section header called 'Labels'. Of course I don't need a header to tell me that the labels are indeed, labels.
Is this a new gMail "feature" or can I remove it?
More than a year ago
Thank you! I was looking for this kind of feature
More than a year ago
super helpful
More than a year ago
i should have done this years ago, good article
More than a year ago
Great article! It helped me de-clutter my inbox. Thanks a ton.
More than a year ago
Reset email password
More than a year ago
This is a great article and helped me.
But I ran into quite a few issues that I can't understand or find reference to. Maybe gmail has 'changed' since this article?
Some of my filters 'didn't work'. I created a 'work' label, with a sub-label and another sub-label under that. Work/NEP/booking confirmation. But the label had 'nothing' in it.
I haven't been able to resolve the issue and noticed there are quite a few options I don't understand. What does the 'Date within 1 day' mean? Should I 'Skip the Inbox'?
I've been poking and prodding... but I'm still coming up with donuts.
I'm looking forward to getting this sorted though.
Also, I've noticed that opening gmail on my iPhone doesn't display the labels looking anything like my laptop... so, I need to work that out too.
But a good basics primer.
More than a year ago
Looks good son!