
Microsoft Teams, a powerful messaging app, is a go-to tool for many businesses and organizations using the Microsoft suite of tools. With Microsoft Teams, staff can collaborate, hold real-time meetings, share files, and easily communicate. Features like group calling, synced calendars, apps, and more make Microsoft Teams a powerful tool for facilitating hybrid or remote work. Additionally, Microsoft Teams is a popular choice for education, including for virtual classrooms.
Microsoft Teams meetings are particularly valuable when you want to collaborate with your staff or engage with your students in real time. While the meetings can support larger groups, sometimes creating smaller groups is important, too. If you have a group that needs to focus on a certain issue that doesn’t concern the rest of the larger group, Microsoft Teams breakout rooms can be ideal.
Pros and cons of Microsoft Teams breakout rooms
With breakout rooms, you can create a sub-meeting within your Teams meeting. These breakout rooms can give smaller groups designated spaces to collaborate and communicate during the Teams meeting. You can create breakout rooms before or during the Teams meeting, and these rooms allow groups to work without being distracted or interrupted by the larger meeting.
While Microsoft Teams breakout rooms can be helpful tools, they have some drawbacks. You’re limited to creating 50 breakout rooms per call, so this may not be an ideal solution if you want to break a meeting into more than 50 groups. If a participant joins the meeting late, you’ll need to assign them to a breakout room, so this technology requires some monitoring.
How to create and manage Microsoft Teams breakout rooms
You can easily create and manage Microsoft Teams breakout rooms using the Teams for Windows or Mac desktop app. Keep in mind that the meeting organizer is the only one who can create or manage breakout rooms.
First, you need to create a Microsoft Teams meeting.
- Choose the Calendar button in the left menu.
- Select New meeting.
- Add the attendees to the group meeting.
You can create your breakout rooms before the meeting starts:
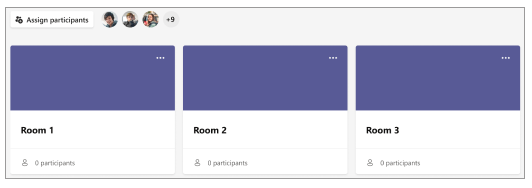
- Open the Microsoft Teams meeting invite.
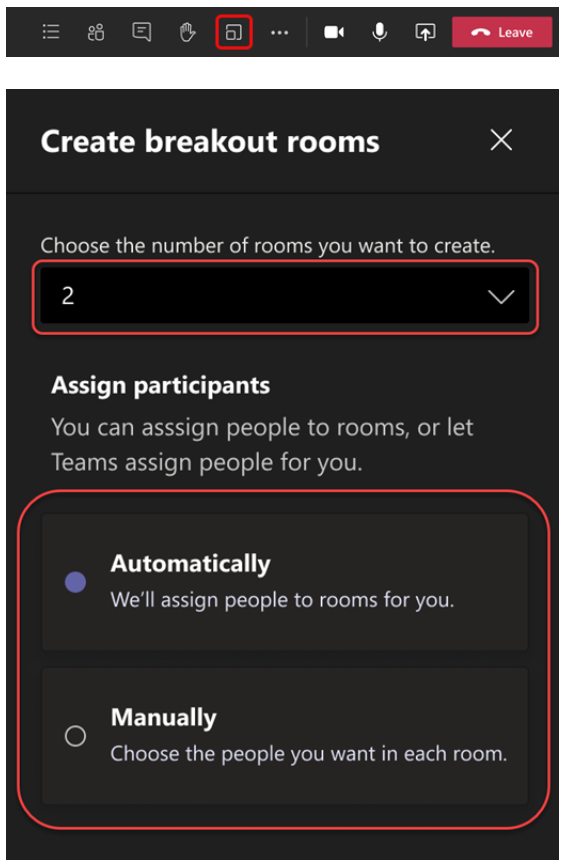
- Navigate to the breakout rooms icon (the square inside a larger square) in the top menu bar.
- Select Create rooms.
- Choose the number of rooms you want to create from the dropdown menu.
- Select Assign participants and decide whether you want to assign participants manually or automatically.
You can also create breakout rooms during the meeting:
- Join the meeting and wait for the participants to join.
- Once the participants have joined, choose the breakout rooms icon from the meeting controls.
- Choose the number of rooms you want to create from the dropdown menu.
- Select Assign participants and decide whether you want to assign participants manually or automatically.
How to assign people to Microsoft Teams breakout rooms
If you choose to have attendees automatically assigned to breakout rooms, you don’t need to take any additional steps. If you choose to manually assign participants, you can assign participants to different rooms in a few simple steps.
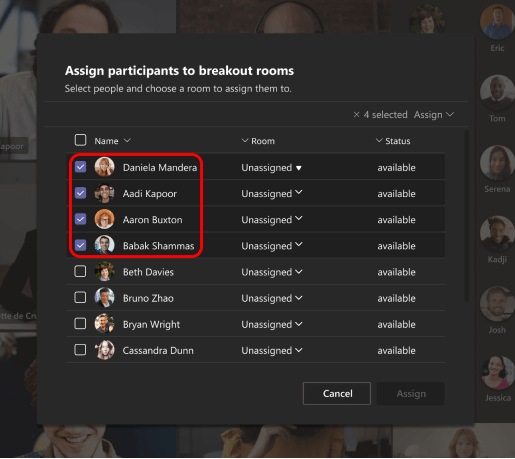
- From the breakout room dashboard, select Assign Participants.
- Select the down arrow next to Name or Room to organize the participants.
- Select the checkboxes next to participants’ names to group them together.
- Select the down arrow next to “Assign” and choose a room for the selected participants.
- Repeat these steps until every participant is assigned to a room.
- Click Confirm.
How to set a time limit for your Microsoft Teams breakout room session
You can set a time limit for breakout rooms, which helps ensure you still have enough time to engage with participants in the larger Teams group setting. Breakout rooms will display a timer and then automatically close at the end of the set time. Participants will automatically return to the main Microsoft Teams meeting.
It’s easy to set a timer for your breakout rooms:
- Click on the breakout rooms icon on the top-left section of the control bar.
- Choose the Room settings gear icon.
- Toggle on the Set a time limit option.
- Use the dropdown menus to choose your session length.
- Toggle on the Let people return to the meeting setting.
- Click the back button.
How to join and close a breakout room in a Microsoft Teams meeting
The process of joining a breakout room is easy for meeting attendees. When the meeting organizer assigns attendees to a breakout room, they’ll receive a notification. They simply need to select Join room on the notification, and they’ll be able to enter and participate in the breakout room.
If the meeting organizer has enabled attendees to leave the breakout room and return to the Teams meeting, attendees can click Return to leave the room and enter the larger Teams meeting.
How Jotform can maximize your value from Microsoft Teams and breakout rooms
Organizing Teams meetings as well as breakout rooms can be a lot to manage. The Jotform and Microsoft Teams integration can help maximize the value you get from Microsoft Teams while also streamlining your processes and saving you some administrative work.
When you use the Jotform and Microsoft Teams integration, new Jotform submissions or completed e-sign documents can automatically trigger direct messages or channel messages to Microsoft Teams. These submissions can create calendar events in Outlook.
For example, let’s say that your sales team has been waiting on a client to sign a contract. When that e-signed document is received, your sales team can receive a channel message on Microsoft Teams.
The message will ensure that your whole team knows the client has signed the contract, and they can promptly take action and move the client along to the next step in the process. Your team can immediately start working on the assignment the contract covers. It’s a great way to demonstrate that your business has established smooth processes and values its clients.
You can also set up an automation to create a new meeting from a form submission. This feature is a valuable option for sales or marketing teams, customer service teams, and teachers who might be scheduling meetings like parent-teacher conferences.
Automatically creating meetings can save you time on calendar management and the back-and-forth that can occur with setting up meetings. It can be a particularly valuable tool when you have to schedule many meetings in a short period of time, such as in the case of parent-teacher conferences.
This integration also offers the ability to set up an action that sends a chat message when someone submits a form. Customer service or technical support teams might use this function often, since it allows them to promptly address customer concerns or client help requests. This function can work well when you have a whole team monitoring a chat channel, which ensures that a staff member is available to attend to each chat.
Thanks to this integration, you don’t have to worry about manually monitoring every form submission. It can streamline your workflow, save you time, and help ensure that multiple people on each team receive notifications so nothing slips through the cracks. The integration also ensures you can seamlessly add Jotform to your existing technologies and systems and enhance your use of Teams.
How to maximize your success with Microsoft Teams breakout rooms
Using Microsoft Teams breakout rooms isn’t difficult, but it does require a little practice. Set up some test meetings ahead of time and practice navigating the rooms in real time. Make sure you’re familiar with the process of adding participants to rooms, especially if you plan to manually assign participants.
You may also need to send announcements to the breakout rooms while the sessions are in progress. Find the Make an announcement setting in the breakout rooms meeting controls and familiarize yourself with how to send a message.
It’s also important to test out the chat function, which allows you to chat with participants while they’re in breakout rooms. You can access the function from your chats list or from the chat function while in the breakout room. As the meeting organizer, you can access all of the breakout room chats. Once breakout rooms close, the chat function also ends, so participants can’t send more messages. You and the participants will still be able to access the chat history, though.
Microsoft Teams is a powerful tool, and the breakout rooms function can help you to customize Teams to your smaller group meeting needs. Learning to use breakout rooms effectively can enhance your meetings and make Teams an even more valuable tool.
Photo by LinkedIn Sales Solutions on Unsplash


Send Comment: