We are thrilled to announce Workflows for Jotform Enterprise, our latest offering to help you streamline your tasks, processes, and payments. We have transformed Approvals into Jotform Workflows. Everything you love about Approvals is still here, with new features like integrations, payments, task assignments, and more.
With this powerful automation tool, you can create entire processes natively in Jotform Enterprise. Workflows is designed to consolidate tools used for data intake, routing submissions, sending emails, and integrating various tools into one centralized platform. In this post, we’ll cover five of our favorite Workflows features to highlight what sets it apart from other automation solutions:
- Integration with third-party applications
- Brand consistency with white-labeled approvals and tasks
- Payment collection within workflows
- Streamlined e-signature collection
- Automated emails and notifications
Automating tasks and approval processes significantly reduces manual effort. Workflows’ easy-to-use, no-code features empower employees to get more done by creating custom processes, integrating multiple task flows, and reducing bottlenecks.
Workflows is free for Enterprise customers, making it accessible to a wide range of organizations regardless of size or budget limitations.
Top benefits of Workflows
Workflows for Jotform Enterprise is a flexible and customizable solution, making it suitable for various industries. Its features include
- A drag-and-drop builder: Create workflows without any coding.
- Conditional logic: Keep projects moving using conditional logic to direct actions and speed up decision-making.
- Automation: Set up advanced automations for internal and external requests using predefined triggers and conditionally assign follow-up forms.
- Third-party integrations: Use conditional integrations to leverage the power of Google Drive, Slack, Microsoft Teams, and more — when and where you need them.
- Payment requests: Collect and manage payments natively in Workflows.
- Task assignments: Review documents, submit reports, and automate notifications and reminder emails to teammates.
- Approval flows: Get approvals from multiple stakeholders, track decisions, and route processes accordingly.
- Notifications: Alert users when specific conditions are met or tasks are pending.
Many enterprise organizations struggle with creating efficient workflows. Juggling multiple tools for payment collection and task management can result in bottlenecks and time-consuming processes. We designed Workflows to optimize the user experience.
With Jotform Workflows, you can
- Automate and manage complex workflows directly from Jotform Enterprise
- Link forms to Workflows for smoother data handling and process automation
- Reduce the time spent on repetitive tasks and focus more on strategic activities
- Customize Workflows according to specific business needs
- Combine form creation, task management, and payment requests from one platform
- Improve collaboration and coordination within teams to enhance productivity
- Cut down on costs with a free, easy-to-implement solution
Creating a workflow is simple. Navigate to Settings in the Form Builder, select Create Workflow, and start by dragging elements from the left side of the page onto your canvas.
Now, let’s take a closer look at our five favorite features of Workflows for Jotform Enterprise.
1. Workflow integrations
Jotform Enterprise has always boasted a vast library of third-party integrations for forms. Now, we’re taking integration and automation to the next level with new Workflows-specific integrations.
With Workflows integrations, you can drag and drop third-party applications directly into your Jotform Enterprise workflows. This lets your organization integrate different applications from your tech stack natively within the Workflows interface to automatically
- Create and manage tasks with Asana, monday.com, and ClickUp
- Send files with Google Drive, Dropbox, OneDrive, Egnyte, and Box
- Schedule meetings with Google Calendar and Microsoft Teams
- Send messages with Slack and Microsoft Teams
- Add customers and records to Airtable, QuickBooks, MailerLite, and Campaign Monitor
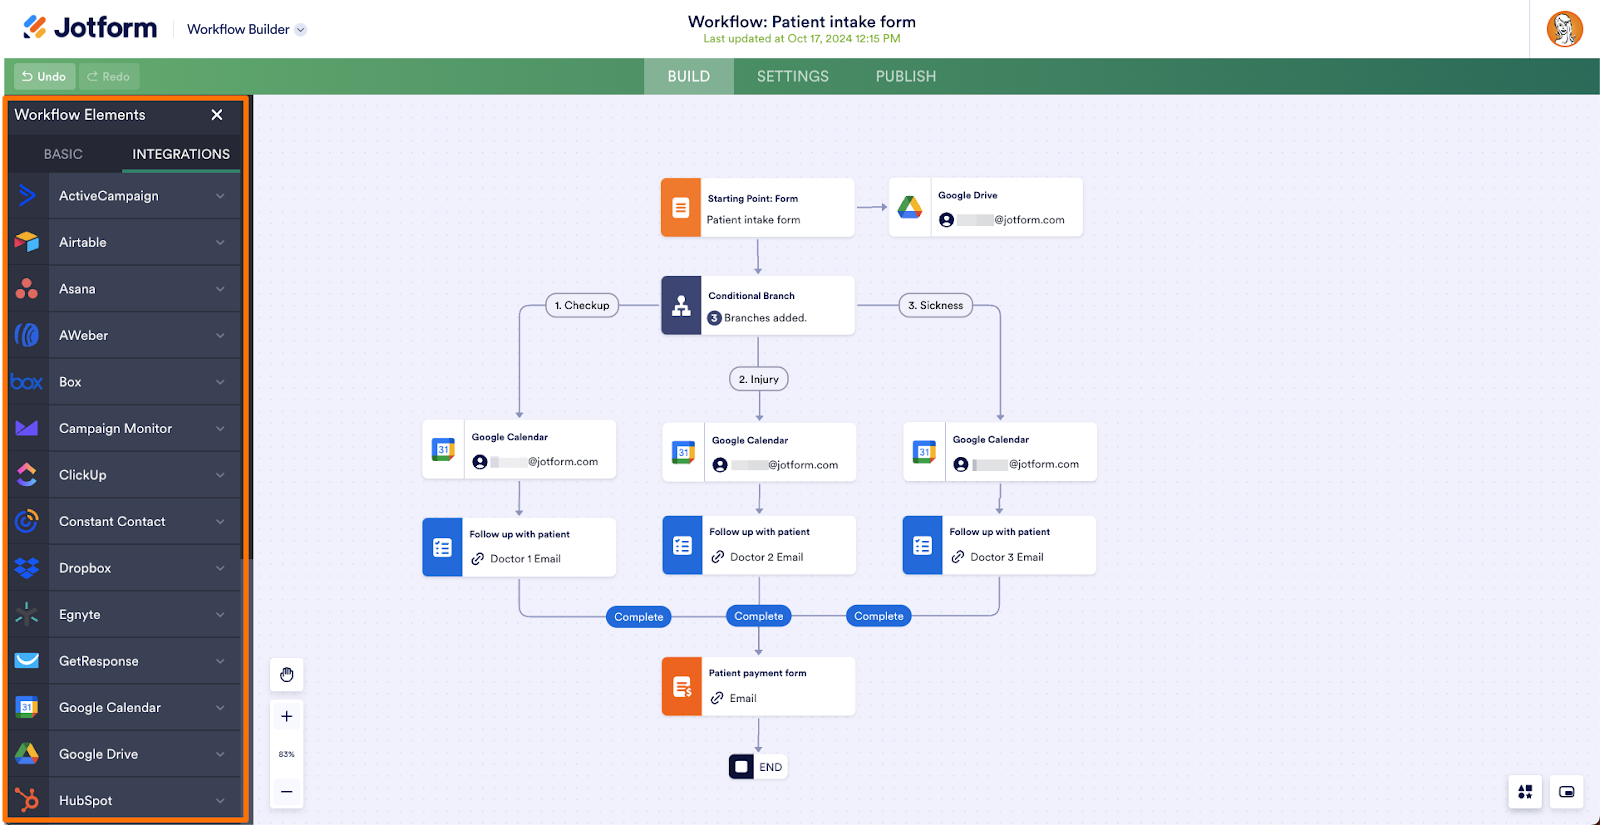
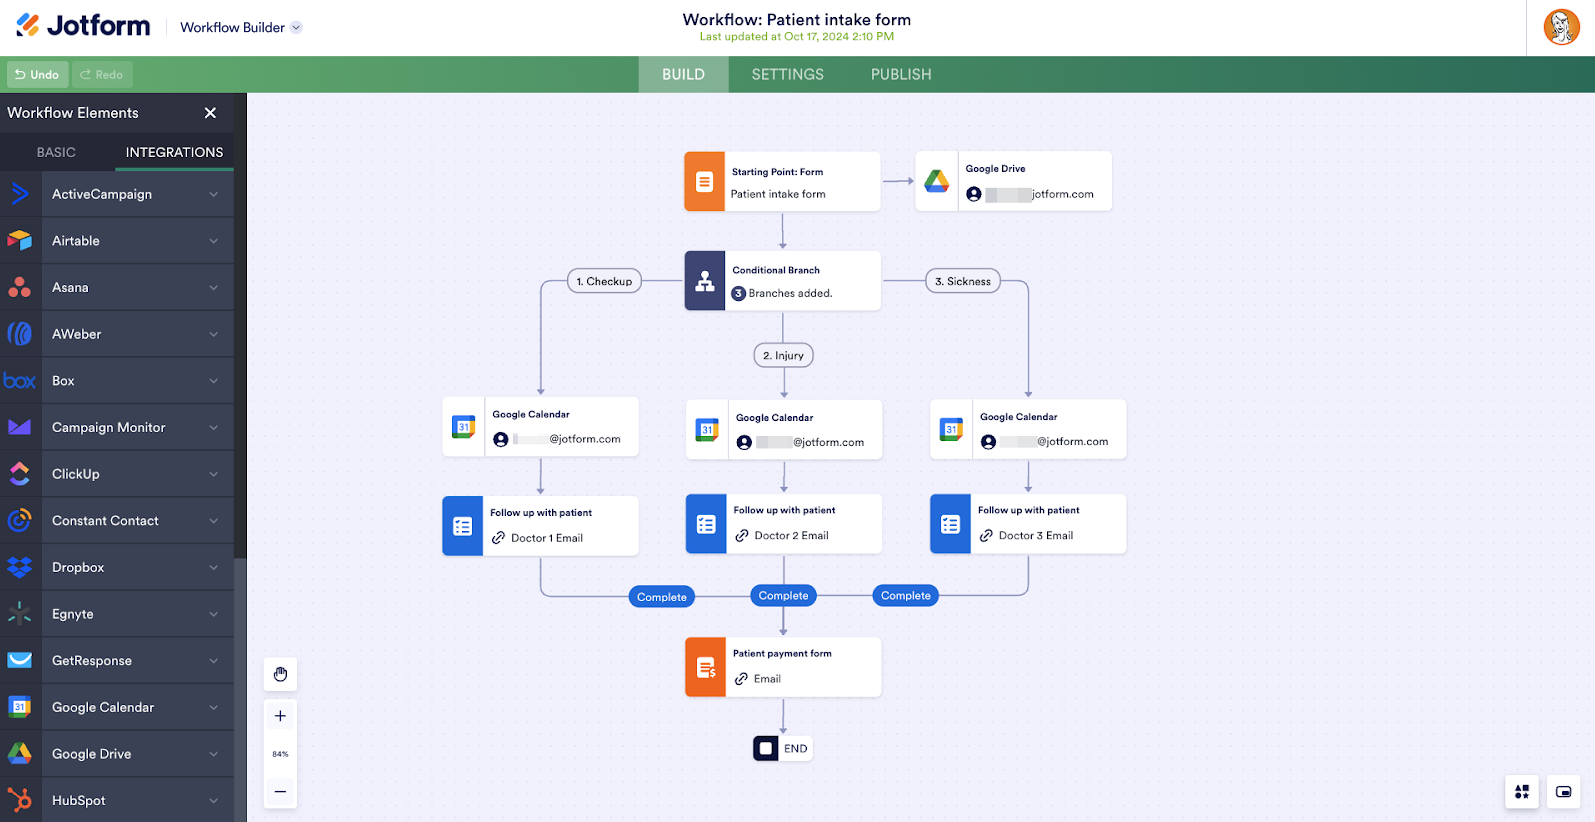
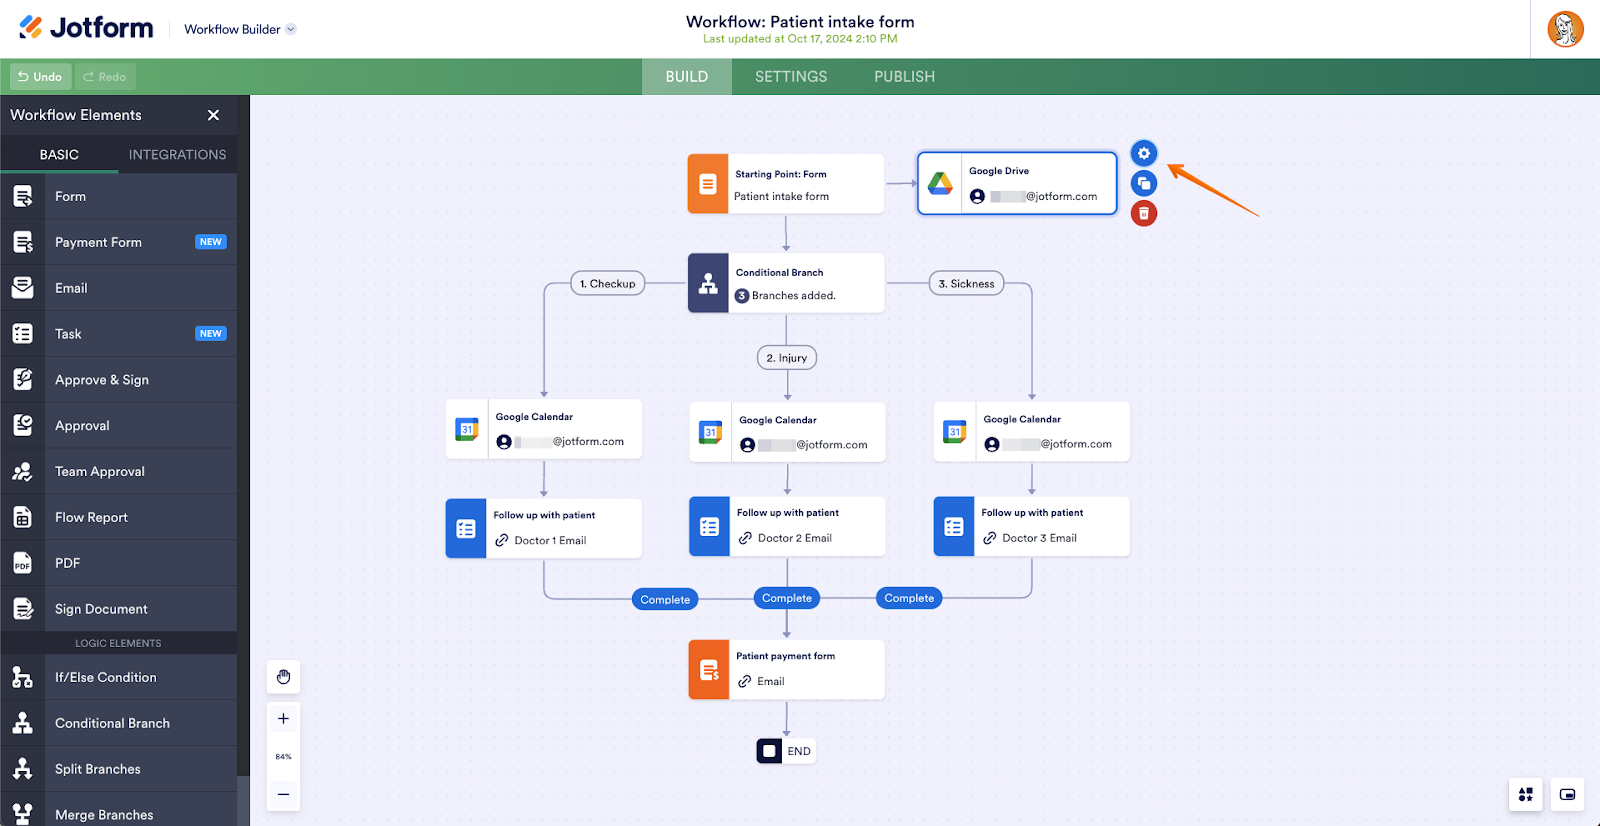
Let’s look at an example of how a healthcare provider can use Workflows to automate the process of onboarding patients, storing electronic protected health information (ePHI) in Google Drive, scheduling appointments with Google Calendar, and collecting payments.
This workflow begins with a simple patient intake form. Using the form, our example healthcare provider can quickly and securely collect information and medical history from new patients.
When a new patient submits a patient intake form, all the information from the form is automatically converted into a PDF and stored in a designated patient data folder in Google Drive.
To set up this automation with Google Drive, drag the Google Drive integration into your workflow and connect it to your form. Next, click on the integration, and then click the gear icon to enter the integration settings. Here, you can link to the Google Drive folder where you want to store patient data.
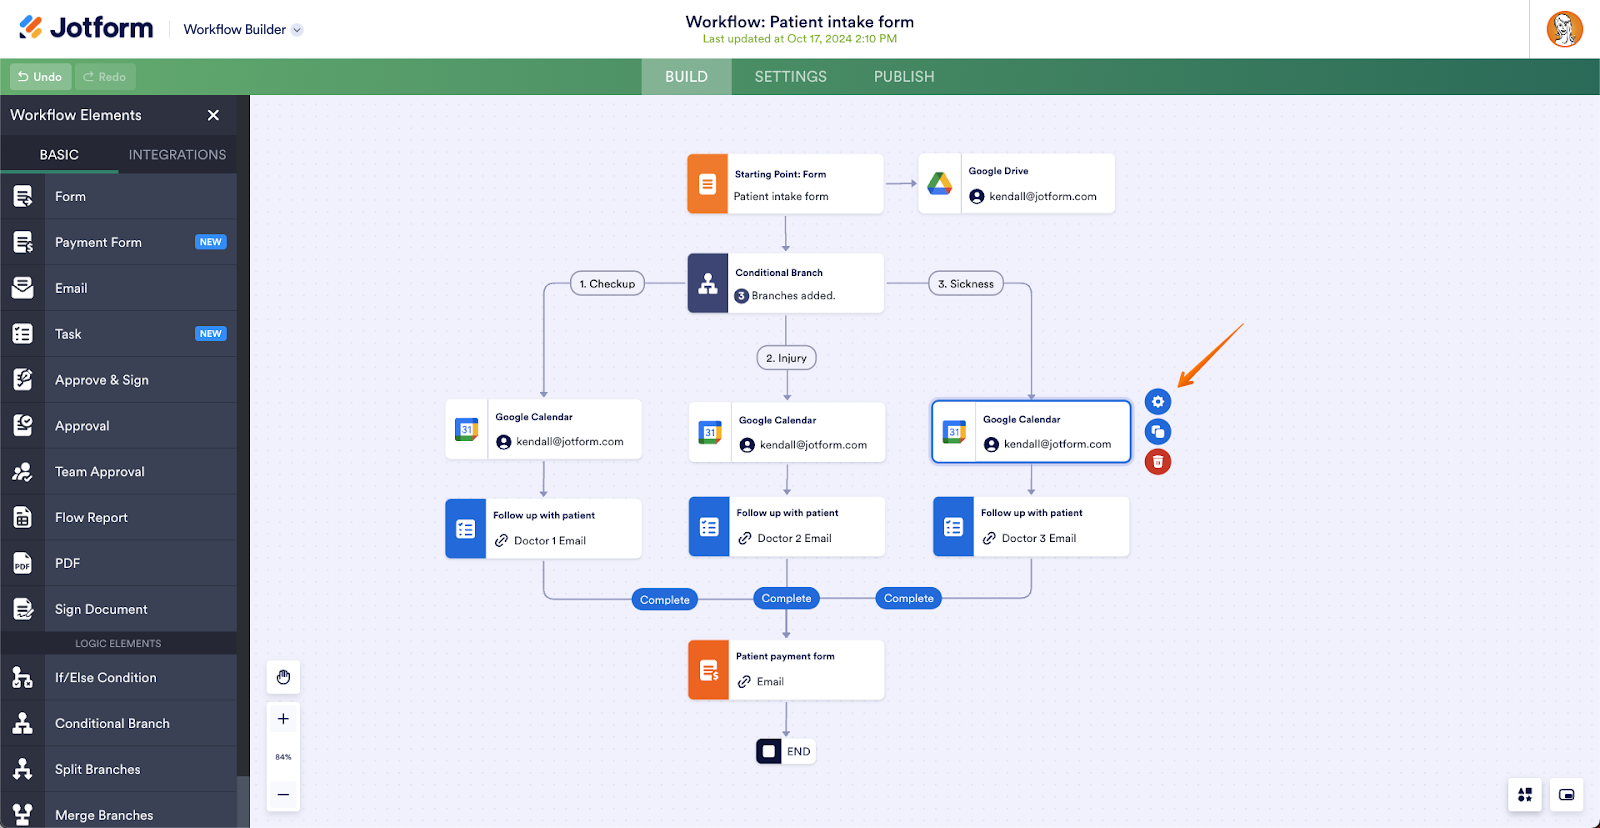
Moving down our workflow, the patient intake form connects to three different conditional logic branches. These paths use the Google Calendar integration to schedule doctor appointments with three different doctors. Patients who request a checkup are automatically prompted to schedule with Doctor 1. Patients with injuries are scheduled with Doctor 2, and sick patients are scheduled with Doctor 3.
Next, we’ll set up a scheduling automation with Google Calendar. Drag the Google Calendar integration into your workflow and connect it to one of the conditional logic branches (i.e. checkup, injury, or sickness). Next, click on the integration, and then click the gear icon to enter the integration settings. Here, you can connect to the appropriate doctor’s Google Calendar for appointment scheduling.
To set up the other workflow integrations, simply drag your desired integration into your workflow from the Integrations menu on the left. Then, enter the integration settings and log in with your credentials to connect the application to your workflow.
2. End-to-end white labeling
White labeling is crucial to creating a cohesive brand for your organization. Leveraging Workflows’ new advanced customization options, your organization can white label each individual step of a workflow process, letting your brand shine at every touchpoint.
In addition to Jotform Enterprise’s existing white-labeling capabilities for forms and e-signature documents, organizations can further strengthen their brand with fully customized approval requests and task completion pages.
For any industry, white labeling is a fantastic tool for improving the user experience across your workflow processes. Any organization that regularly uses Jotform Enterprise to send forms, documents, emails, approval requests, or tasks can benefit from more professional-looking outreach, both internally and externally.
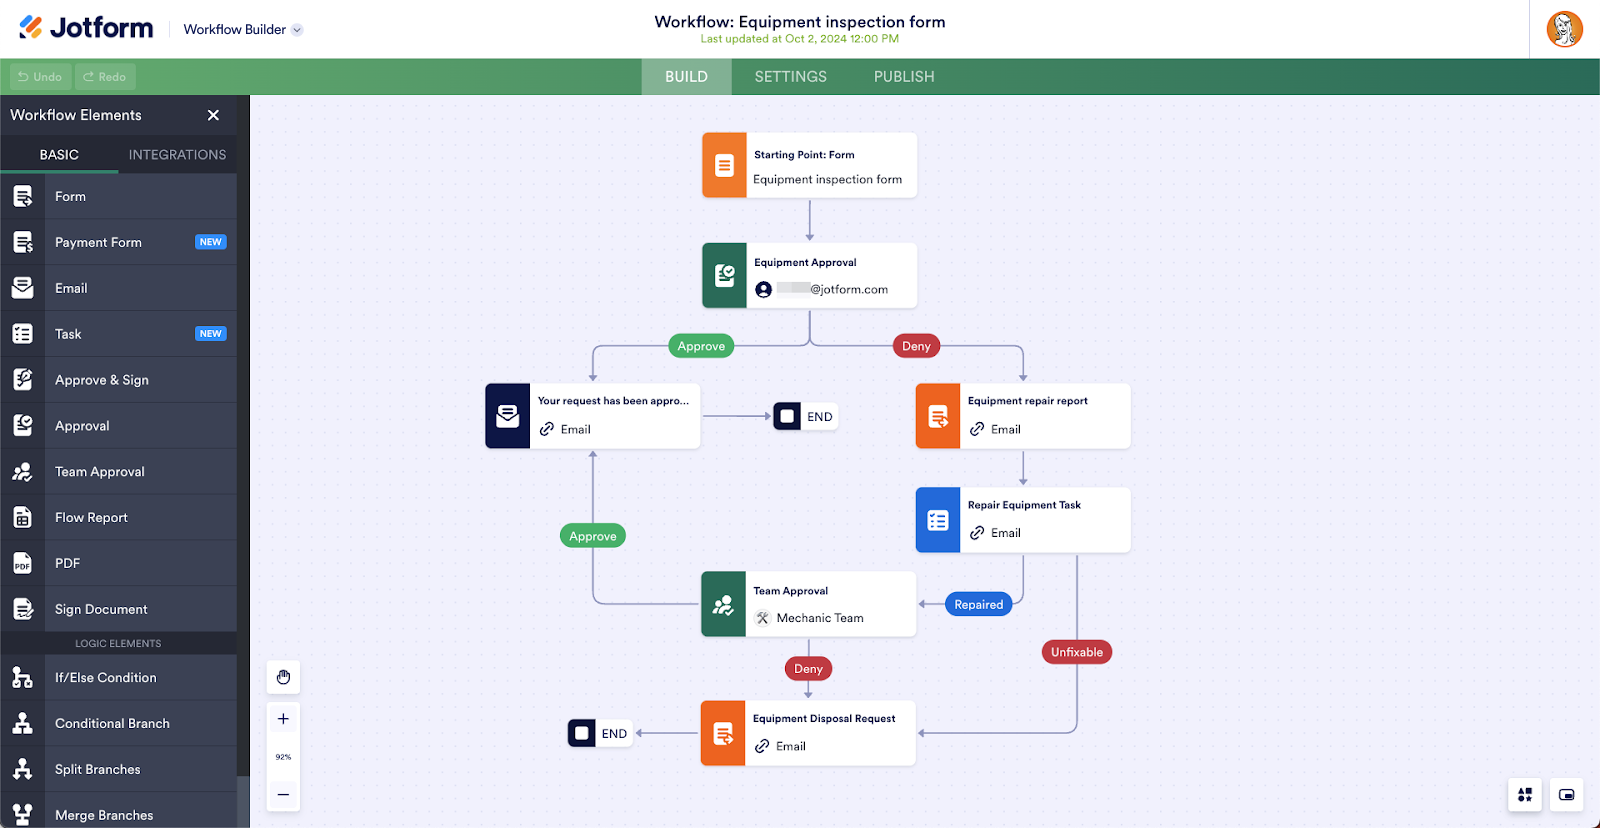
Let’s look at an example of how a field services management organization can use end-to-end white labeling in an equipment inspection workflow.
This workflow starts with an equipment inspection form, which employees fill out and submit. Using white labeling, our example organization has completely customized the form’s logo, colors, and style — no Jotform branding in sight.
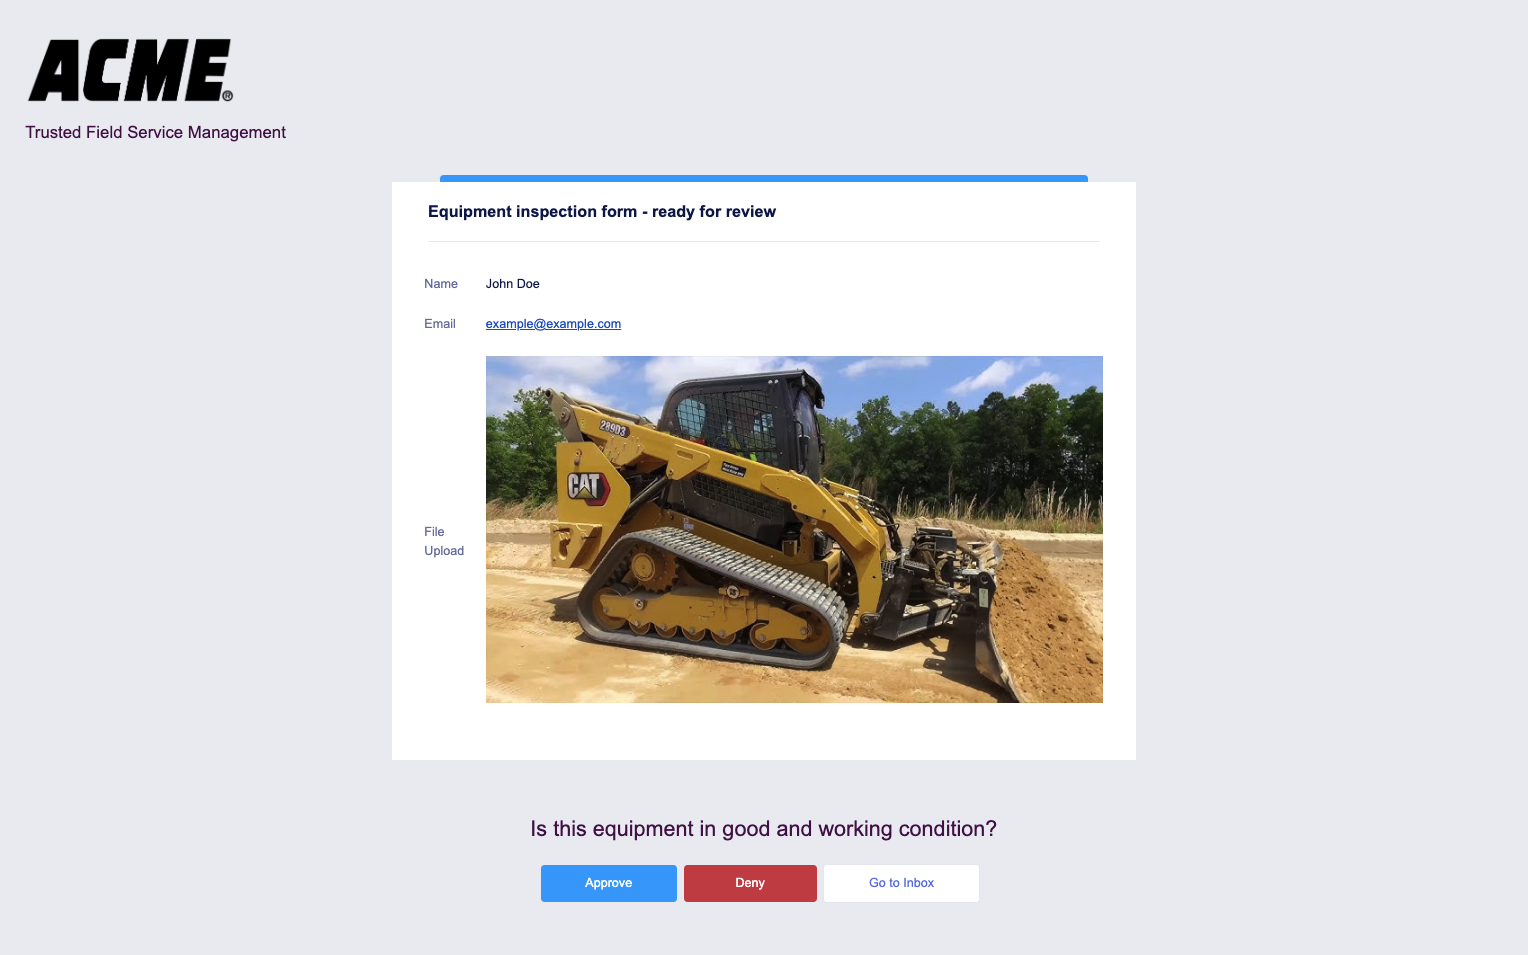
Submissions to this form are automatically routed to a senior manager to decide if the equipment is in working condition or not. With white labeling, we can fully customize the approval request email that is sent to the manager.
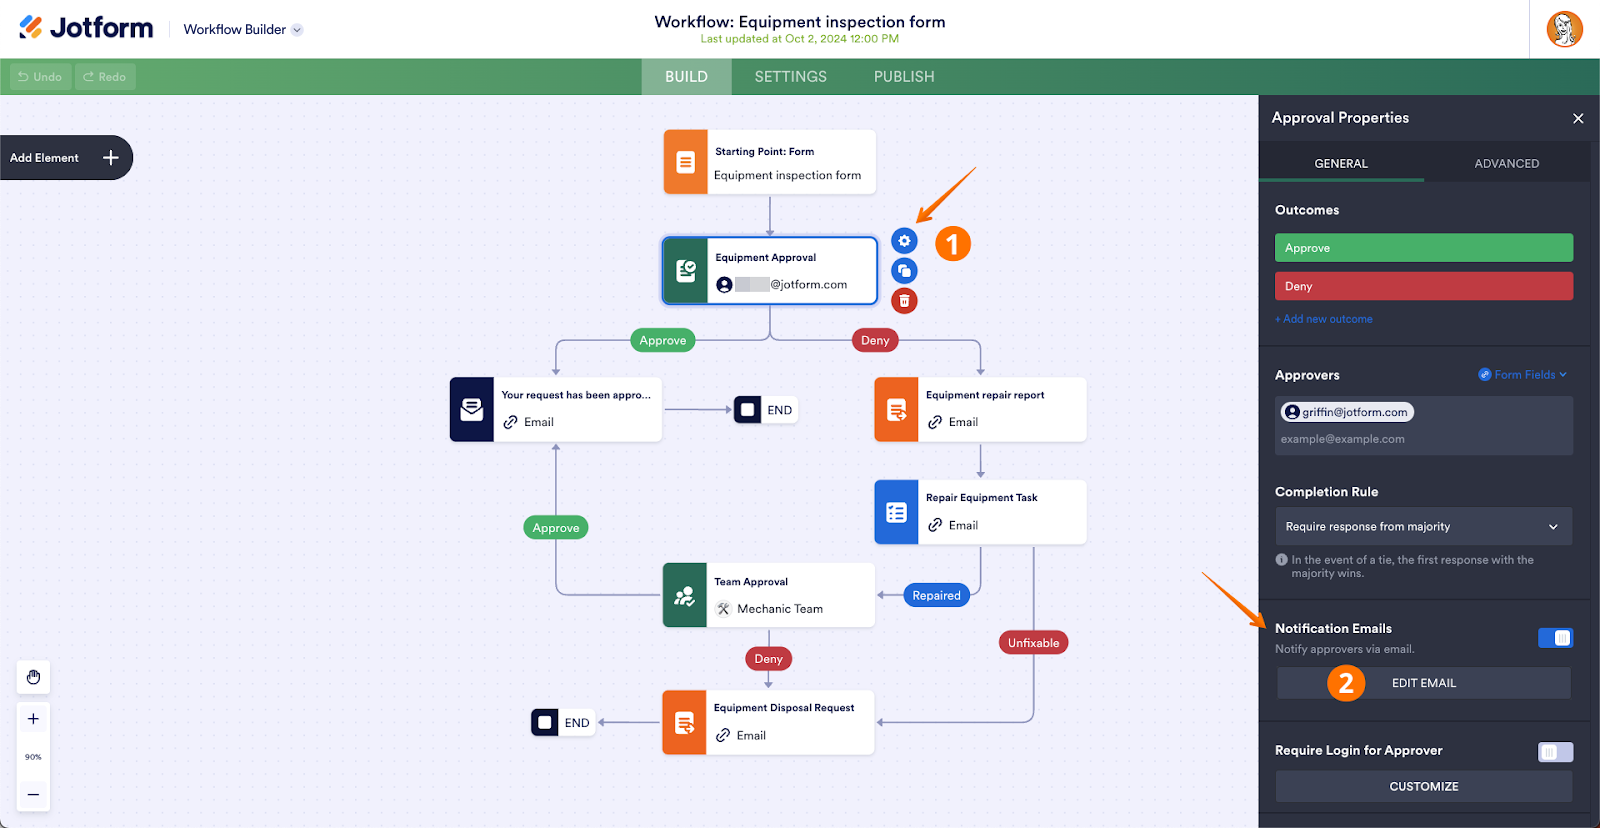
To do this, we’ll click on the first approval in the workflow, and then click the gear icon to enter the Approval Properties. In the Notification Emails section, click Edit Email to customize the approval email.
In the email customization window, we can add a company logo, select custom colors, change formatting, and include data from specific fields in the form, such as the name of the employee submitting it.
Click Save to finalize the white-labeled approval request. Now, when an employee submits the form, a fully customized approval email will be sent to the designated manager.
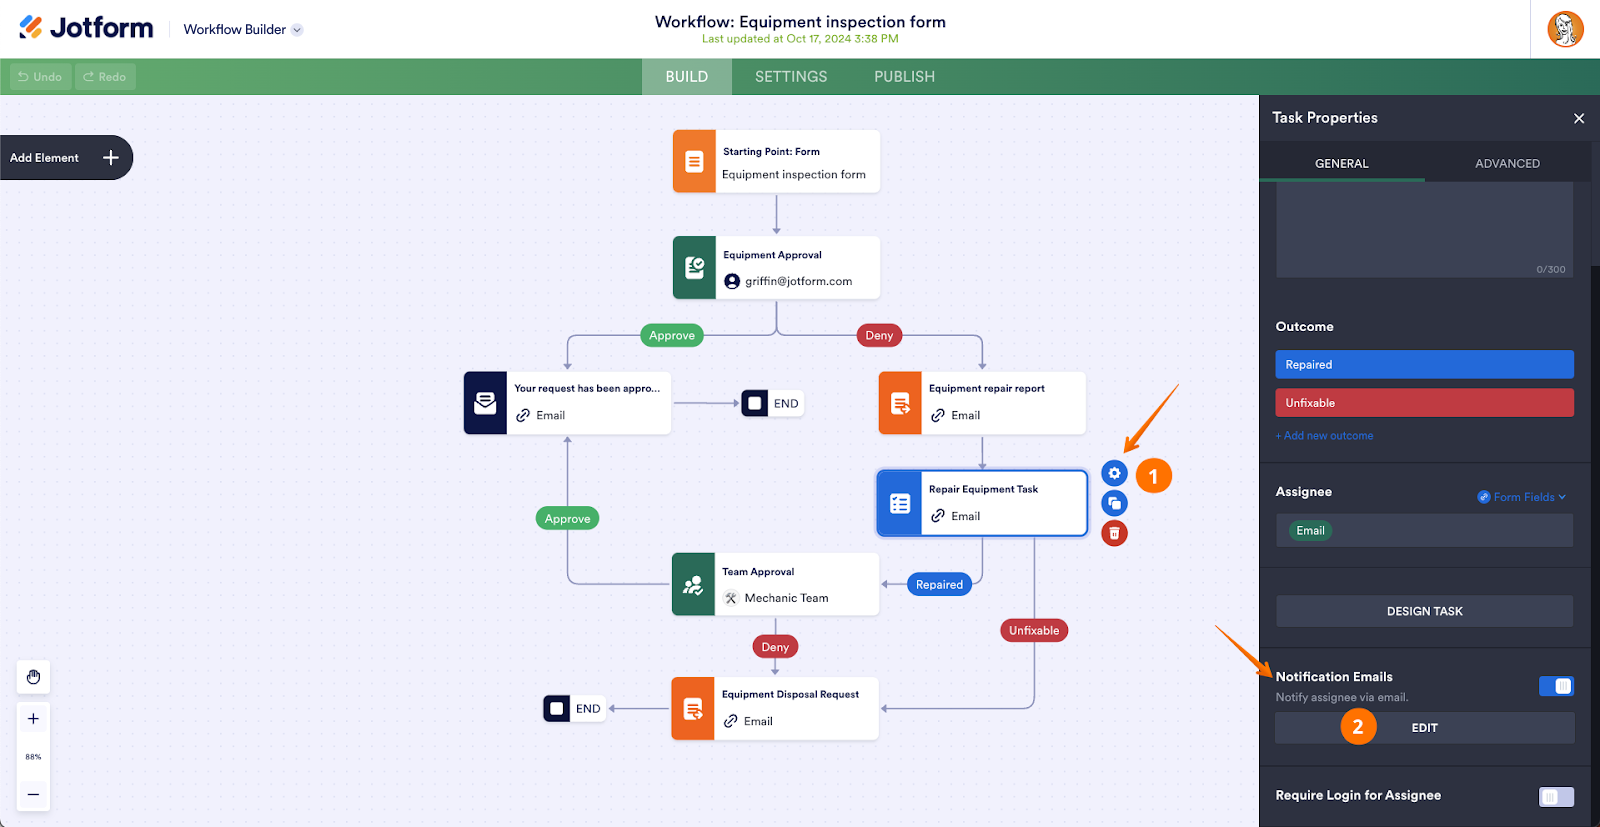
If the manager approves the equipment, the workflow will end. However, if the manager indicates that the equipment isn’t in good working condition, the workflow will automatically send an equipment repair form to the employee and assign them an equipment repair task.
We can use white labeling feature again to send employees custom-branded task requests. In this case, we’ll ask the employee to attempt a repair and report on the outcome in the equipment repair form. We’ll also assign them a task to indicate whether the repair was possible. Let’s look at how to customize the email for the task assignment.
To start, click the equipment repair task in the workflow, then click the gear icon to open the Task Properties. Here, we see options to describe the task and add potential outcomes — in this case, we’ll use Repaired or Unfixable. To white label the task email, we’ll click Edit in the Notification Emails section.
As with approval emails, you can add custom logos, colors, branding, and data from specific form fields to task emails.
When the assignee clicks View Task in this email, a task page will open. These task pages are automatically white labeled using your organization’s logo from the Admin Console.
In this example, the equipment repair task can be completed by choosing either Repaired or Unfixable. If the employee selects Repaired, their report on the equipment repair, including any photos they’ve uploaded, will be sent to a group of company mechanics for final approval. Selecting Unfixable will trigger an equipment disposal form to be sent to the employee.
This process shows how a field service company can use Workflows to automate the equipment inspection, repair, and disposal process, all while using white labeling to maintain a consistent brand throughout.
3. Requesting and collecting payments
Most organizations need to collect payments. Whether you’re part of a nonprofit accepting donations or a finance team processing vendor payments, you can include payment forms within your workflows in Jotform Enterprise.
Integrating payment collection with your workflow eliminates the need for separate systems, saving time and simplifying financial processes. The ability to request payments within an automated workflow is a distinctive feature of Jotform Workflows that’s not commonly found in other workflow products.
Jotform Workflows also provides top-notch protection for payments with PCI DSS Service Provider Level 1 certification — the highest level of security for businesses that collect payments from and integrate with credit cards.
To add a payment form, drag and drop the Payment Form element into your workflow. Then select an existing payment form and the email address for the person you’re assigning the form to. The Payment Form element only allows you to select forms that are already integrated with a payment processor, ensuring that you pick a form that’s already set up to accept payments.
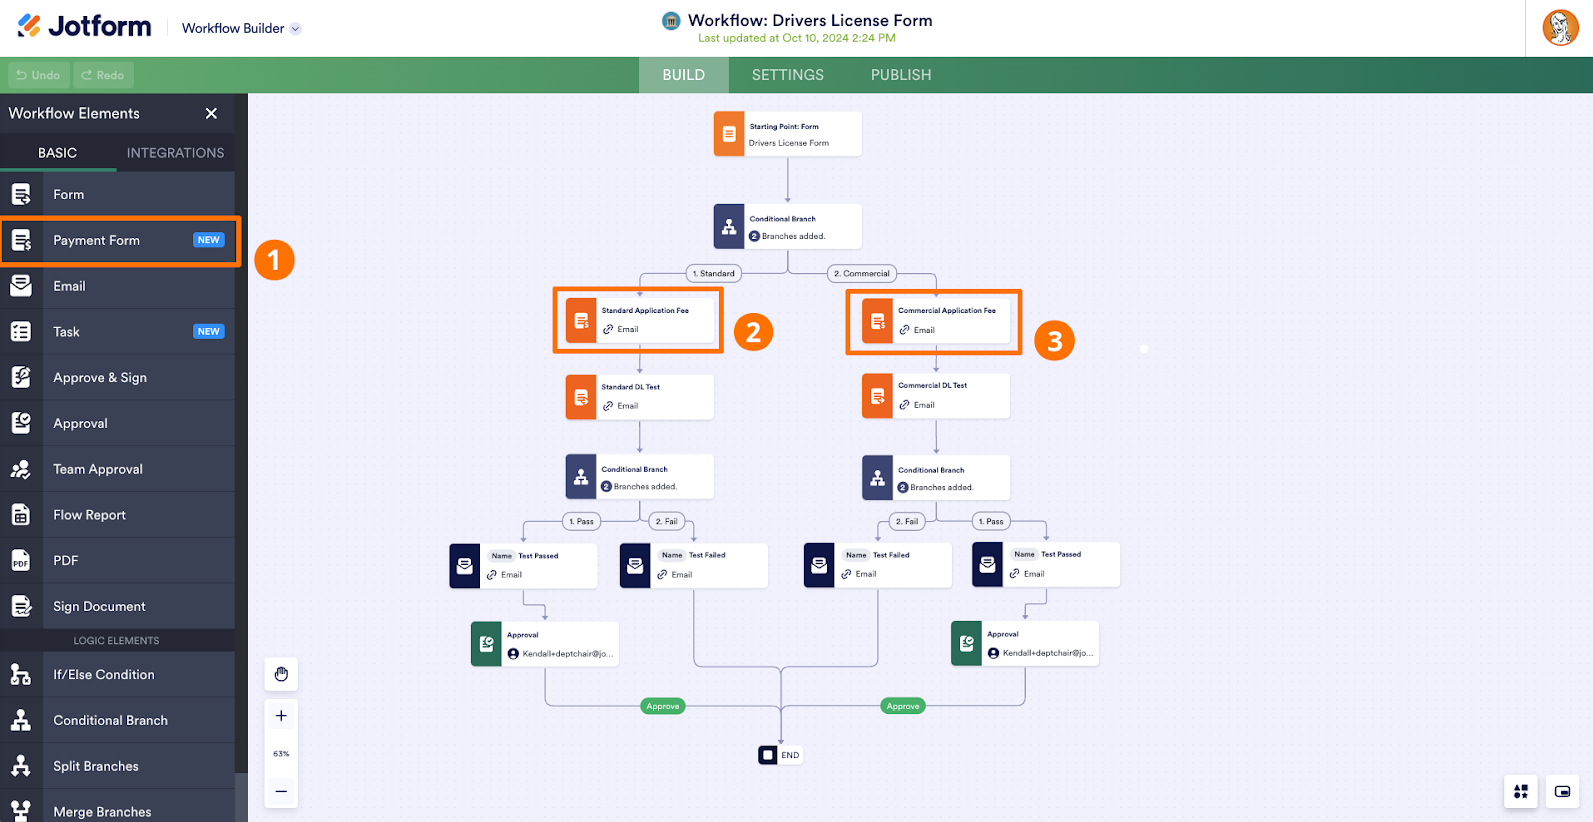
As an example, let’s walk through how the Department of Motor Vehicles (DMV) could manage the process of issuing driver’s licenses using the payment collection feature in Workflows.
This workflow begins with a driver’s license application form. In the form, the applicant is asked whether they are applying for a standard or commercial driver’s license.
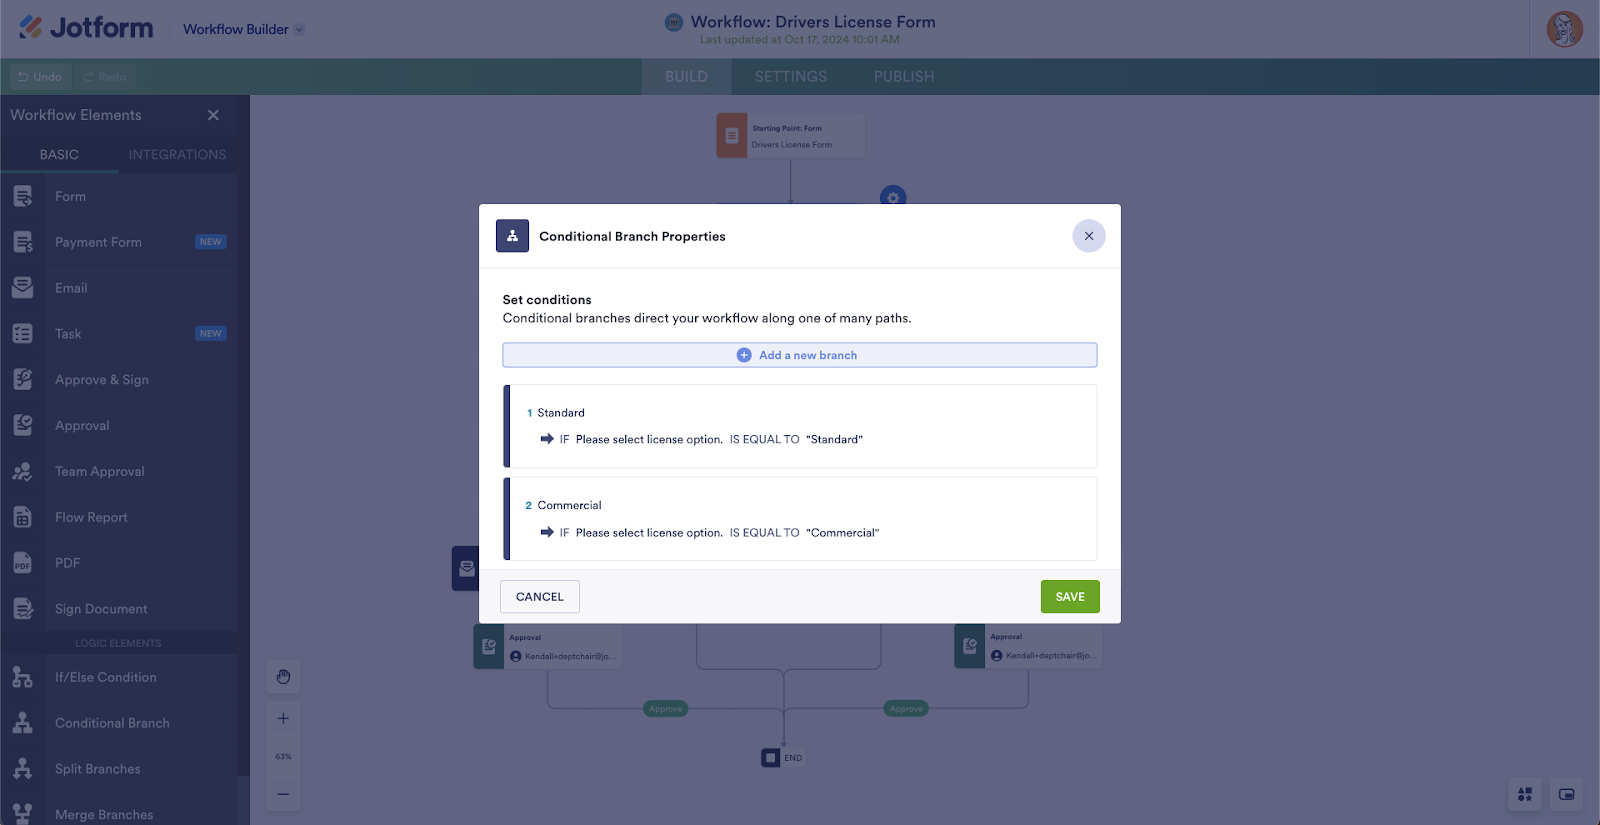
Next, a Conditional Branch element will route the applicant depending on whether they selected a standard license or a commercial license. These branches then lead to two separate application fee payment forms, as the payment amount differs depending on which license type the person is applying for.
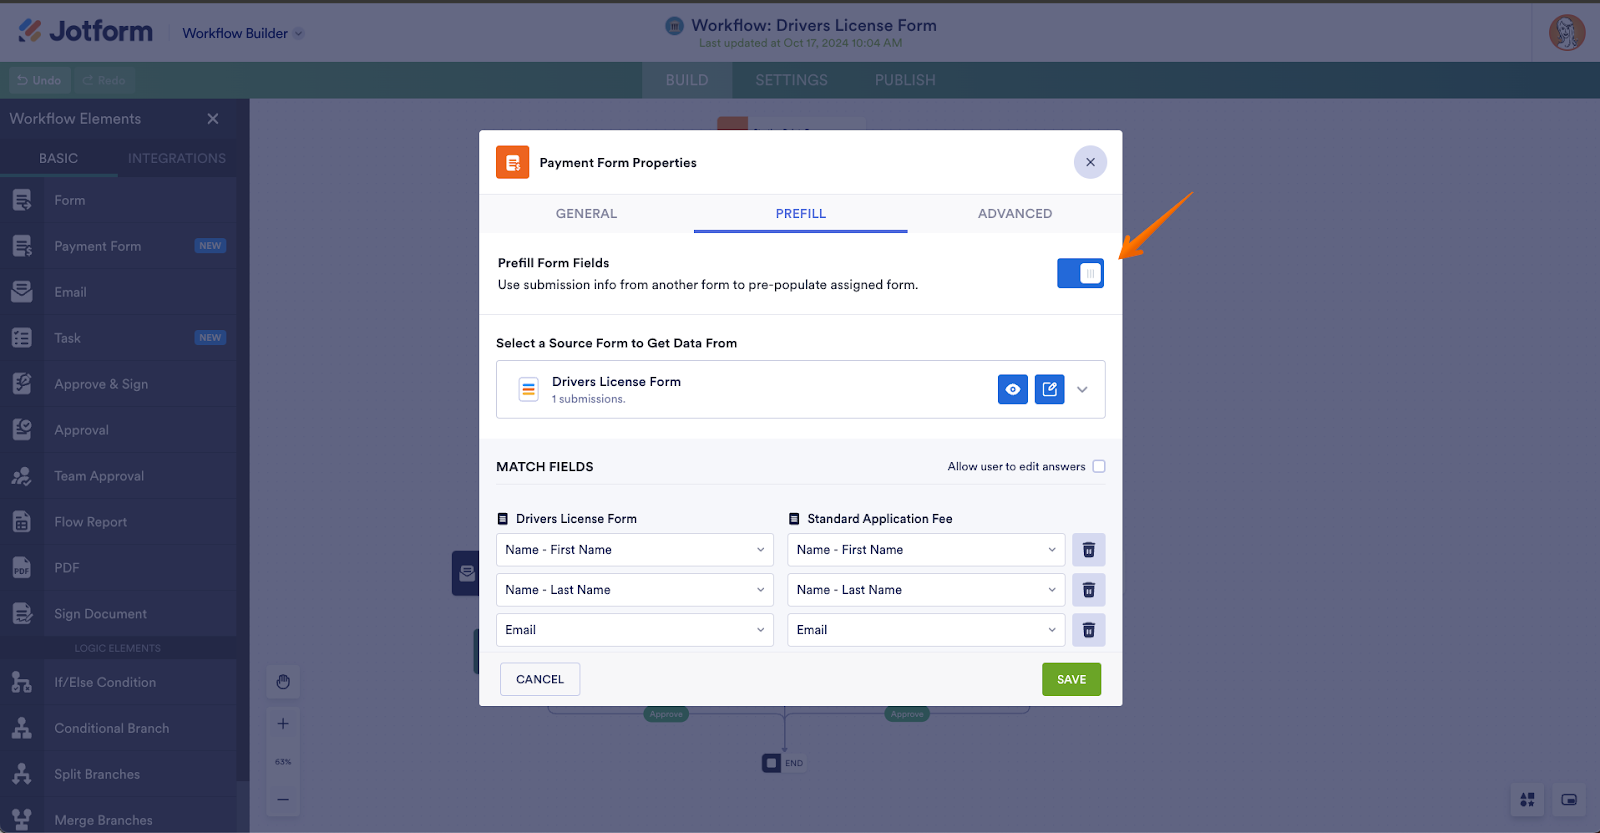
Next, the workflow can automatically pull the information from the original license request form into each payment form, so the user doesn’t have to fill in their information twice. To set this up, we’ll select the gear icon to open the Settings screen for each payment form. Then, we’ll toggle on the Prefill Form Fields setting in the Prefill tab.
Next, we select the form we’ll use to prefill data and choose which form fields to prefill. We can also allow the user to edit their answers from the original form, in case they would like to use a different email address, for example.
The payment form, with the selected data prefilled, will be sent to the applicant’s email address. Once it’s completed, the applicant will automatically be sent a driver’s license test.
Each question in the driver’s license test is assigned a value, and the score is calculated automatically — a huge time saver for the DMV. Using another conditional branch element, the workflow then splits depending on whether the applicant passes or fails the test.
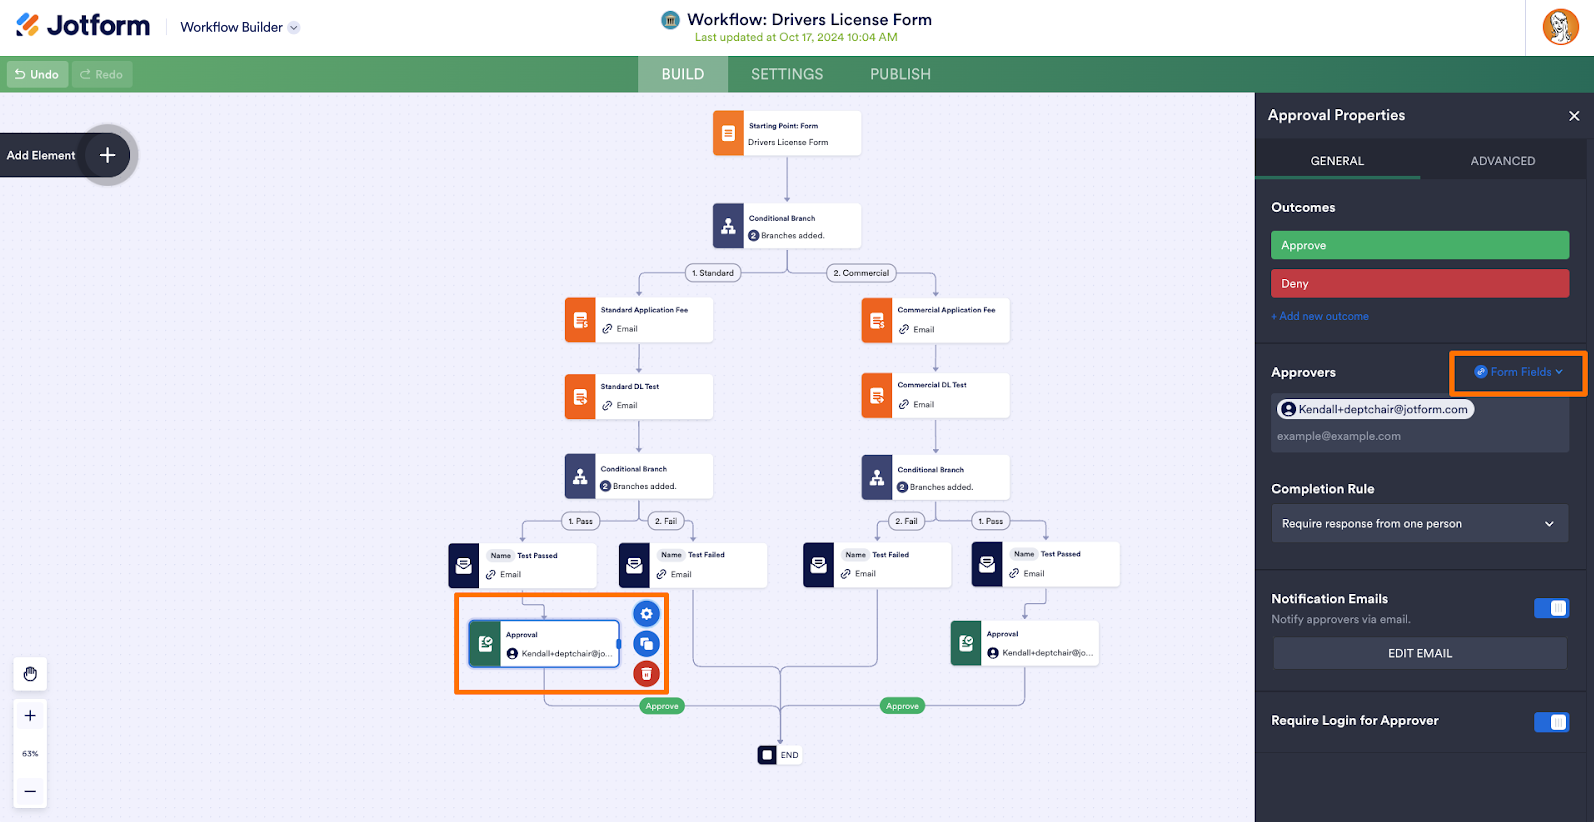
If the applicant passes, they receive an email with their test results, and an approval request is sent to the DMV to confirm the applicant can receive their license. You can edit the approval request options in the Settings of the Approval element. You’ll be able to set the approval outcomes, add any completion rules you want, and edit the notification email. Add approvers or prefill them using the Form Field dropdown menu.
After the appropriate DMV staff approves an application, the workflow ends. If the applicant fails the test, they receive an email with their test results and the workflow ends.
4. Streamline e-signature collection
Integrating e-signature collection into Workflows can streamline and accelerate approval processes. With Jotform’s dedicated e-signature solution, Jotform Sign, employees, customers, and other stakeholders can sign documents directly in Workflows, reducing delays and bottlenecks in approval processes. Jotform Sign is free to all Enterprise customers.
E-signatures provide a secure way to authorize documents, giving your organization peace of mind. Using Jotform Workflows and Jotform Sign, enterprise customers can easily track the e-signature process to ensure that all approvals are obtained in a timely manner.
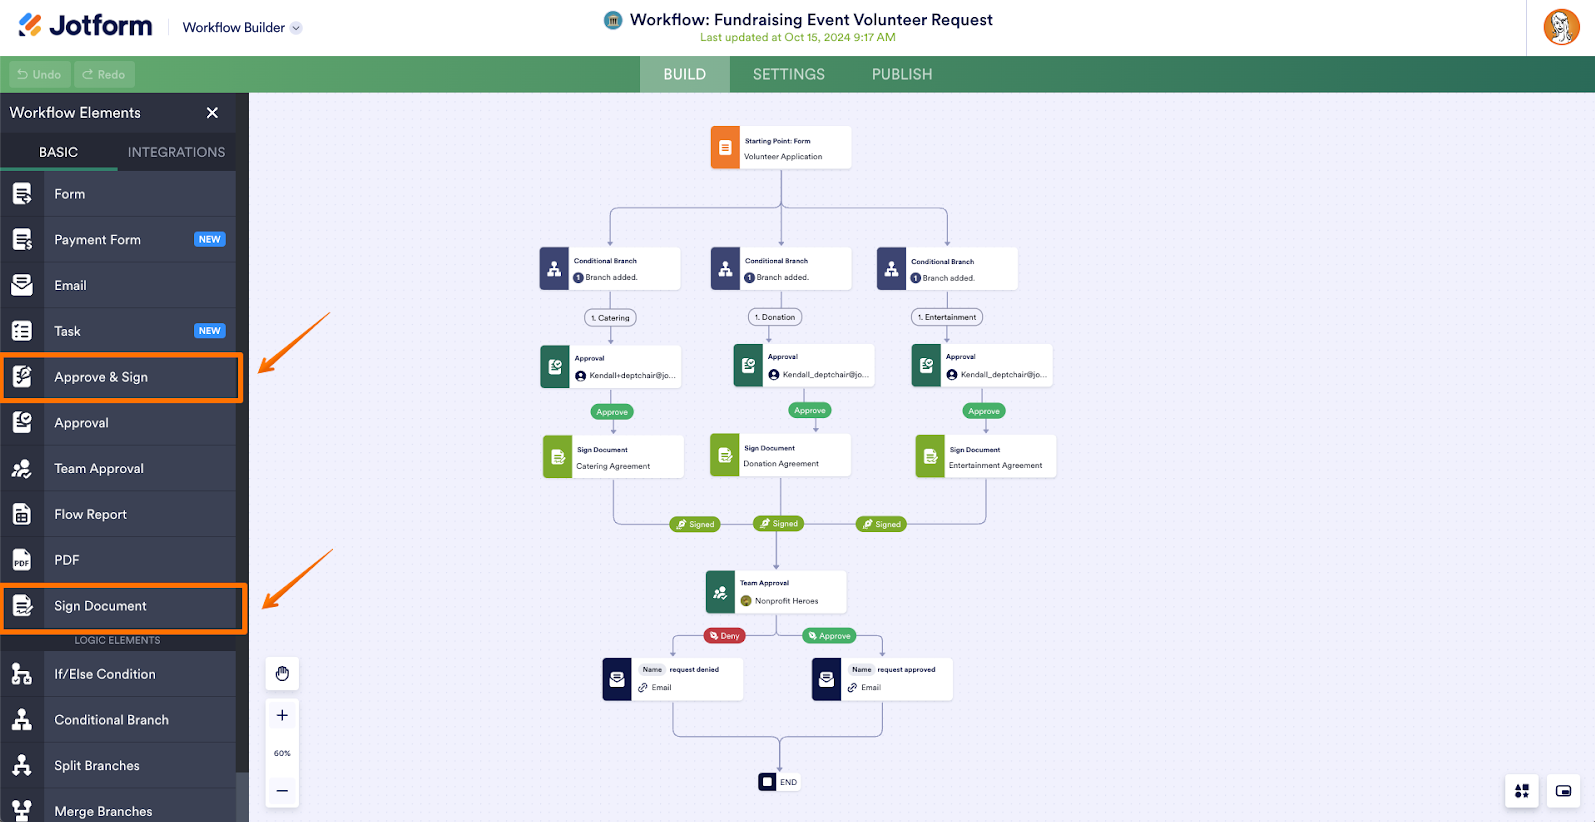
Workflows includes an Approve & Sign element that allows you to request e-signatures along with an approval action. You can upload a static PDF contract into Jotform and it will automatically detect the signature fields and transform it into an e-signature document.
With Jotform Sign enabled directly in Workflows, you can automate form filling for petitions, contracts, and more.
Let’s say you work for a nonprofit organization hosting a fundraising event, and you’re looking for volunteers to help with specific tasks. Here’s how you can use Workflows to streamline volunteer sign-ups.
In this example, the workflow starts with a volunteer application form that asks applicants to indicate whether they want to help with catering, donations, or entertainment.
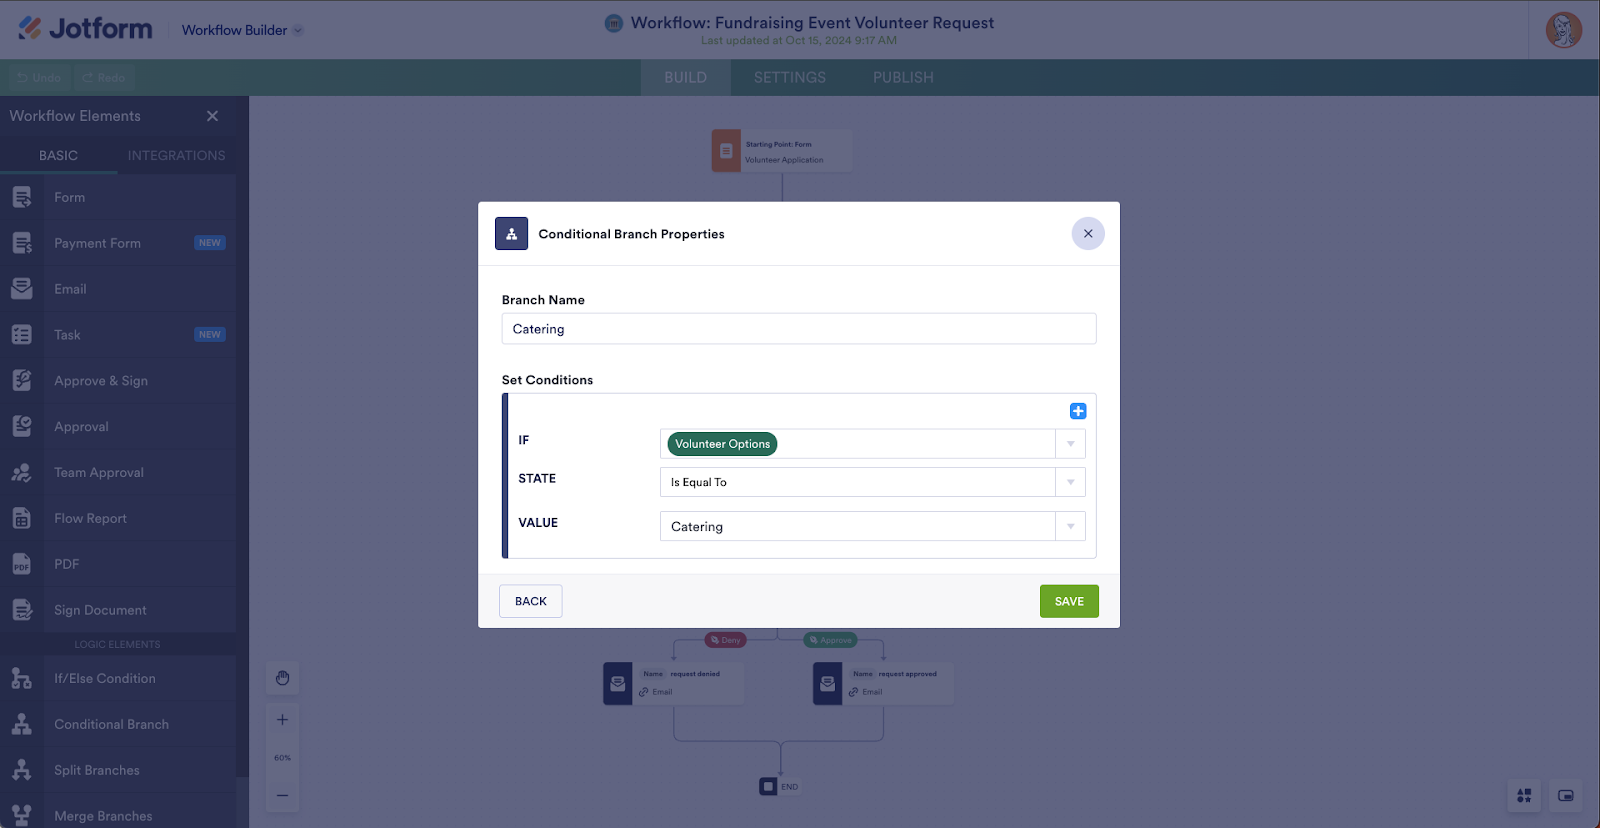
The workflow uses a Conditional Branch element to create a different sequence for each of the three volunteer position options. The form filler’s selection automatically triggers the appropriate next step for them in the workflow.
To set this up, select the Settings option for each Conditional Branch element to edit it. In this case, we named each branch according to the volunteer position the applicant selected. For example, if the form filler selects catering, the nonprofit’s event coordinator is notified to approve or decline the applicant.
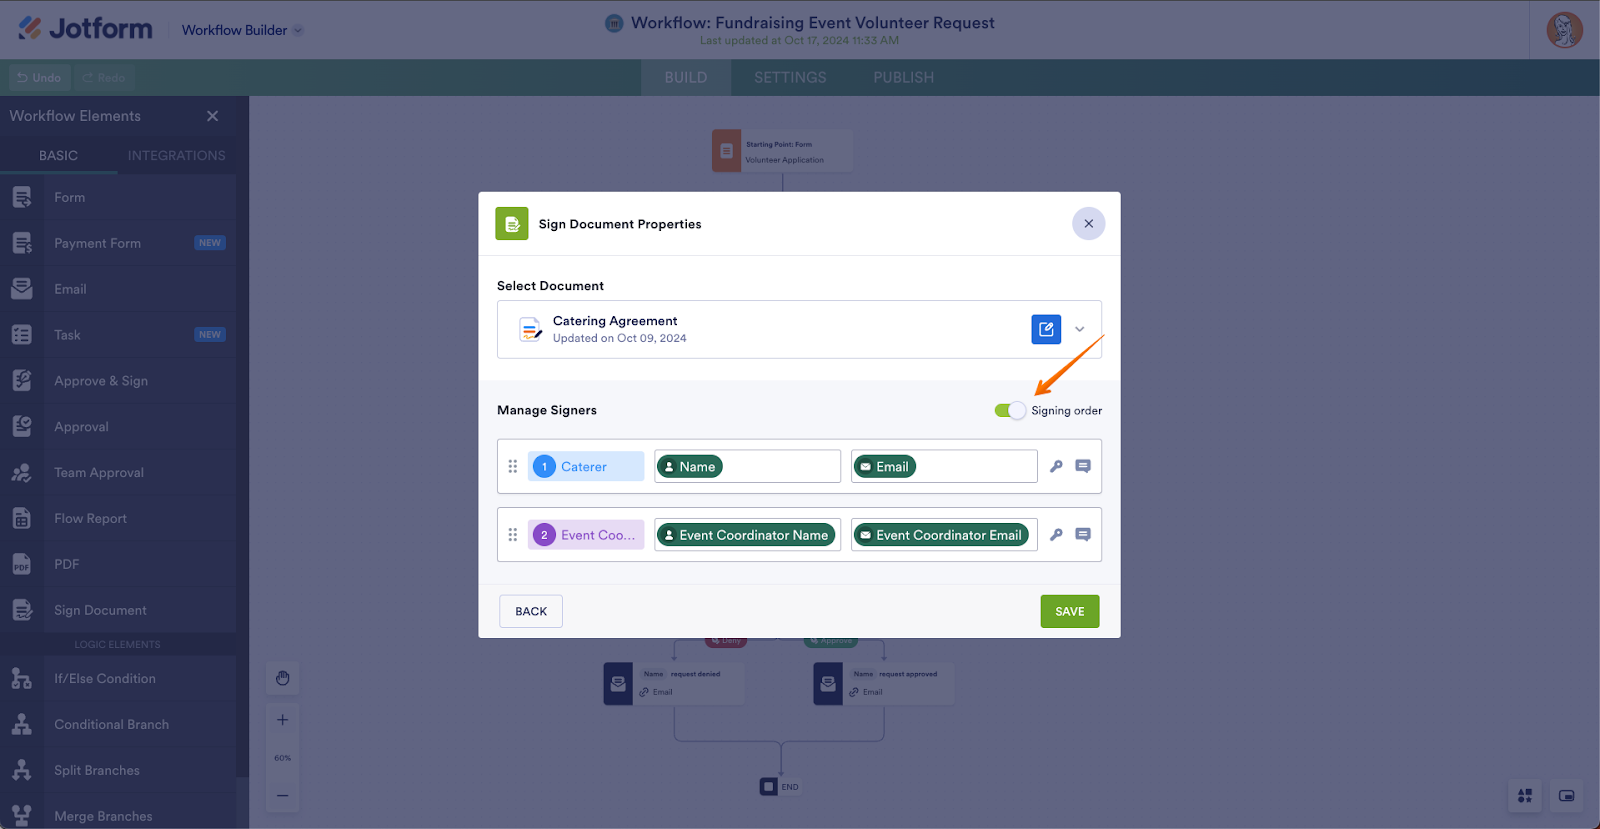
If the application is approved, the volunteer is sent a catering agreement to e-sign. To add an agreement to a workflow, drag and drop the Sign Document element into your workflow and choose the appropriate document.
Next, go to Settings to select your e-signature document and manage the signing order. In this example, we’ve set the caterer to sign first and the nonprofit event coordinator to sign second.
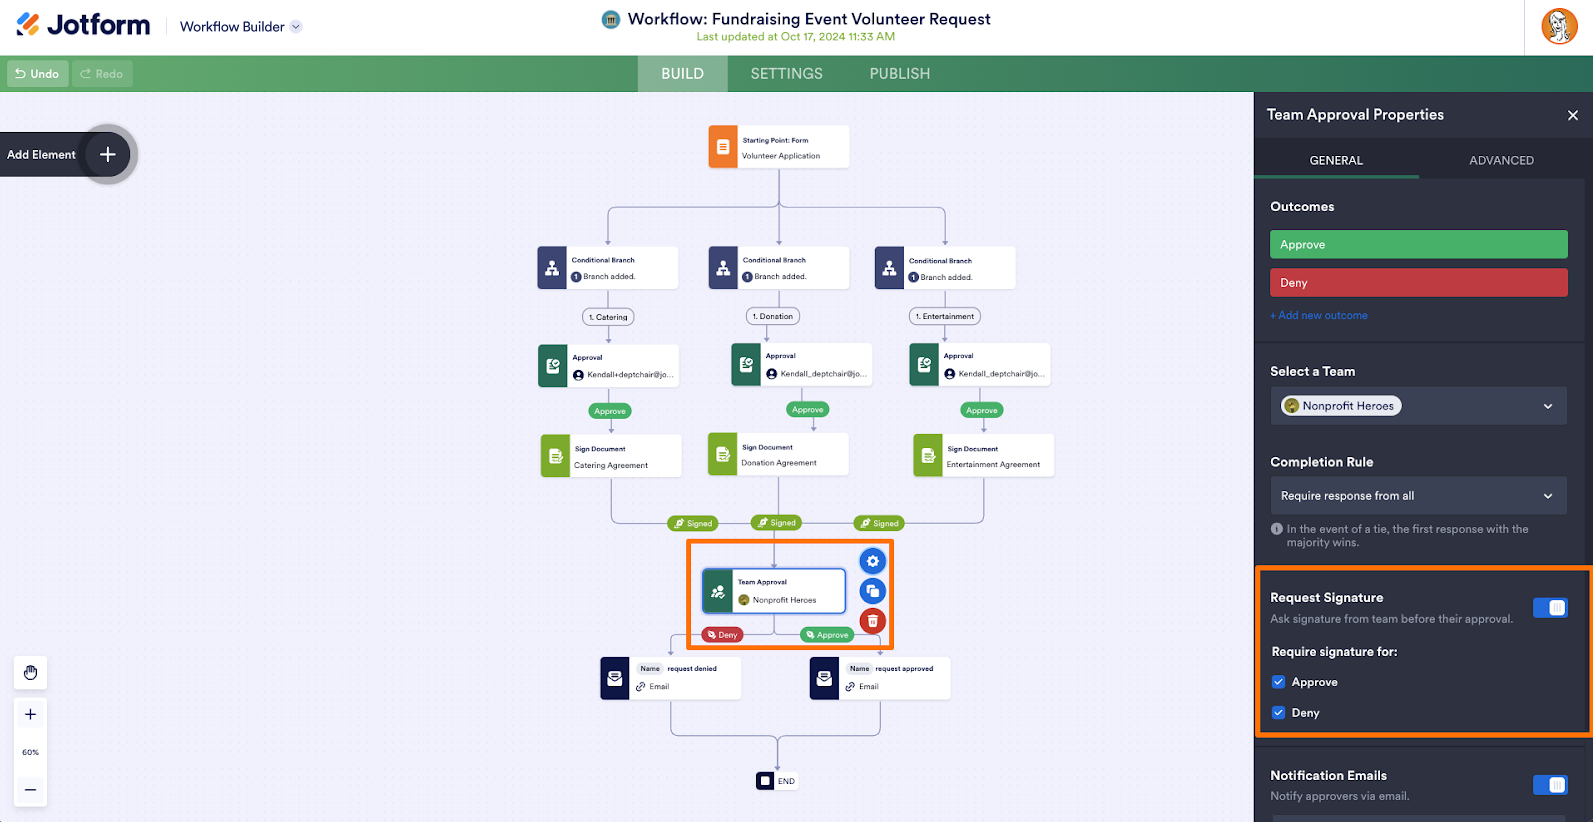
After all parties sign the agreement, a final team from the nonprofit will approve all volunteer applications. All three e-signature documents are directed to a Team Approval. Open the Settings for the Team Approval to set conditions for the approval. For example, you can toggle on the Request Signature option to require a signature from team members to finalize approval.
If the nonprofit team denies the application, a rejection email is sent to the applicant, and the workflow ends. If the application is approved, a confirmation email is sent to the applicant, and the workflow ends.
Learn more about how Jotform Sign can benefit your organization.
5. Advanced notification options
For enterprise organizations, keeping employees, customers, and stakeholders in the loop is of the utmost importance. With new Workflow integrations for instant messaging and project management apps, automating communications with Jotform Enterprise has never been easier.
There are a number of ways to keep communication flowing seamlessly throughout your organization with Workflows. These include
- Email elements: Conditionally send emails from workflow triggers
- Task elements: Automatically assign tasks and send reminders
- Messaging integrations: Send notifications and messages to third-party messaging platforms
- Project management integrations: Send tasks and notifications to third-party project management platforms
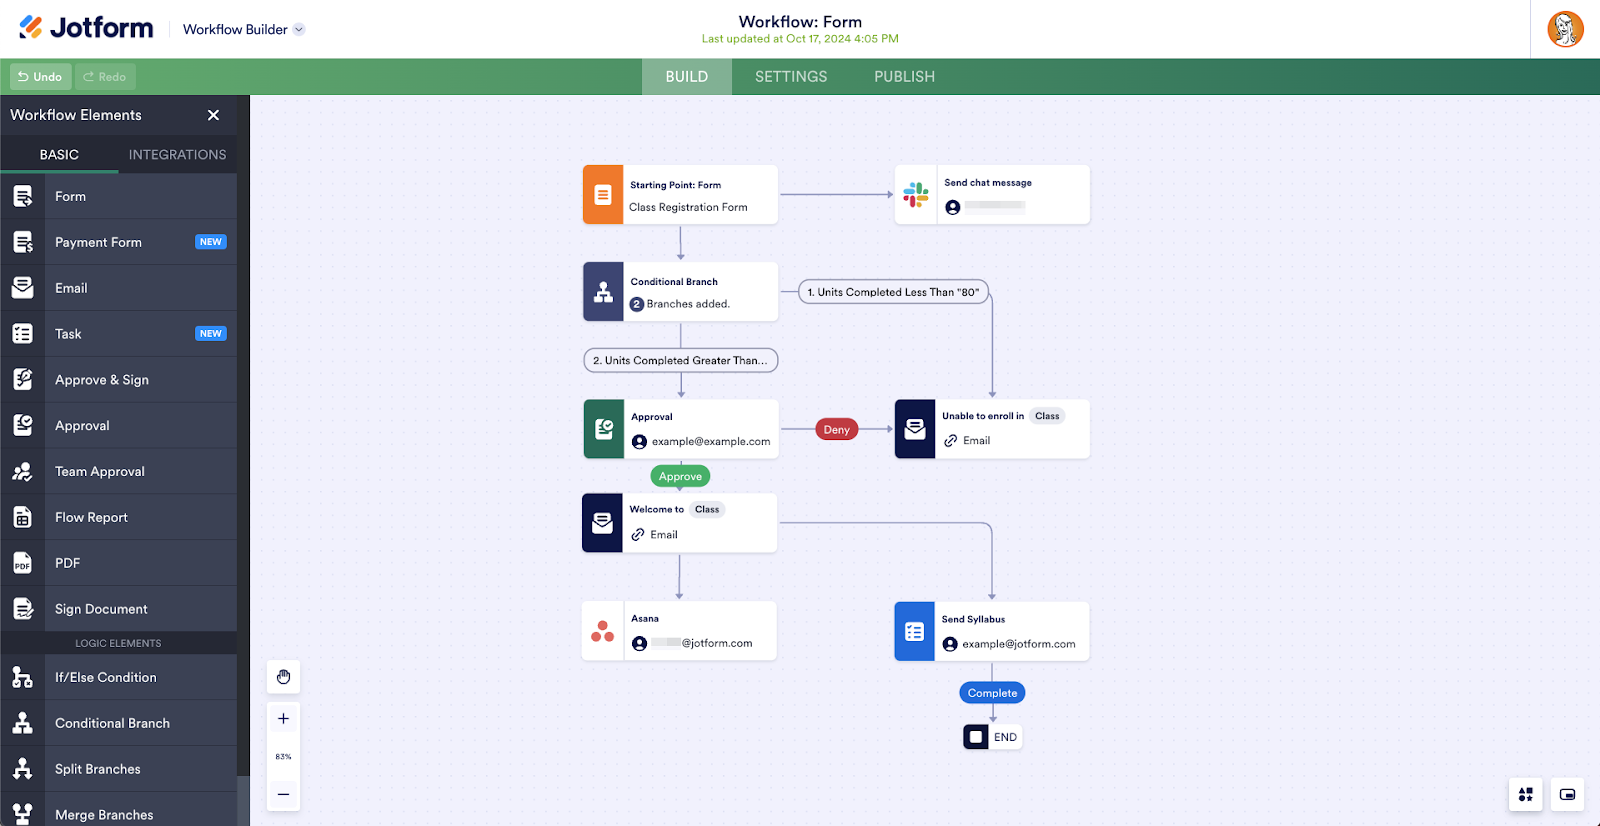
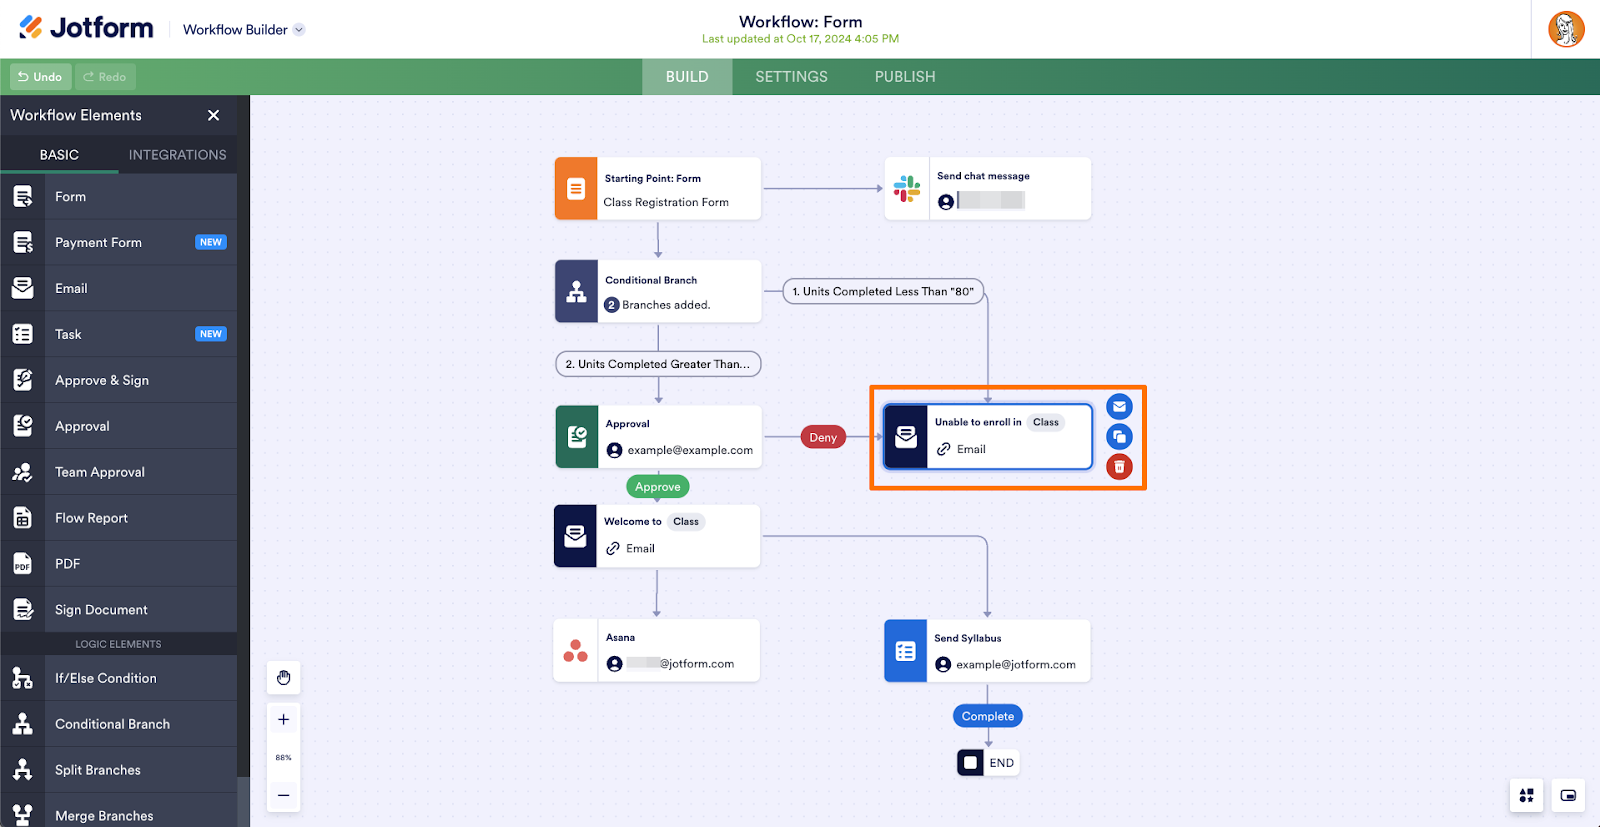
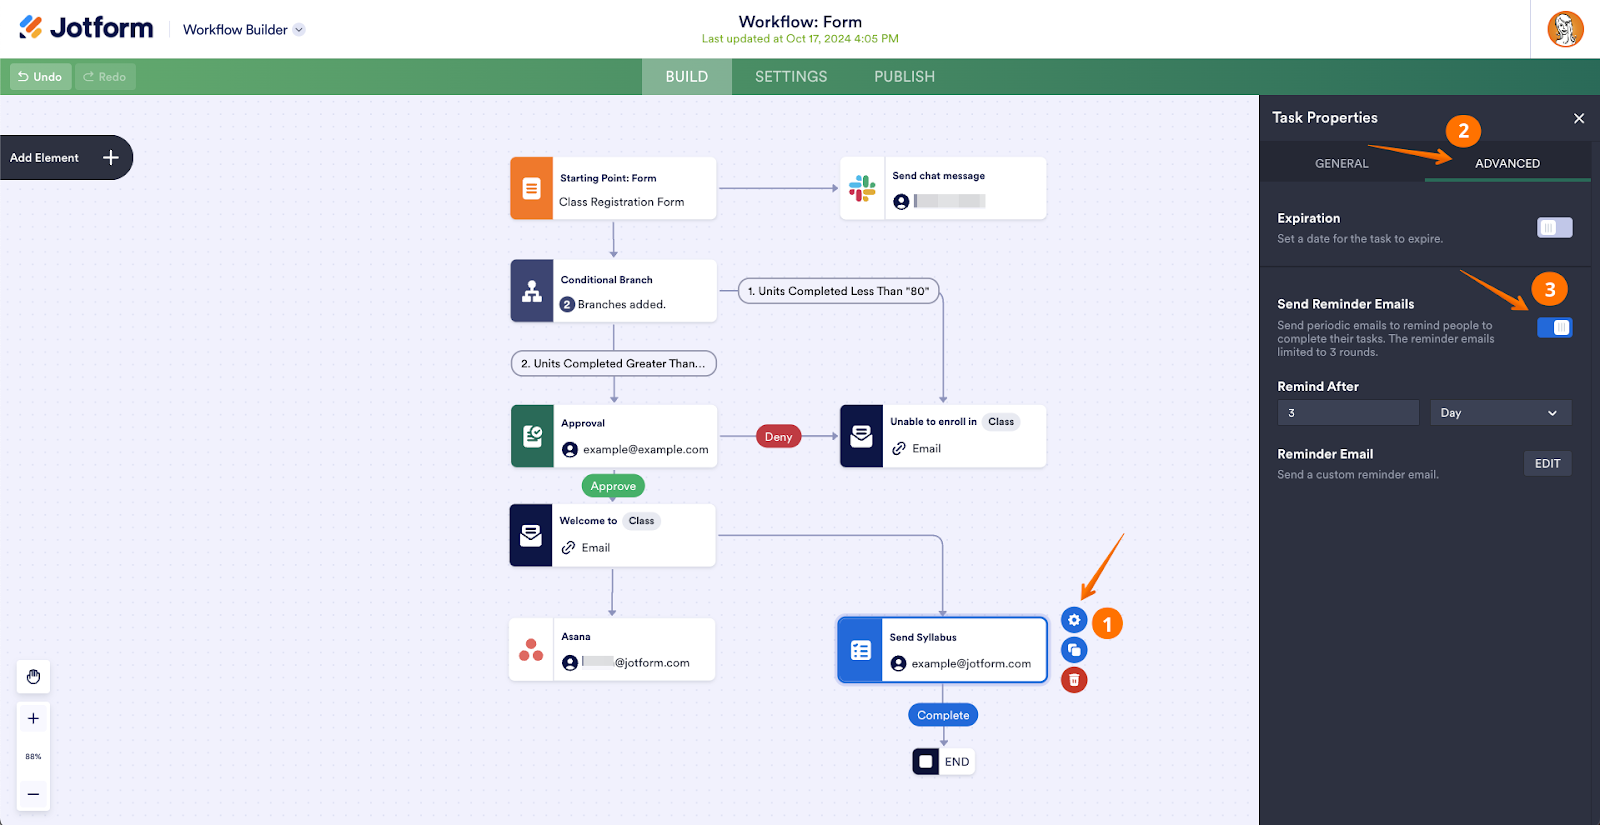
These features offer unique ways to automate communications. Let’s take a closer look at each feature by examining an example workflow. Below is a college class registration workflow used by a professor to automate the class sign-up process.
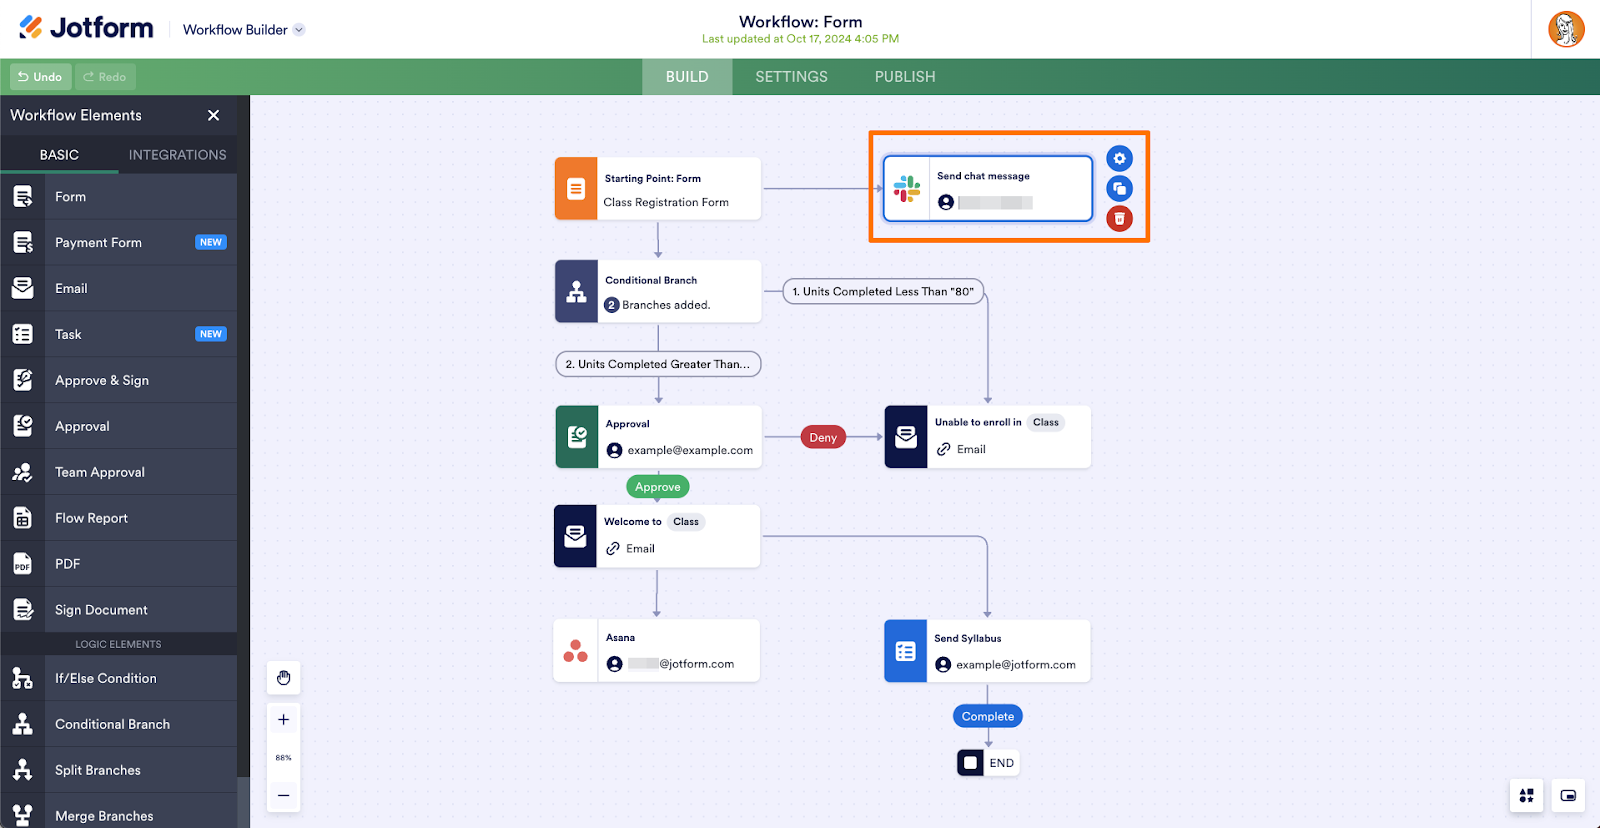
Starting from a class registration form, the workflow branches out to a Slack integration. With this integration, the professor can automatically be notified in Slack whenever a new student requests to register for a class.
Moving down, the workflow splits using conditional logic. This professor’s class requires that students have completed a minimum of 80 units, so the workflow splits according to whether or not the student indicates they have met that requirement. If the student does not meet the minimum unit requirement, they will automatically be sent an email informing them that they are unable to enroll in the class.
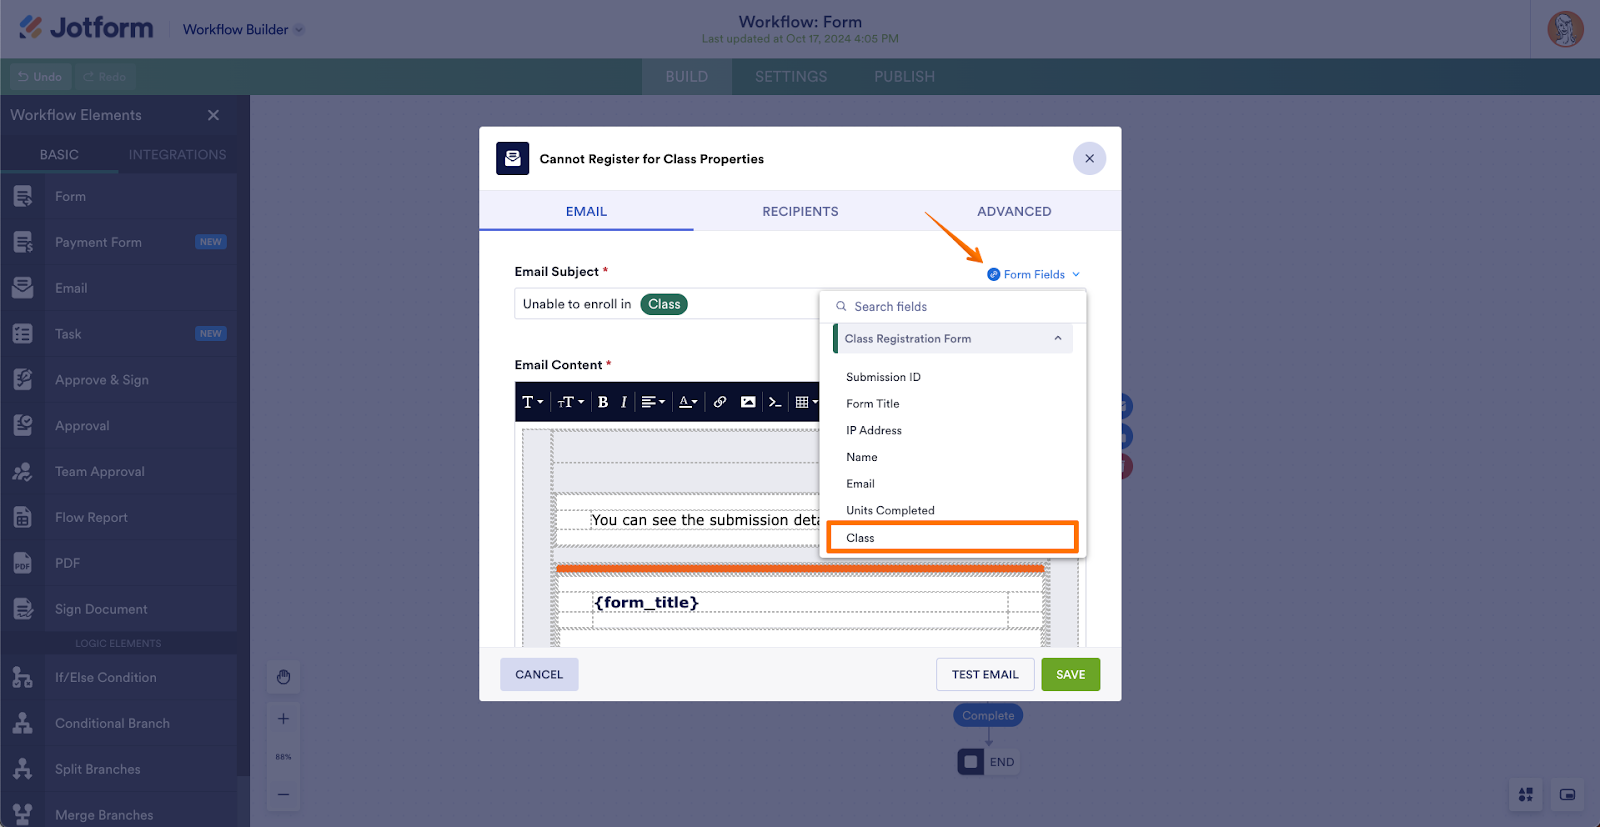
Automatic notification emails can be completely customized. For example, this “Unable to enroll” email includes a dynamically prefilled subject line pulled from the class registration form. The email subject line will automatically prefill the name of the class the student attempted to register for. For example, if the student attempted to register for calculus, the email subject line would be “Unable to enroll for calculus.”
To set up dynamically filled form-field elements, navigate to your notification email’s settings by clicking the email element in your workflow, then clicking the mail icon. In the dialog box that opens, select Form Fields to see a dropdown menu of available fields to prefill.
Continuing down the workflow, if a student has enough credits to qualify for the class, an approval request is automatically sent to the professor for review. This approval request is sent directly to the professor’s email address, allowing the professor to review the student’s application and decide whether or not to admit the student to the class.
If the professor denies the enrollment, the student is automatically sent the same “Unable to enroll” email found previously in the workflow. If the professor approves the student, a welcome email is automatically sent to the student, confirming their enrollment. However, the workflow does not end here.
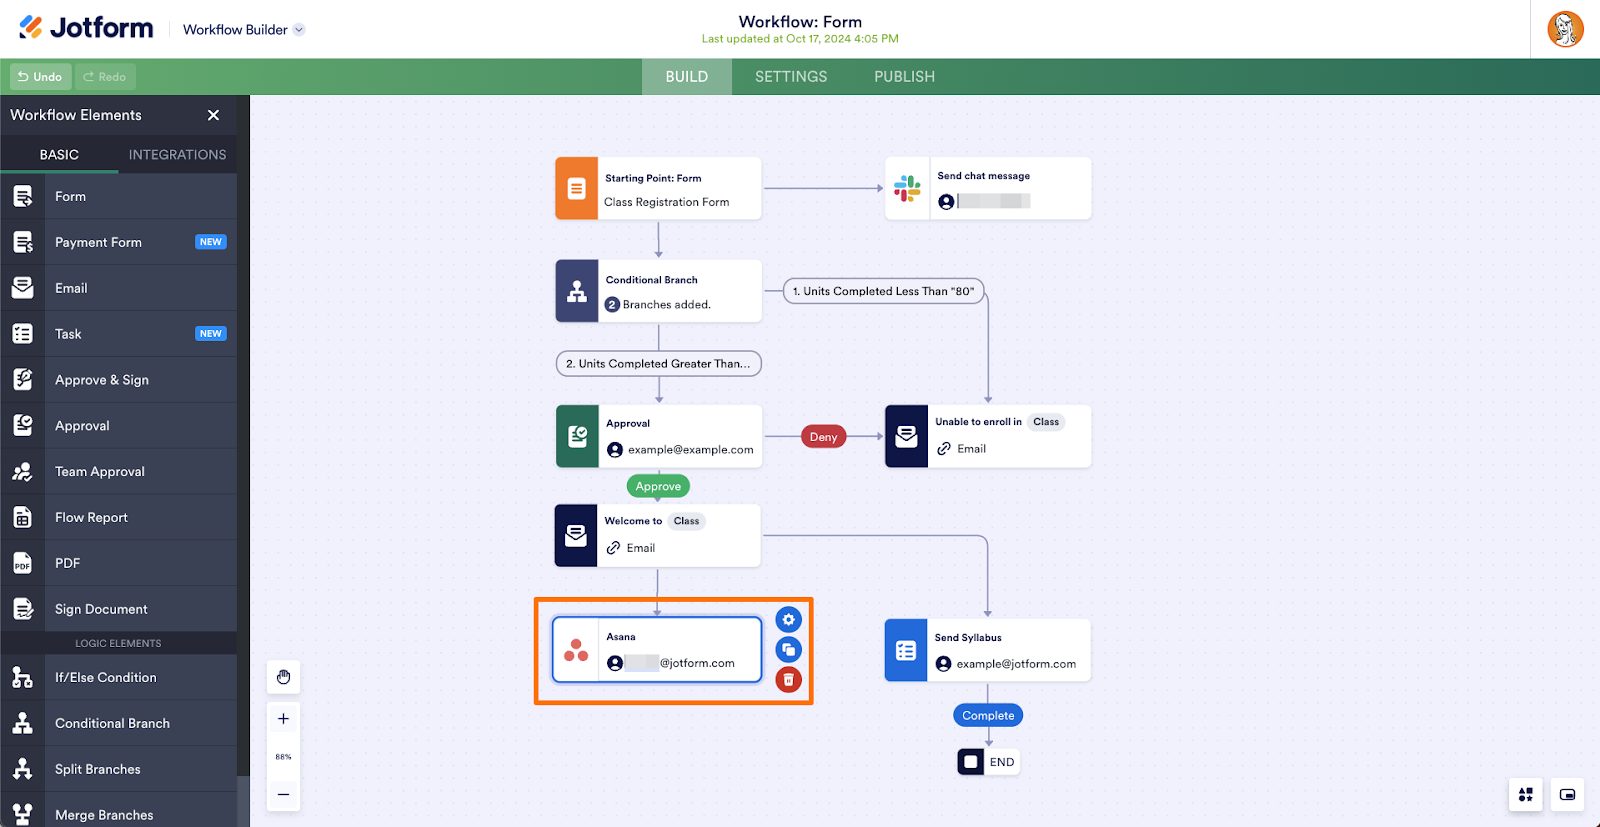
After the welcome email is sent, this workflow automatically creates a task in the professor’s Asana board for sending the student a personalized introduction and the course syllabus.
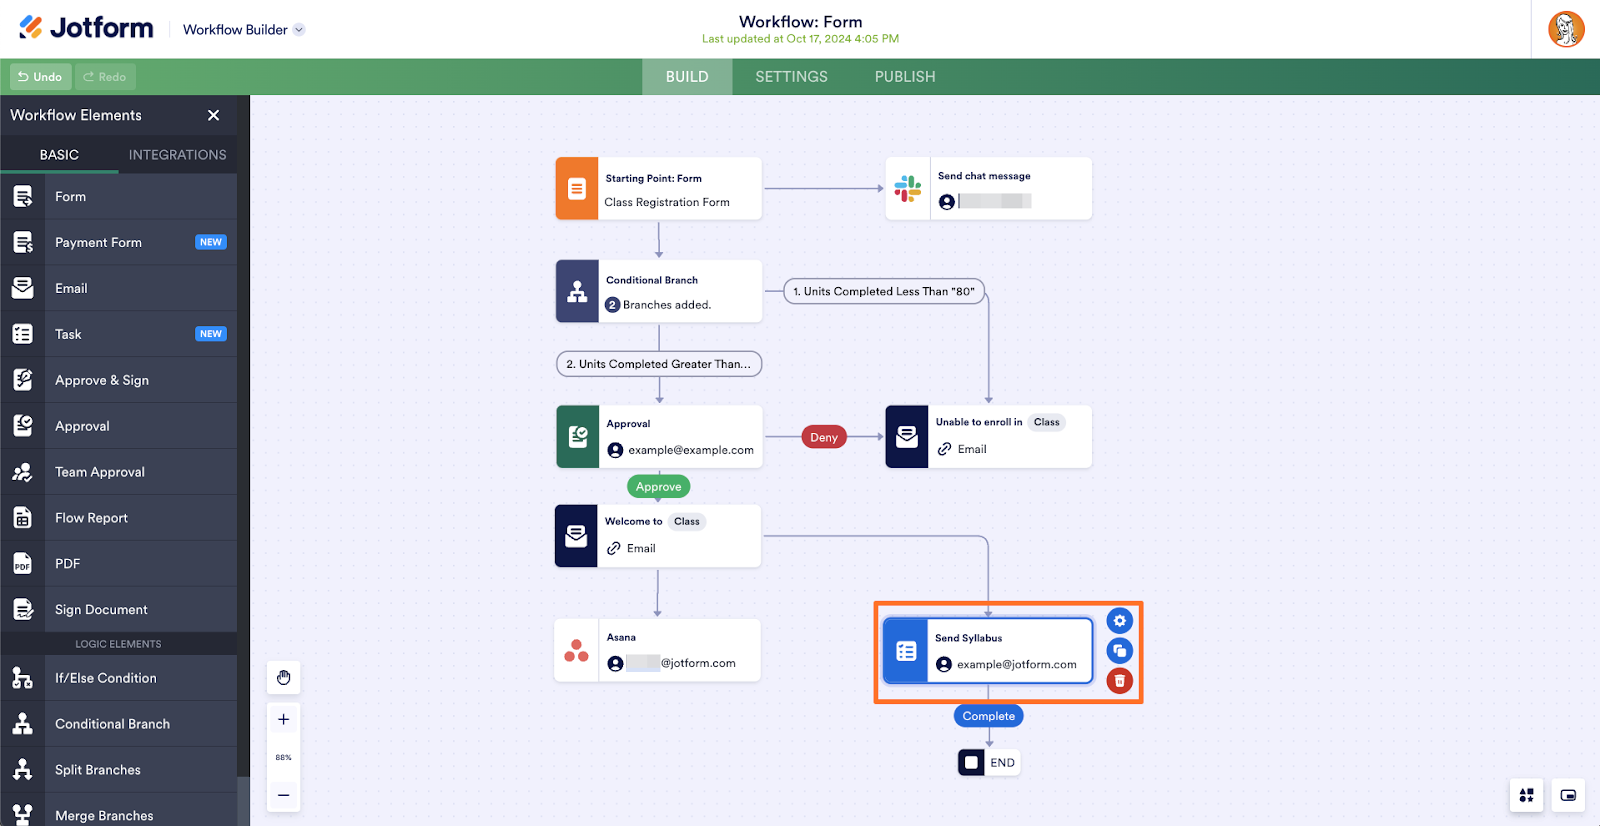
The final branch of this workflow is a Jotform Workflows task assigned to the professor, also reminding them to send the student an introduction and syllabus. Having this task in both Asana and Jotform will help ensure that each student is welcomed to the class and sent the appropriate materials.
Tasks assigned using Workflows can also be customized to send automatic reminders. The task of sending the syllabus, for example, is set to automatically remind the professor every three days until the task is completed. Scheduled reminders can be extremely useful for ensuring the completion of tasks.
To schedule reminders for tasks, navigate to a task’s settings by clicking on the task in your workflow and then clicking on the gear icon. From there, click on the Advanced tab, then the Send Reminder Emails section. Here, you can customize how frequently you would like to send task reminder emails.
From sending emails and automating notifications to assigning tasks and scheduling reminders, Workflows covers all your automated communication needs.
Conclusion
Workflows for Jotform Enterprise takes Approvals to the next level by offering a powerful, all-in-one automation solution. Take advantage of features like built-in payments requests, white labeling, conditional logic, and more in Workflows for Jotform Enterprise to optimize your organization’s processes.
To learn more, contact the Enterprise sales team or your customer success team, or register for our webinar.








Send Comment: