Thousands of customers worldwide have used the Salesforce integration for Jotform to automate data intake processes and streamline workflows.
Today, we’re taking the integration to the next level with the introduction of five new features for Salesforce + Jotform to help you save time and further maximize your platform usage. These features include
- Salesforce Dynamic Prefill: Automatically prefill forms with real-time Salesforce data
- Prefill link automation: Generate prefill links using Salesforce merge fields for fast, personalized form distribution
- Integration Logs for advanced error management: Gain visibility and control over Salesforce integrations with detailed logs
- Send files and PDFs to Salesforce: Flow submitted files and PDFs directly from Jotform to Salesforce
- Attach signed documents to Salesforce records: Securely send Jotform Sign documents to be stored within Salesforce records
Each of these features offers a new, unique benefit to help your organization further its Salesforce and Jotform usage. Let’s look at each feature in more detail and explore how they can help you reduce manual work, improve data accuracy, and boost productivity.
1. Salesforce Dynamic Prefill
To kick things off, we’ve completely overhauled our Salesforce prefill solution. The new Salesforce Dynamic Prefill feature can populate form fields in real time, dynamically pulling from an unlimited number of Salesforce records.
The benefits of dynamic, real-time prefill are two-fold: Dynamically retrieving Salesforce data eliminates the need for creating individual prefill links, and real-time prefill ensures that the most accurate, up-to-date data is being populated into forms. Furthermore, Salesforce Dynamic Prefill supports all Salesforce objects, including custom objects.
With these improvements, Salesforce Dynamic Prefill significantly improves the user experience for both form fillers and form creators.
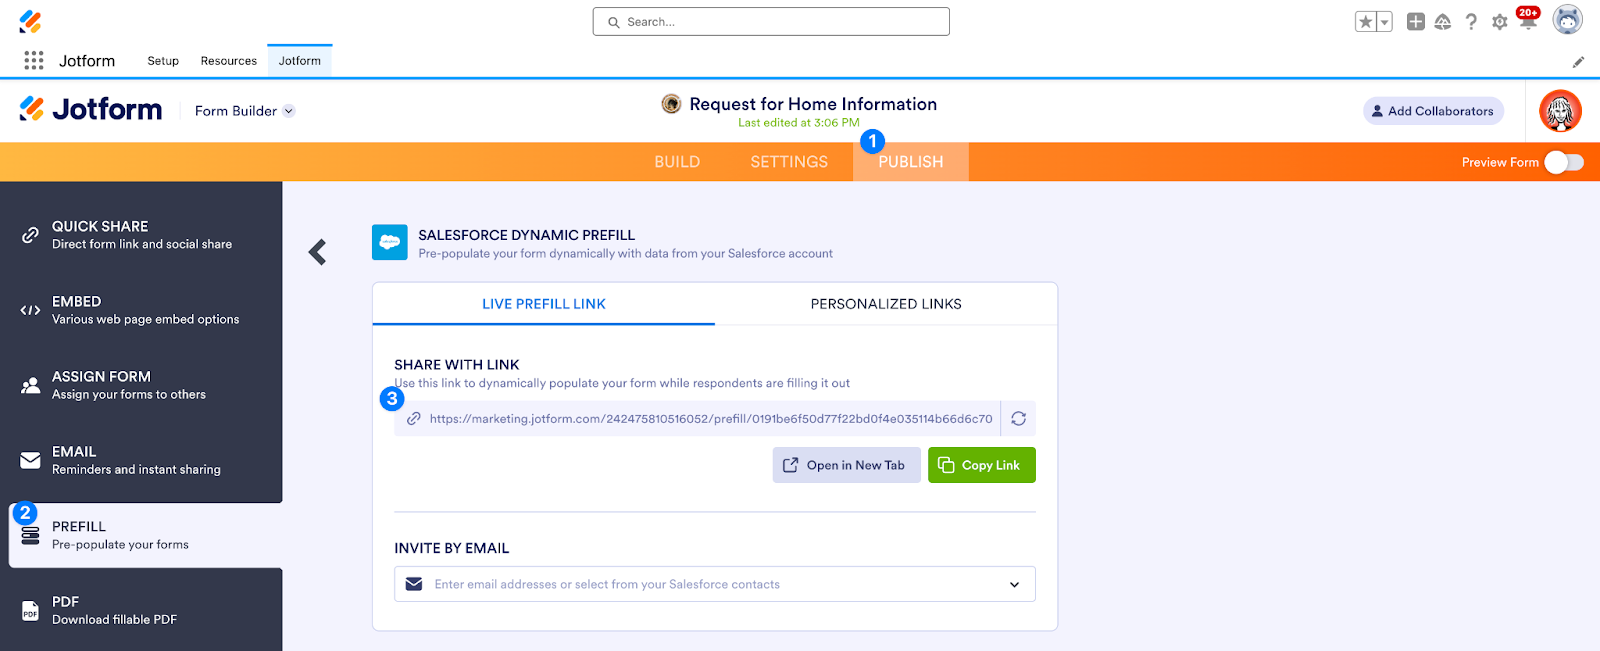
Let’s look at how to set up Salesforce Dynamic Prefill. Starting in the Form Builder, click the Publish tab at the top, then go to the Prefill section of the left navigation menu. In the Prefill tab, click Salesforce Dynamic Prefill.

Next, follow the prompts to authenticate your Salesforce account. After authenticating, you will be able to select a Salesforce lookup object to pull data from. You’ll then be able to match up Salesforce object fields and Jotform form fields to create lookup filters.
Salesforce Dynamic Prefill analyzes form fields in real time while your respondents are filling out your form. At the same time, lookup filters query your Salesforce database. If the lookup filter criteria are met in your form, data from the matching record will automatically be prefilled into your form from Salesforce.
For example, suppose you use Contact as your lookup object, and Email and Name as your lookup filters. With these filters, Salesforce data will be prefilled only when your form filler enters an email and a name that match a contact in your Salesforce database.
You can also choose how to handle duplicate records, with options to prefill the most recent record or skip prefill altogether.
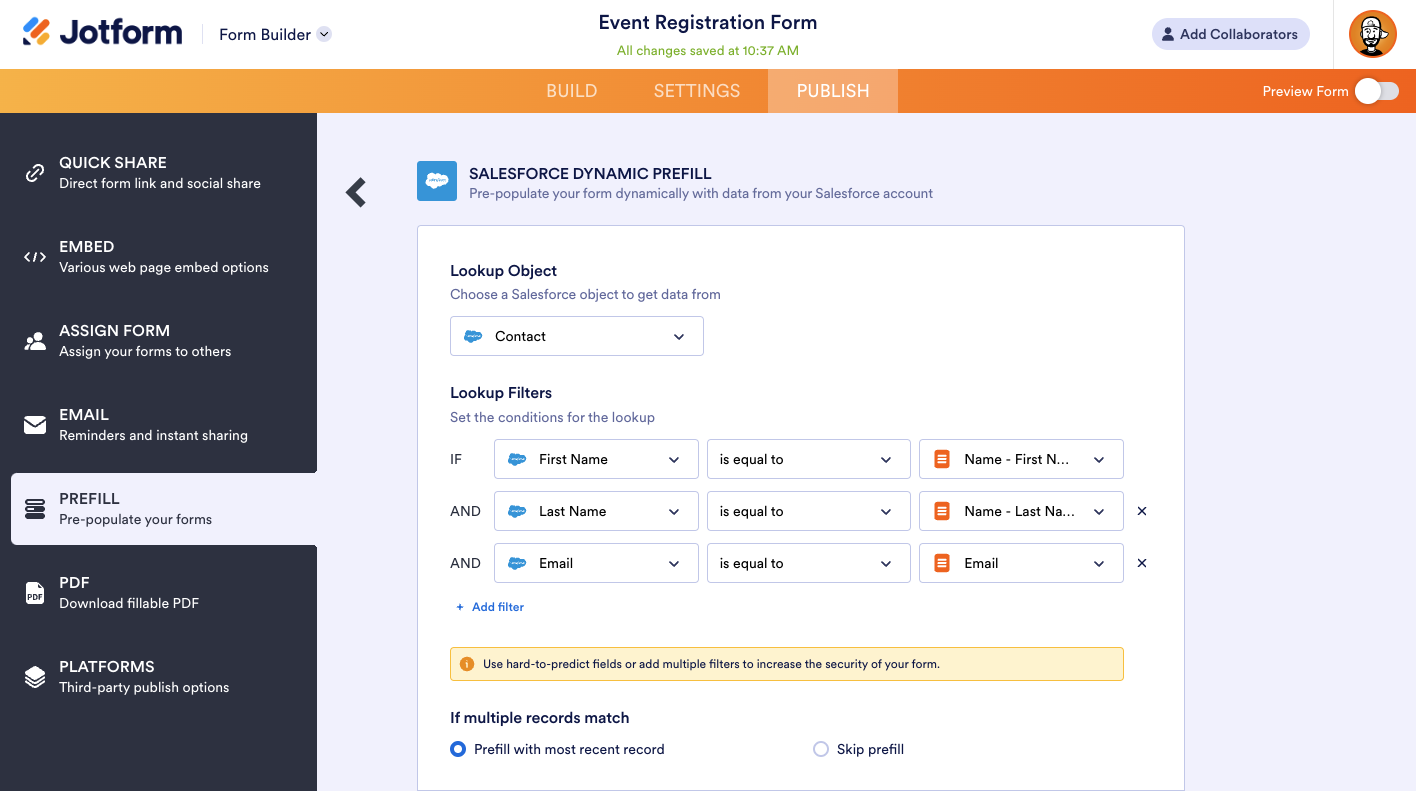
By adding multiple lookup filters, you can ensure that the right Salesforce record data is prefilled, making your Salesforce Dynamic Prefill forms even more secure. While forms can be automatically prefilled by simply by entering an email address, you can also require multiple conditions to be met before prefilling any data for tighter security.
Once you’ve defined your lookup filters, you can customize which form fields you would like to be prefilled. After doing so, click Save to complete your Salesforce Dynamic Prefill form setup.
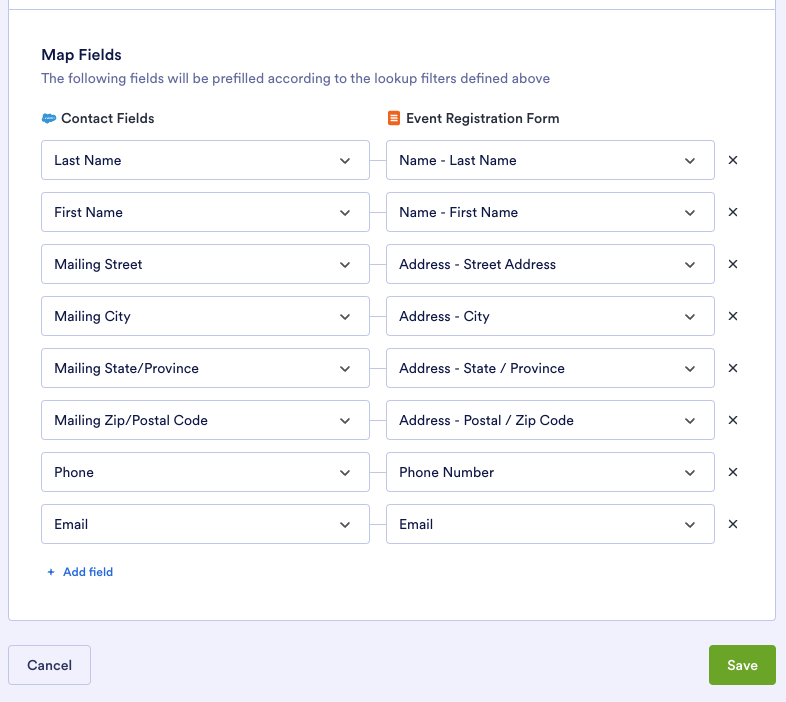
After saving, your form will dynamically prefill data using your specified lookup filters.
Once you’ve configured your Salesforce integration to dynamically prefill form data, you can further enhance the form experience by creating personalized links for your form fillers. These links direct users to forms that are prefilled with basic data from an individual’s Salesforce record.
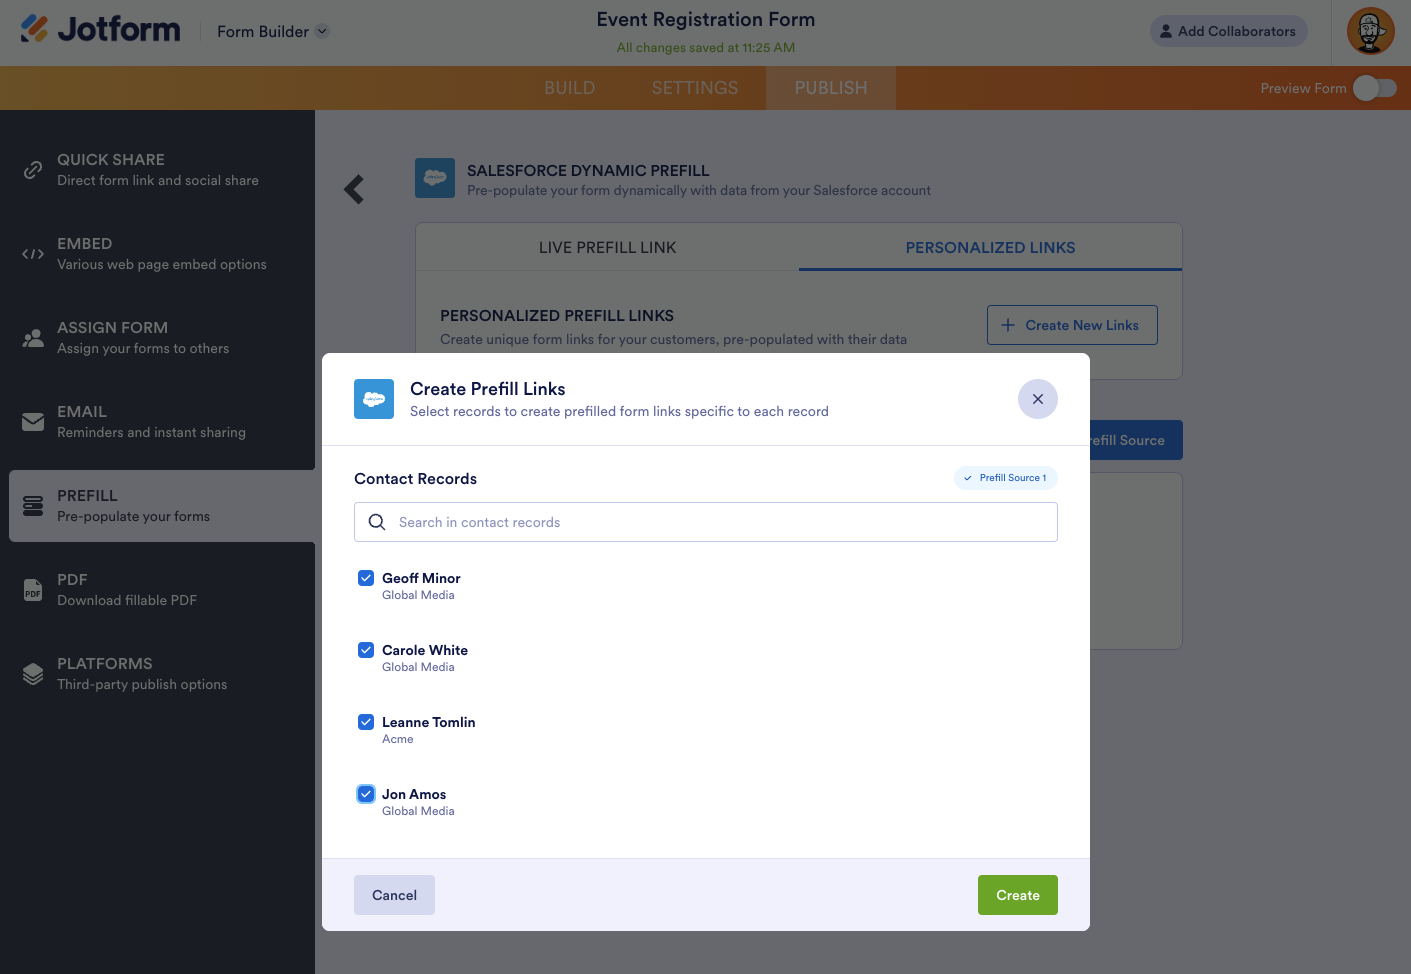
To access this new feature, go to the Salesforce Prefill section in the Form Builder, select Personalized Links, and click on Create New Links.
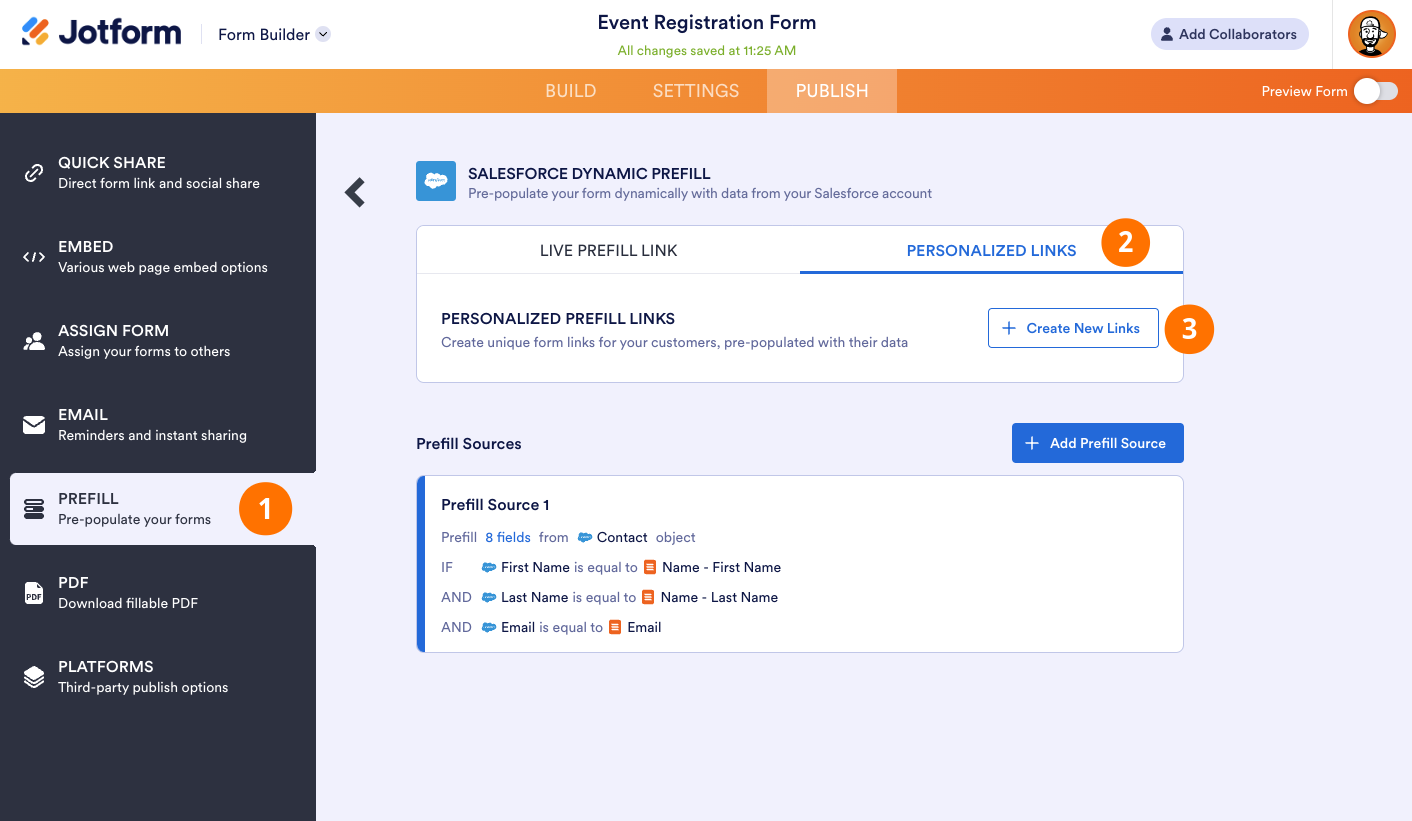
From there, you’ll see a list of the contact records from the associated Salesforce object. Select the contacts for whom you’d like to create a unique link and click the Create button at the bottom right.
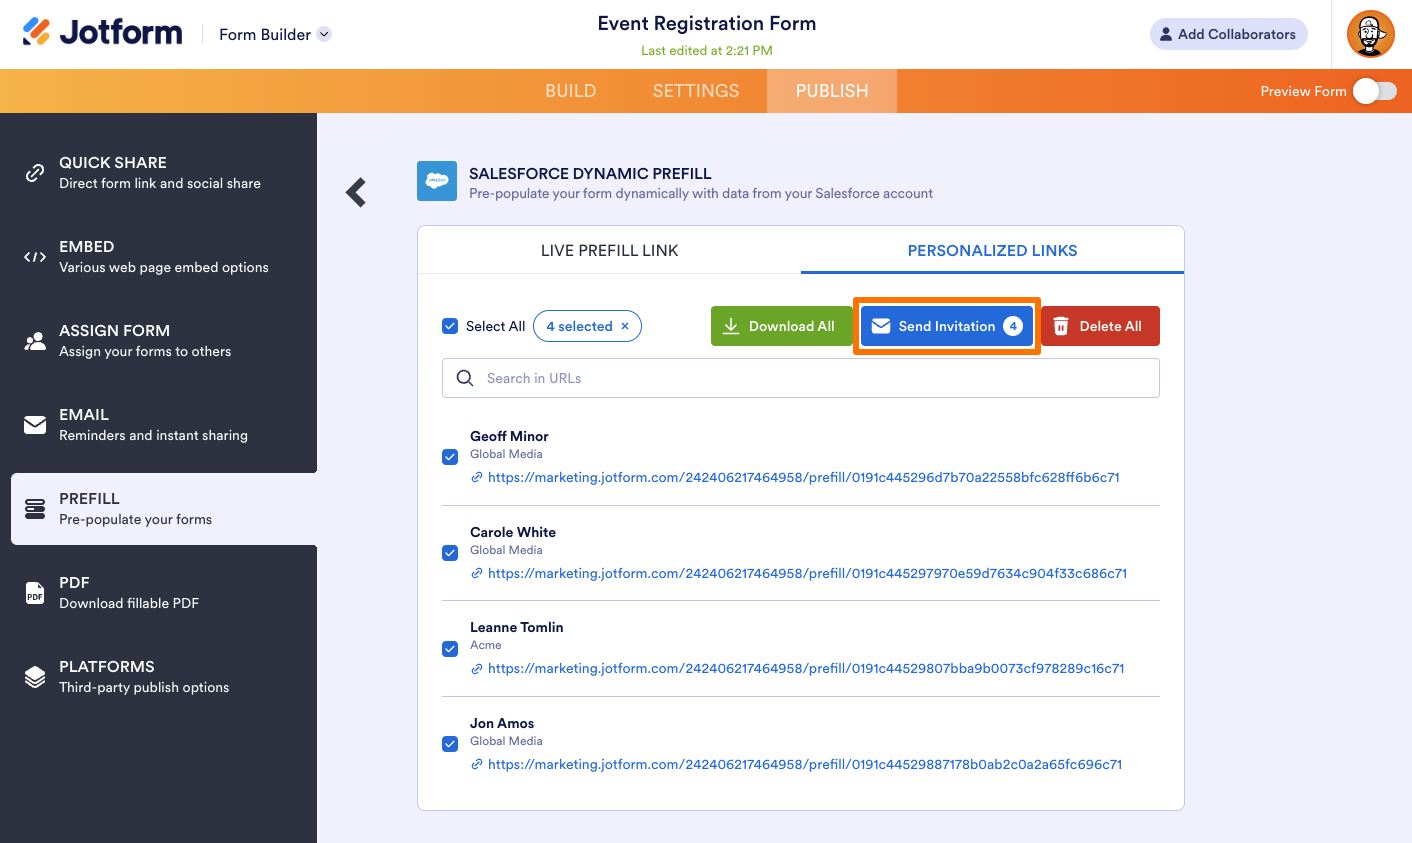
Once you’ve created your personalized prefill links, they’ll be listed under the Personalized Links tab. Complete the process by selecting which contacts should receive your form, and then click Send Invitation.
Pro Tip
If a Contact and Lead object in Salesforce contains an email address, that email will be auto populated in Jotform to send personalized prefill links. You can also change the default email address if you like. If an email address is not already included in a Salesforce record, you’ll need to add one manually to send a prefill link from Jotform.
You can also download a CSV file of your personalized links for easy reference or delete links as needed. Need to find the personalized link for a particular record? No worries. Use the search bar to locate them in your list.
You can create additional links at any time by clicking the Add New button. Records that already have personalized links will be displayed but disabled to avoid creating duplicate personalized links.
2. Prefill link automation
Next, let’s look at how to customize live prefill URLs using query parameters and Salesforce merge fields. This handy feature is great for creating custom buttons or links for your Salesforce record pages and enhancing email automation within Salesforce.
For example, let’s say you’re a real estate agent who wants to automatically notify current and prospective customers about new home listings. To do this, we’ll use a Salesforce email template and a simple Jotform form that includes some details about the home listings and asks respondents to indicate their interest in the property.
We’ll also need to create a flow in Salesforce to manage the automation. We’ll be using a Record-Triggered Flow that will be triggered when a new contact record is created. Let’s walk through the steps.
In Jotform, open the form you’d like to prefill in the Form Builder. Click on Publish > Prefill > Salesforce Dynamic Prefill, and then copy your prefill link.
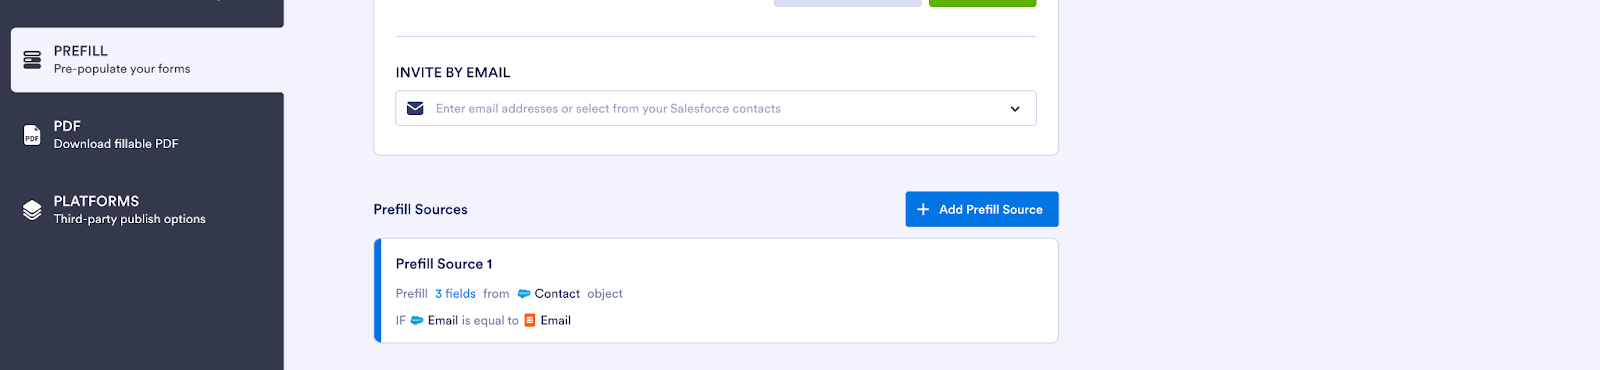
For this example, we’ve already established the prefill sources and mapped the form fields to the right Salesforce object. When the respondent enters their email address in the form, the fields we’ve specified will populate with data from Salesforce.
In Salesforce, create or edit an email template to invite people to fill out your form. Using the editor, insert your prefill link, and add the custom merge field that will connect your Salesforce data to your form. In this example, we’ve used an email field, appending the form URL with: ?email={{{Reciepient.Email}}}.
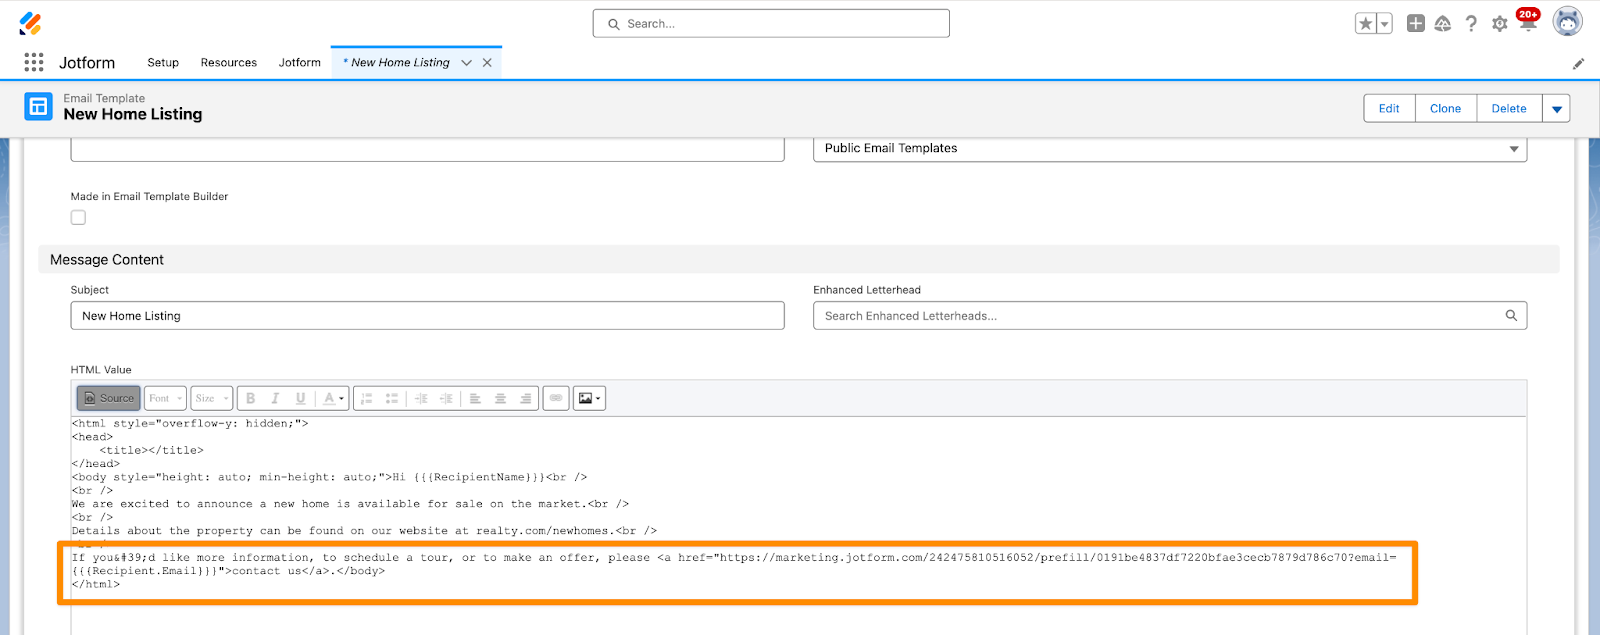
Once your email template is saved, each merge field will automatically be populated with the relevant data from Salesforce when your email is sent.
Finally, set up a flow in Salesforce to link all these elements together and trigger the automation you want to take place. Below we’ve set a flow to trigger an email when a new contact record is created, inviting that new contact to view new property listings and fill out the form for more information. Be sure to include the Email Template ID and the Recipient ID in your email action, so each element is connected to your flow.
3. View Integration Logs for advanced error management
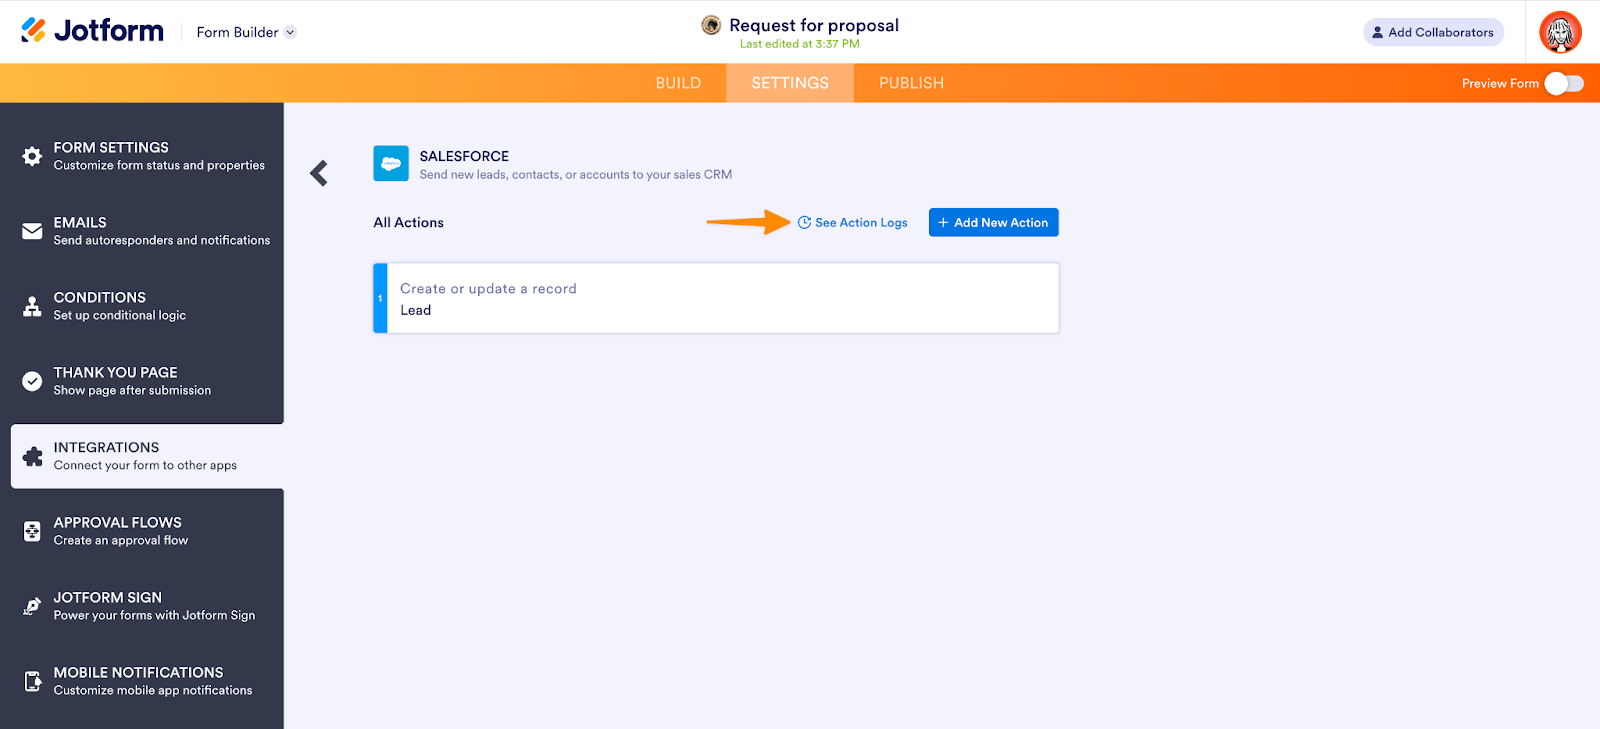
When you need to troubleshoot or test the flow of your submission data, the new Salesforce Integration Logs can help you quickly identify a mismatched field or confirm that everything is working as expected. To monitor the data transfers between Jotform and Salesforce, view the Action Logs, which are accessible through your Salesforce integration screen in Jotform.
From the Form Builder in Jotform, go to the Settings tab and click Integrations in the left panel. Your Salesforce integration should be listed at the top with a green checkmark; select it. Next, click the See Action Logs option.
The logs will capture any errors in the flow of your data from Jotform to Salesforce, including errors involving submission data, file uploads, and e-signature documents. You’ll also receive a daily email summary of any errors that occur.
Note that the logs will show errors from the past 30 days. Any errors beyond that period will no longer be viewable. To help identify and address potential disruptions, users will receive daily notifications with error summaries and a link to view error logs on the integration settings page. For more detailed instructions and to view a list of common errors, check out our help guide.
4. Send file uploads and submission PDFs to Salesforce
Imagine having all your documents and form attachments in one place. With our updated Salesforce integration features, you can now ensure that all your form-related documents are organized and accessible in Salesforce, so your team always has the latest version of submission data PDF forms and documents.
Whether you’re uploading updates from the field or need to capture a PDF record of a customer’s request, you can rest assured that submission data will automatically sync with your Salesforce account, keeping everyone in the loop.
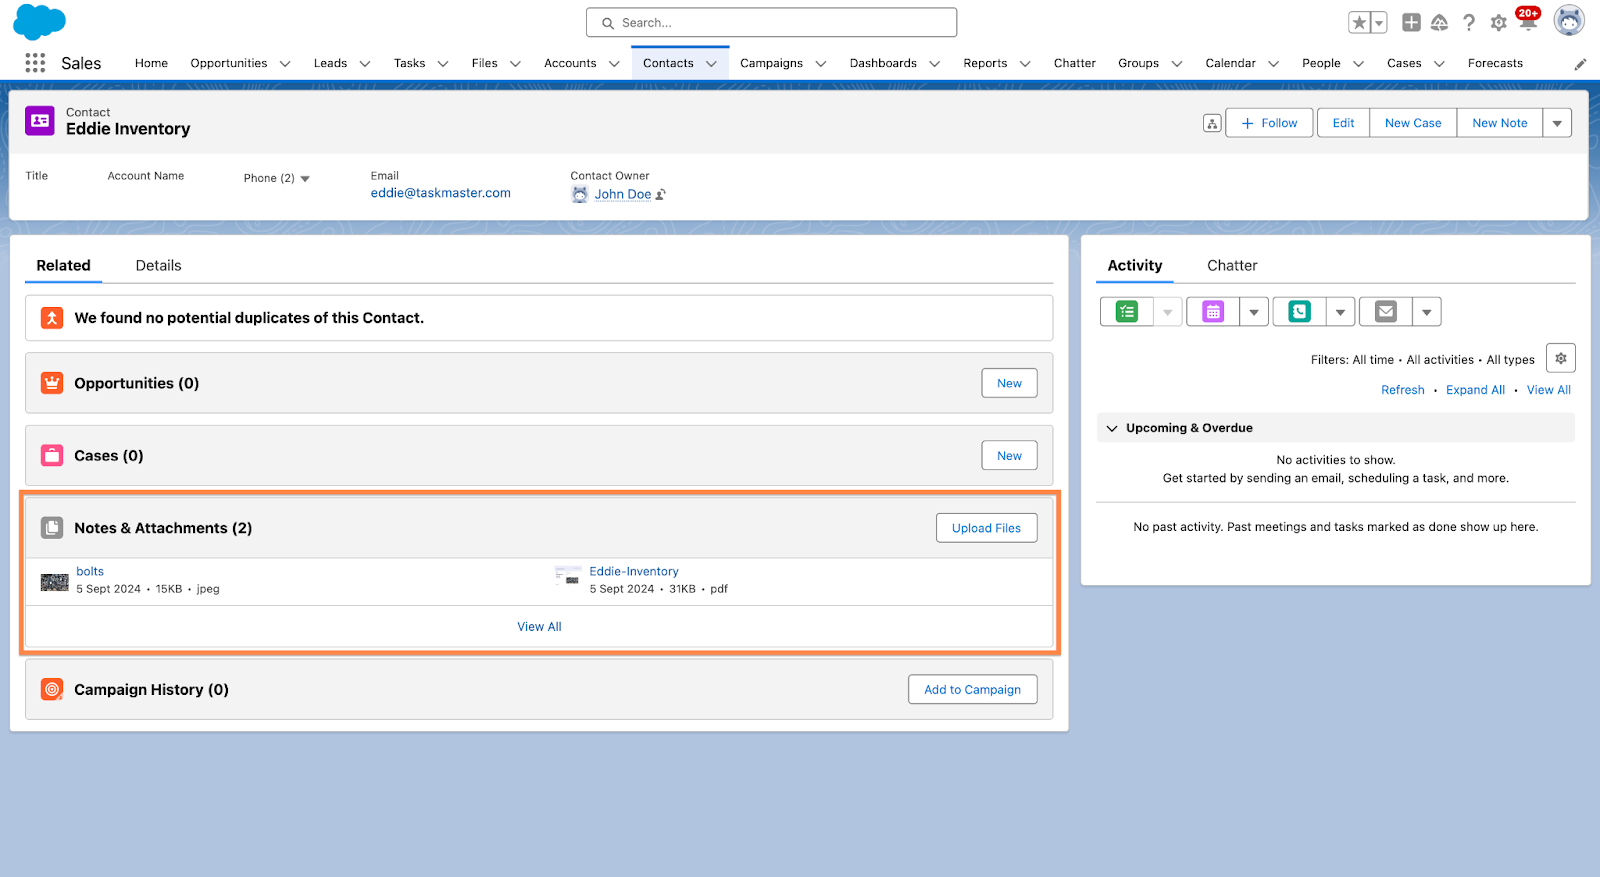
To enable this automation, go to the Form Builder, click on the Settings tab, and go to Integrations. The Attachments section appears toward the bottom of the screen. Simply toggle on the option to enable both file uploads and PDFs of submissions to be sent as attachments to the created record in Salesforce. You’ll then be able to find them in the Notes & Attachments section of the relevant record.
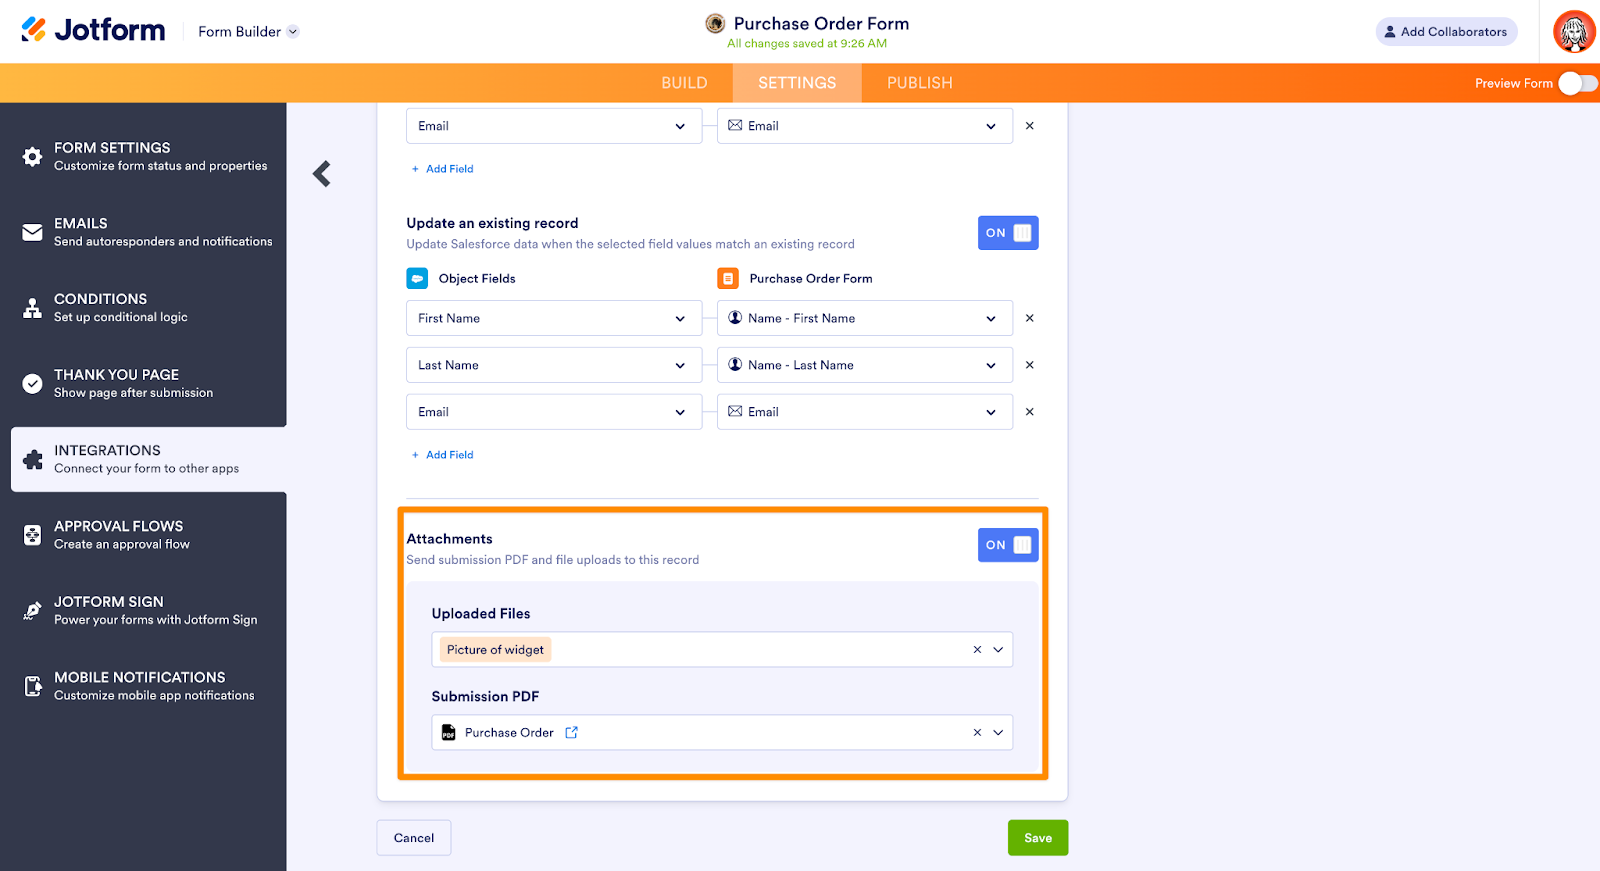
From the Uploaded Files section, you can select multiple file upload fields to collect attachments from. Having shared access to images and file uploads is a great way to align your team’s work.
Using the file upload field with a Salesforce-integrated form saves you time by ensuring all relevant files and documents are automatically filed correctly. You’ll also eliminate the need to send files back and forth over email, which can lead to missed communications and compromised file quality.
5. Attach Jotform Sign documents to Salesforce records
If you’re responsible for getting people to sign off on or sign up for something, now you can send your completed e-signature documents automatically to your Salesforce records through the Jotform Enterprise + Salesforce integration.
Using Jotform Sign, Jotform’s e-signature collection tool, your signed documents will now automatically be stored within Salesforce records, saving you valuable time and effort. Each document will be linked directly to the relevant Salesforce record, making it easy to view, retrieve, and track documents.
Plus, you can take advantage of all the features of Jotform Sign to meet your organization’s workflow and compliance needs:
- View an audit trail showing the signature time(s) and date(s) for each sign document
- Assign multiple signers and a signing order to route contracts and requests as needed
- Send automated reminder emails to notify recipients that their signature is needed
- Let signers delegate an e-sign document to another person to minimize bottlenecks
Setting up an automation to send your Sign documents to your Salesforce instance is easy. From the Jotform Sign Builder, click on the Settings tab. Then select Integrations from the menu on the left and configure your Salesforce integration. Next, indicate whether you want to create or update a record, and select the Salesforce object to which you want to send your signed files.
At the bottom of the configuration screen, toggle on the Attachments option, and choose whether you want to send your signed document with or without an audit trail. Once your document is signed, the e-signature data will be sent to Salesforce and your signed document will be automatically attached to the relevant record in the Notes & Attachments section. No more filing, forwarding, or stressing over where to find your organization’s e-signature documents. Jotform Sign has you covered.

Note: If you’re using a server with HIPAA compliance features enabled for your documents, the document owner must set a password for the document. HIPAA-related documents are zipped in the transfer to Salesforce and the password set by the document owner will be required to access them.
Now that you’re equipped with five new features to supercharge your Salesforce integration, there’s just one question: Which feature are you going to try first? Whatever you choose, we hope it brightens your Jotform journey. And if your journey takes you to Dreamforce this year, be sure to swing by and visit us!


Send Comment: