Jotform Sign is here! Now you can connect the power of the Jotform Enterprise platform to a native e-signature solution to automate agreements at scale.
What can I do with Jotform Sign?
Jotform Sign allows you to collect legally binding e-signatures and seamlessly incorporate them into your existing forms, approvals, tables, and more on the Jotform Enterprise platform.
With the same drag-and-drop, no-code interface as the Form Builder, Jotform Sign is easy to adopt across your organization. Incorporating Jotform Sign as your e-signature solution can help you reduce tech complexity and automate and streamline existing workflows. It’s a great solution for
- Processing client and vendor contracts and proposals
- Reducing paper and printing costs
- Routing design and copy reviews for sign-off
- Sending job offer letters to new recruits
Jotform Sign features multiple signer capability, reminder emails, and the option to delegate signing rights as needed, so you can customize each e-signature document to suit your needs. Want to learn more? Just follow along below and try it out for yourself.
How do I use Jotform Sign?
From the My Forms section of Jotform Enterprise, click Create Form, and then Create Signable Documents. Alternatively, go to My Documents and click Create Sign Document.
Next, upload an existing PDF document, use a demo document, or build a document from scratch.
In addition to importing your current e-signature documents, you can take advantage of Jotform’s PDF Editor to digitize and customize paper forms and documents in minutes.
Creating your e-signature document
Once you’ve selected a file, click on Create Signable Document to upload your document into the Jotform Sign Builder, where you can make any desired changes.
Jotform Sign offers AI-driven, automatic field detection to convert your existing document fields to fillable online form fields. To enable this feature, simply click Detect Fields.
Adding fields to e-signature documents
To add additional fields, simply drag them from the list of field elements on the left. You can move and resize them as needed, and quickly copy any field to collect similar information.
Clicking on the gear icon on any field in your document will bring up Settings options in a panel on the right.
Defining who should sign your document and in what order
Once you’ve added a signature field, assign it using the Field Assignee dropdown in the signature field settings. If multiple people will be signing a document — for example, spouses, business partners, or parents and guardians, click Add a new role to require multiple signatures on your document.
You can easily edit the field labels if you need to clarify signature roles. Instead of “Signer 1” and “Signer 2,” you can change them to “Vendor” and “Client,” “Contractor” and “Subcontractor,” or “Student” and “Parent/Guardian.” Additionally, each signature field is assigned a different color to make roles easier to differentiate.
If you forget to assign the signature role, the system will automatically prompt you to add it before the document is sent for signature.
Changing the title of your e-signature document
Editing the name of an e-signature document is simple. From the Settings tab, simply click into the document title field displayed in the General Settings to make changes.
Customizing Jotform Sign email settings
The Settings tab is also where you can edit the text of the email your e-signature document recipients will receive. Both the subject line and message are completely customizable.
Once you’ve created your e-signature document, you can send it via email, share it with a link, or embed it on your website or on third-party platforms. But with Jotform Enterprise, that’s just the start of your e-signature collection journey.
Sending your document for e-signature
From the Send tab, you have several options for sending your document for signature. The roles you assigned in the document will be automatically populated so you can see who will be asked to sign.
Click the Signing order toggle switch to dictate a specific order for signature collection. To adjust the order, simply drag the listed signer to the desired signing position.
For an added layer of security, you can create a custom key code that your signers will need to enter before they can access the document. Create your key code and add a custom message to be sent with the code to your signer along with the email invitation.
For documents requiring only one signature, you can create an embed code to place the form on your website. Once you’ve added the code to a page of your site, you can preview it for mobile, tablet, or desktop directly from the Jotform Enterprise interface.
The Jotform Sign experience for signers
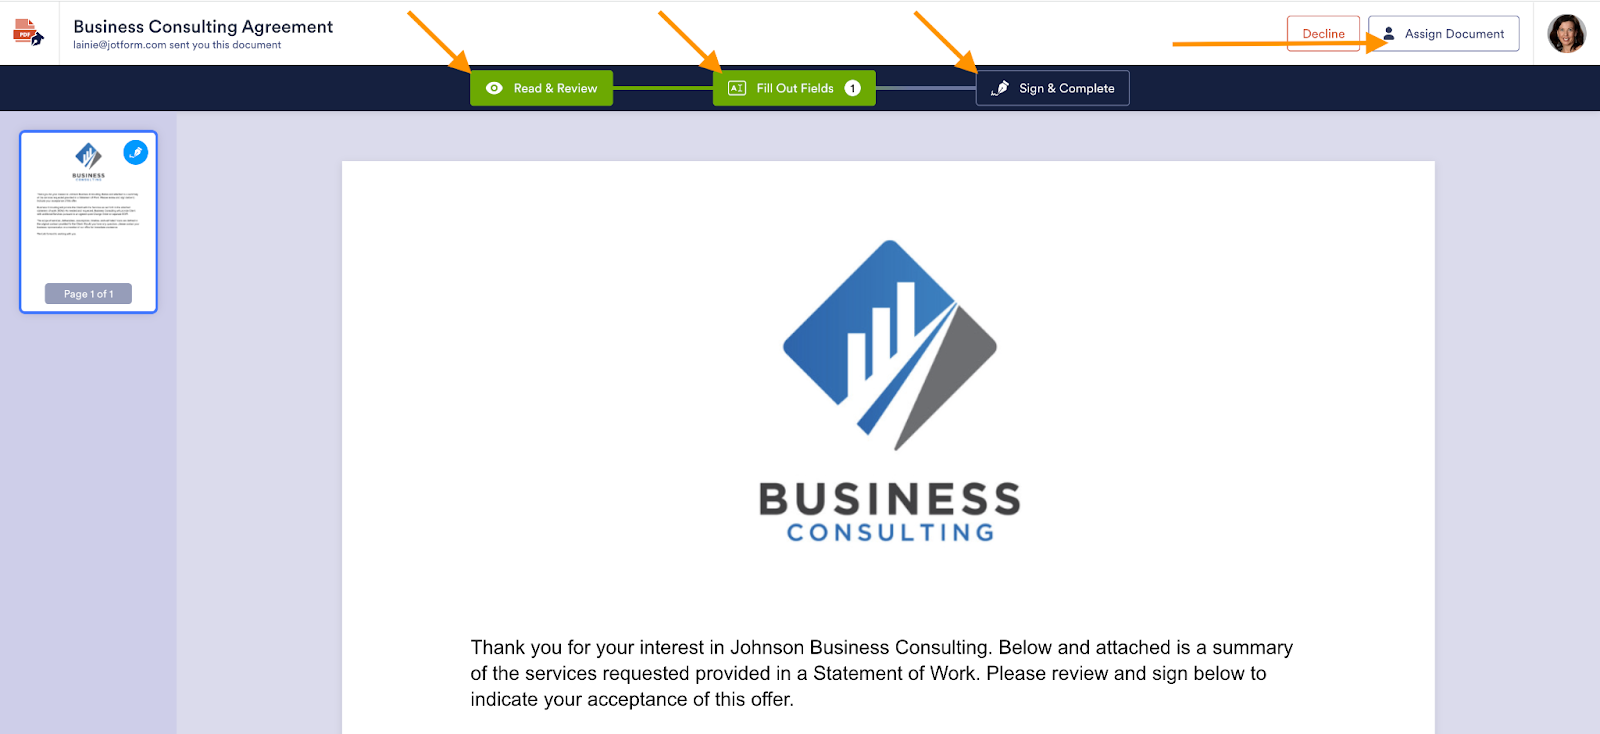
Recipients of your e-signature documents will have clear steps to follow, flagged by green buttons prompting them to Read & Review, Fill Out Fields, and Sign & Complete. They can also opt to decline the document or delegate their signature to someone else, if you’ve provided that option.
Document signers are prompted to acknowledge that their signature is legally binding before completing the process. Once they sign and accept, they will receive an acknowledgment of their signature. After the signing flow is completed, an email with the document details, including an audit trail (described below), will be sent to the signers.
Automations to enhance e-signature collection
People often need a friendly reminder to take action on an email. Fortunately, you can send automatic reminder emails to prompt individuals to sign your documents. If you anticipate that your desired audience might be away on vacation or too busy to review your document, the Allow Signer Delegation toggle switch provides additional flexibility by letting them reassign the signature field to someone else.
If your agreement has a deadline, use the Expiration Date setting to select a date when the link to your e-signature document will no longer be valid.
Finally, you can keep colleagues and other interested parties informed of agreements by entering the relevant emails in the Add CC Recipient field.
Tracking the progress of e-signature documents
Once a document is sent, you’ll see it listed in the Sent Documents section with a date and time stamp, along with the names of the individuals asked to sign.
The Jotform Sign Inbox provides a dashboard to track the status of all your documents. From here, you can
- Determine which signatures are pending
- Send reminder emails
- Search for, filter, view, cancel, and download e-signature documents
- Navigate to another document using the dropdown arrow next to the document title
Documenting e-signatures with an audit trail
When all parties have signed the document, the flow is completed, and an email is sent to all signatories with the signed document and an audit trail, including
- The title of the document
- The document ID
- Number of pages in the document
- Status of the document (completed, canceled, etc.)
- Time zone
- Document history, including when
- The signing flow started
- Invitations were sent
- The document was viewed
- The document was signed
- The flow was completed
- The signer delegated signing authority
Get started today
Now that you know how to get up and running with Jotform Sign, why not give it a try in your organization? Jotform Sign is ideal for a range of business and nonprofit functions, including
- Financial, legal, and real estate consulting
- Nonprofit memberships and major donor gifts management
- Managing sales agreements, contracts, and vendor proposals
- Securing volunteers for community and grassroots campaigns
- Business consulting and temporary staffing services
- Student registration and permission slips
- Obtaining medical and HIPAA release authorizations
From contracts and consent forms to estimates and end-of-year appeals, Jotform Sign is your key to faster, smarter e-signature collection.
To learn more about Jotform Sign, check out our dedicated page or sign up for our webinar. We hope you’re excited to try Jotform Sign and consider all the ways it can streamline and automate your e-signature collection and communication process. We look forward to hearing your feedback and continuing to bring you new products that help you get everything on your to-do list done.


Send Comment: